Absolem Is A Rabbit Hole Keyboard Build

This is usually how it happens — [mrzealot] had been using some awful chiclet-style keyboard without much of a care, and topping out at 50-60 WPM using an enhanced hunt-and-peck method. But he really wanted back-lighting, and so got his first taste of the mech life with a Master Keys Pro S. Hooked, [mrzealot] started researching and building his endgame keyboard, as you do once bitten. It looked as though his type would have as few keys as possible, and thumb keys laid out in arcs.

And so the cardboard prototyping began, with real switches and keycaps and a split design. After getting tired of adjusting the halves’ position on the desk, [mrzealot] threw that plan out the window and started scheming to build a monoblock split. He had a steel switch plate cut for this prototype, and used cardboard for the bottom layer, complete with a little hatch to access the Pro Micro’s reset button.

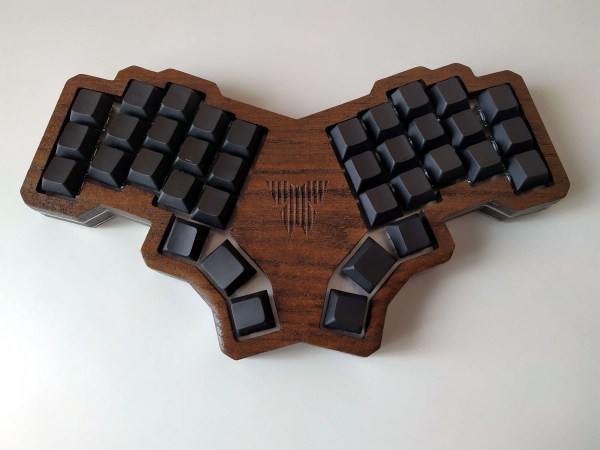
Now satisfied with the 36-key layout, it was time to go wireless with a Feather nRF52 Bluefruit LE. This is where things get serious and final, with a laser-cut layered oak case and thick, blank, PBT keycaps.

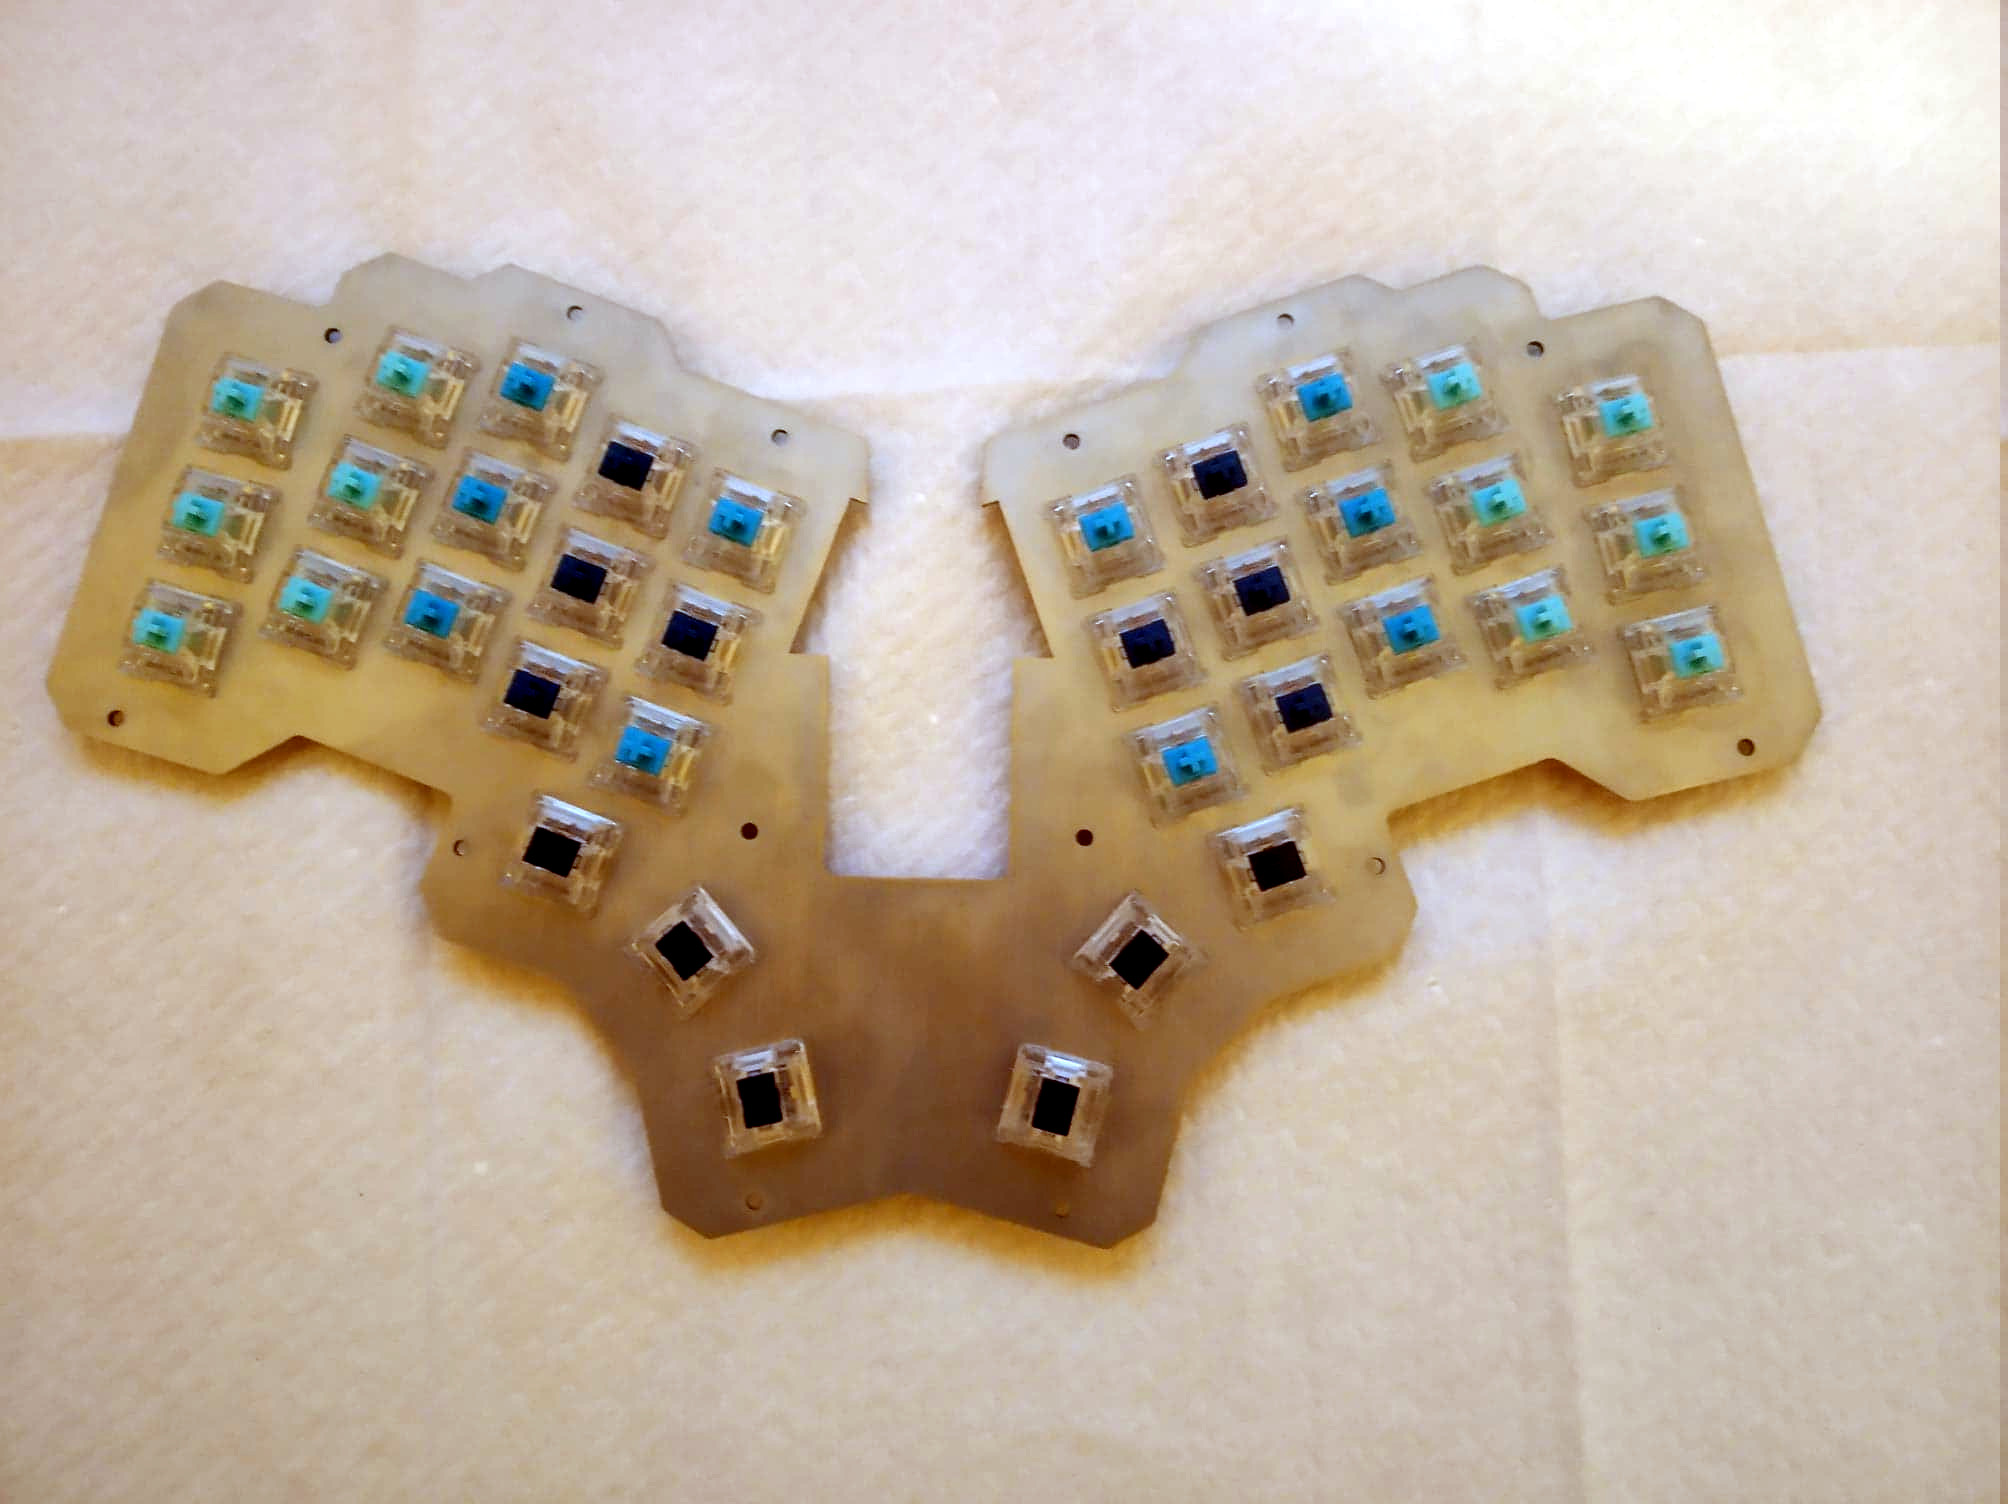
Under all that plastic lies a range of actuation force levels on the key caps that (in our opinion) range from heavy to really heavy — 62 gram switches on the pinkies and ring fingers, 65 g on the middle, 67 g on the index fingers, and a whopping 78 g for the thumb clusters.

We just love the way this ended up looking, and are pretty jealous of that neoprene layer on the bottom. Beauty aside, there is some real utility here to be shared. In designing the layout, [mrzealot] created a keyboard generator called ergogen that will get you closer to your endgame without the need for CAD skills, just YAML.

Those of you who read Hackaday closely may recognize the term ‘ergogen’ from [Matthew Carlson]’s coverage of [Ben Vallack]’s guide to creating a low-profile keyboard. This is something else in the same vein.

Thanks for the tip, [HBBisenieks].

Tune Your Dish Antenna Like A Pro

It’s a problem we all have at one time or another: your five-meter radio astronomy dish gets out of calibration and you don’t have a ridiculously expensive microwave holography rig on hand to diagnose it. OK, maybe this isn’t your problem, but when [Joe Martin]’s parabolic antenna got out of whack, he set out to diagnose and repair it, and then wrote up how he did it. You can download the PDF from his radio astronomy articles collection.

At the heart of the measurement rig is a laser rangefinder connected to a Porcupine Labs interface that passes the data on to a Pi 4. This is placed on the end of a two-degree-of-freedom servo gimbal that scans over the surface of the dish, measuring its shape. After measuring and math, [Joe] found out that it’s a little bit long here and short there, he attached two cables with turnbuckles to the front of the dish and pulled it back into shape — the sort of thing that you should probably only do if you’ve got a measurement rig already set up.

The Fluke rangefinder and Porcupine labs interface combo is pretty sweet, but it comes with a fairly hefty price tag. (Nothing compared to a professional dish measurement rig, we presume.) We’ve seen a few attempt at hacking into el-cheapo laser rangefinders, but other than [iliasam]’s heroic effort where he ended up writing his own firmware, it doesn’t seem like there are any successes. A shame, because applications like [Joe]’s prove that there’s a need for one. Let us know if there’s anything we missed?

Thanks [Ethan] for the tip!

Old Printer Becomes Direct Laser Lithography Machine

What does it take to make your own integrated circuits at home? It’s a question that relatively few intrepid hackers have tried to answer, and the answer is usually something along the lines of “a lot of second-hand equipment.” But it doesn’t all have to be cast-offs from a semiconductor fab, as [Zachary Tong] shows us with his homebrew direct laser lithography setup.

Most of us are familiar with masked photolithography thanks to the age-old process of making PCBs using photoresist — a copper-clad board is treated with a photopolymer, a mask containing the traces to be etched is applied, and the board is exposed to UV light, which selectively hardens the resist layer before etching. [Zach] explores a variation on that theme — maskless photolithography — as well as scaling it down considerably with this rig. An optical bench focuses and directs a UV laser into a galvanometer that was salvaged from an old laser printer. The galvo controls the position of the collimated laser beam very precisely before focusing it on a microscope that greatly narrows its field. The laser dances over the surface of a silicon wafer covered with photoresist, where it etches away the resist, making the silicon ready for etching and further processing.

Being made as it is from salvaged components, aluminum extrusion, and 3D-printed parts, [Zach]’s setup is far from optimal. But he was able to get some pretty impressive results, with features down to 7 microns. There’s plenty of room for optimization, of course, including better galvanometers and a less ad hoc optical setup, but we’re keen to see where this goes. [Zach] says one of his goals is homebrew microelectromechanical systems (MEMS), so we’re looking forward to that.

Continue reading “Old Printer Becomes Direct Laser Lithography Machine”

The New-Phone Blues: A Reminder That Hackers Shouldn’t Settle

For all the convenience and indispensability of having access to the sum total of human knowledge in the palm of your hand, the actual process of acquiring and configuring a smartphone can be an incredibly frustrating experience. Standing in those endless queues at the cell phone store, jumping through the administrative hoops, and staring in sticker shock at a device that’s likely to end its life dunked in a toilet all contribute to the frustration.

But for my money, the real trouble starts once you get past all that stuff and start trying to set up the new phone just right. Sure, most phone manufacturers make it fairly easy to clone your old phone onto the new one, but there are always hiccups. And for something that gets as tightly integrated into the workflows of your daily life as cell phones do, that can be a real bummer. Especially when you find out that your shiny new phone can’t do something you absolutely depend on.

Continue reading “The New-Phone Blues: A Reminder That Hackers Shouldn’t Settle”

Satellite Snoopers Pick Up Surprising TV Broadcast

While Internet based streaming services appear to be the future of television, there are still plenty of places where it comes into the home via a cable, satellite, or antenna connection. For most satellite transmissions this now means a digital multiplex carrying a host of channels from a geostationary satellite, for which a set-top box or other decoder is required. Imagine the surprise of satellite-watchers than when the Russian polar communications satellite Meridian 9 which has a highly elliptical orbit was seen transmitting old-style terrestrial analogue TV (ThreadReader Link). What on earth was happening?

How a Russian polar comms satellite picked up a TV station.

The TV signal in question comes from Turkmenistan, so were some homesick Turkmenistanis in an Antarctic base being treated to a taste of their country? The truth is far more interesting than that, because the signal in question comes from a terrestrial transmitter serving domestic TV viewers in Turkmenistan.

We’ve all heard of the idea that somehow every TV show ever transmitted is somewhere out there still traveling as radio waves across space, and while perhaps we can’t fly far enough out to check for 1960s Doctor Who episodes it’s true that the horizontal transmissions from a TV tower pass out into space as the earth curves away from them.

Thus Meridian 9 passed through the beam from the Turkmenistan transmitter which happened to be on a UHF frequency that matched one of its transponders, and the result was an unexpected bit of satellite TV. We’re indebted to the work of [@dereksgc] and [Scott Tilley] for bringing us this fascinating observation. We’ve featured [Scott]’s work before, most notably when he relocated a lost NASA craft.

Hacked GDB Dashboard Puts It All On Display

Not everyone is a fan of GUI interfaces. But some tasks really lend themselves to something over a bare command line. Very few people enjoy old command line text editors like edlin or ed. Debugging is another task where showing source files and variables at all times makes sense. Of course, you don’t absolutely have to have a GUI per se. You can also use a Text User Interface (TUI). In fact, you can build gdb — the GNU Debugger — with a built-in TUI mode. Try adding –tui to your gdb command line and see what happens. There are also many GUI frontends for gdb, but [cyrus-and] has an easy way to get a very useful TUI-like interface to gdb that doesn’t require rebuilding gdb or even hacking its internals in any way.

The secret? The gdb program runs a .gdbinit file on startup. By using Python and some gdb commands, [cyrus-and] causes the debugger to have a nice dashboard interface for your debugging sessions. If you install a helper script, you can even get syntax highlighting.

The system uses modules and you can even add your own custom modules and commands, if you like. You can also control what modules appear on each dashboard display. Normally, the dashboard shows when the program stops. For example, on each breakpoint. However, gdb has a hook system that allows you to trigger a dashboard using the appropriately-named dashboard command on other commands, too. Using the layout option to the dashboard command, you can even trigger different modules at different times.

Installation is simple. Just put the .gdbinit file in your home directory. If you want syntax highlights, you need to install Pygments, too. We understand you can even use his under Windows, if you like.

We don’t always take full advantage, but gdb is actually amazing. The flexible architecture makes all sorts of interesting things possible.

IR Remote Transforms To RF

Most consumer remote controls operate using infrared light. This works well assuming the piece of equipment has a line of sight to the remote. But if you have, say a receiver in a cabinet or closet, the IR remote signal can’t reach the sensor. Some equipment has remote receivers that you can leave poking out, but it is still not very handy. That’s why some equipment now uses RF remotes. [Xtropie] used a pair of inexpensive 433 MHz RF modules to convert an IR system to RF. You can see a short video about the project below.

We might have been tempted to simply put an IR LED on the receiver so it could feed IR into the device sensor, but [Xtropie] took a different approach. He found the IR sensor and tied the RF receiver directly into its output. It seems to work, but we probably would have removed the IR sensor to make sure there were no conflicts.

Continue reading “IR Remote Transforms To RF”