Espresso maker with added nixie flair

AI Powered Coffee Maker Knows A Bit Too Much About You

People keep warning that Skynet and the great robot uprising is not that far away, what with all this recent AI and machine-learning malarky getting all the attention lately. But we think going straight for a terminator robot army is not a very smart approach, not least due to a lack of subtlety. We think that it’s a much better bet to take over the world one home appliance at a time, and this AI Powered coffee maker might just well be part of that master plan.

Raspberry Pi Zero sitting atop the custom nixie tube driver PCB
PCB stackup with Pi Zero sat atop the driver / PSU PCBs

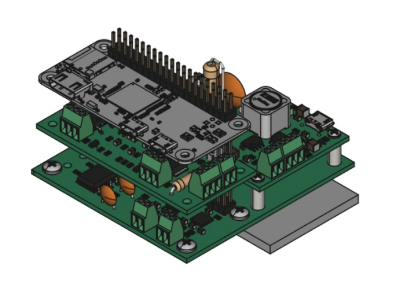
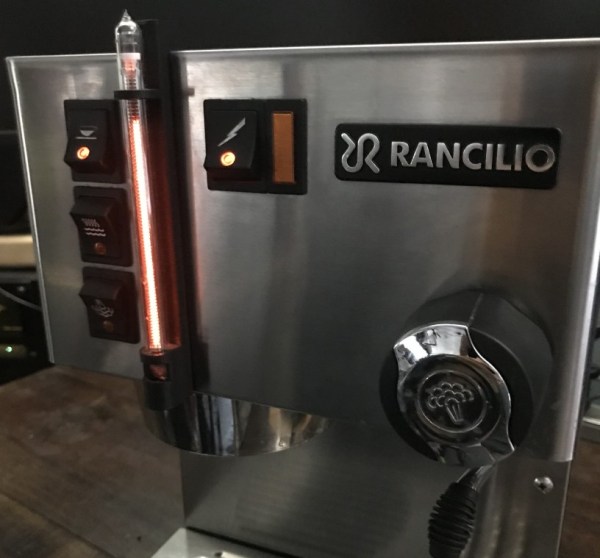
[Mark Smith] has taken a standard semi-auto espresso maker and jazzed it up a bit, with a sweet bar graph nixie tube the only obvious addition, at least from the front of the unit. Inside, a Raspberry Pi Zero sits atop his own nixie tube hat and associated power supply. The whole assembly is dropped into a 3D printed case and lives snuggled up to the water pump.

The Pi is running a web application written with the excellent Flask framework, and also an additional control application written in python. This allows the user to connect to the machine via Ethernet and see its status. The smarts are in the form of a simple self-grading machine learning algorithm, that takes a time series as an input (in this case when you take your shots of espresso) and after a few weeks of data, is able to make a reasonable prediction as to when you might want it in the future. It then automatically heats up in time for you to use the machine, when you usually do, then cools back down to save energy. No more pointless wandering around to see if the machine is hot enough yet – as you can just check the web page and see from the comfort of your desk.

But that’s not all [Mark] has done. He also improved the temperature control of the water boiler, and added an interlock that prevents the machine from producing a shot until the water temperature is just so. Water level is indicated by the glorious bar graph nixie tube, which also serves a few other user indication duties when appropriate. All in all a pretty sweet build, but we do add a word of caution: If your toaster starts making an unreasonable number of offers of toasted teacakes, give it a wide berth.

Highly Configurable Open Source Microscope Cooked Up In FreeCAD

What do you get when you cross a day job as a Medical Histopathologist with an interest in 3D printing and programming? You get a fully-baked Open Source microscope, specifically the Portable Upgradeable Modular Affordable (or PUMA), that’s what. And this is no toy microscope. By combining a sprinkle of off-the-shelf electronics available from pretty much anywhere, a pound or two of filament, and a dash of high quality optical parts, PUMA cooks up quite possibly one of the best open source microscopy experiences we’ve ever tasted.

GitHub user [TadPath] works as a medical pathologist and clearly knows a thing or two about what makes a great instrument, so it is a genuine joy for us to see this tasty project laid out in such a complete fashion. Many a time we’ve looked into an high-profile project, only to find a pile of STL files and some hard to source special parts. But not here. This is deliberately designed to be buildable by practically anyone with access to a 3D printer and an eBay account.

The project is not currently certified for medical diagnostics use, but that is likely only a matter of money and time. The value for education and research (especially in developing nations) cannot really be overstated.

A small selection of the fixed and active aperture choices

The modularity allows a wide range of configurations from simple ambient light illumination, with a single objective, great for using out in the field without electricity, right up to a trinocular setup with TFT-based spatial light modulator enabling advanced methods such as Schlieren phase contrast (which allows visualisation of fluid flow inside a live cell, for example) and a heads-up display for making measurements from the sample. Add into the mix that PUMA is specifically designed to be quickly and easily broken down in the field, that helps busy researchers on the go, out in the sticks.

The GitHub repo has all the details you could need to build your own configuration and appropriate add-ons, everything from CAD files (FreeCAD source, so you can remix it to your heart’s content) and a detailed Bill-of-Materials for sourcing parts.

We covered fluorescence microscopy before, as well as many many other microscope related stories over the years, because quite simply, microscopes are a very important topic. Heck, this humble scribe has a binocular and a trinocular microscope on the bench next to him, and doesn’t even consider that unusual. If you’re hungry for an easily hackable, extendable and cost-effective scope, then this may be just the dish you were looking for.

Continue reading “Highly Configurable Open Source Microscope Cooked Up In FreeCAD”

Spooky USB Baby Types Out Messages From Beyond

You might think it’s a bit early for us to be running Halloween hacks, but don’t worry. While this microcontroller-equipped doll that mimics a USB keyboard to type out messages in the creepiest way possible might seem like a gag gift you’d get after attending somebody’s bone-chilling holiday bash, creator [Jonathan] actually put it together for a friend’s wedding. So not only is it an interesting piece of hacked together hardware, but it’s also a great reminder about the importance of having a wedding registry.

Even if this seems like a rather unusual wedding gift from an outsider’s perspective (for the record, pranks involving this “haunted doll” have been a running gag between them since their school days), we can’t help but be impressed with the way [Jonathan] implemented it. An ATtiny85-powered Digispark is hidden inside the doll, along with a simple USB 2.0 hub that supposedly eases some teething issues the diminutive development board has with newer USB 3.0 ports. Through the use of V-USB, this lets the baby type out messages once plugged into the recipient’s computer.

Soldering the Digispark to a cheap USB hub keeps newer computers happy.

Now he could have just stopped there, but [Jonathan] wanted this to be an interactive experience. Specifically, he wanted the baby to present the newlyweds with a personally test of sorts, and that meant taking user input. He came up with the clever user interface demonstrated in the video below, which responds to changes in the system’s “Caps Lock” state.

This platform-agnostic solution lets the user navigate the doll’s menu system by tapping a single key, although the Chromebook users out there will have to break out the Alt key to play along. It’s a neat trick for getting two-way communication going between a MCU and a computer without any client-side software, and worth filing away mentally for future non-haunted projects. It’s also worth checking out the effort [Jonathan] put into optimizing everything to fit into the chip’s paltry 6012 bytes of flash.

Incidentally, this is a good a time as any to remind readers that our Halloween Hackfest contest is live right now and taking entries until October 11th. If you’ve got any cursed bar mitzvah gifts you’ve been putting the finishing touches on, we’d love to see them.

Continue reading “Spooky USB Baby Types Out Messages From Beyond”

Brain electrodes

Brain Interface Uses Tiny Needles

We often look at news out of the research community and think, “we could build that.” But the latest brain-machine interface from an international team including the Georgia Institute of Technology actually scares us. It uses an array of tiny needles that penetrate the skin but remain too small for your nerves to detect. Right. We assume they need to be sterile but either way, we don’t really want to build a pin grid array to attach to your brain.

It seems the soft device is comfortable and since it is very lightweight it doesn’t suffer from noise if the user blinks or otherwise moves. Looking at the picture of the electrodes, they look awfully pointy, but we assume that’s magnified quite a few times, since the post mentions they are not visible to the naked eye.

Continue reading “Brain Interface Uses Tiny Needles”

A couple of joysticks wired up to a Teensy for prototyping.

Custom Joystick Build Guide Should Point You In The Right Direction

Over the last two years, [benkster] has been perfecting their ideal flight controller. Like many people, they started out with a keyboard and mouse and eventually moved on to a joystick. While a HOTAS (hands on throttle-and-stick — e.g. a yoke controller with inputs right there on the sides) might have been the next logical step, those things cost too much. Naturally, the answer is to build one, ideally for less money. Hey, it could happen.

The design went from just an idea to a cardboard prototype, and then to a wooden enclosure and later, a 3D-printed case. Since [benkster] learned a great deal along the way, they want to give back to the community with a comprehensive joystick design/build guide so that others don’t have to start from zero, overwhelmed with information.

[benkster] wanted three joysticks, a bunch of big buttons, a throttle, a display to show component status (as in, is joystick #3 a joystick right now or a WASD keyboard?), and immersive details everywhere — you know, a million buttons and switches to give it that cockpit feel. [benkster] is using a Teensy 4 to control two 3-axis joysticks and one 2-axis stick. Since this adds up to too many axes for Windows/DirectX to read in, the 2-axis stick is used as a WASD keyboard.

This guide is a great place to start, especially for folks who may be newer to electronics. There are nice introductions to many types of components and tidbits that are relevant outside the world of joysticks.

You want immersive flight simulation away from the PC? Here’s a printable flexure-based ‘stick that snaps right on your Xbox controller and pushes the buttons.

Arduino Powered Heat Pump Controller Helps Warm Your Toes

Heat pump heating technology is starting to pop up more and more lately, as the technology becomes cheaper and public awareness and acceptance improves. Touted as a greener residential heating system, they are rapidly gaining popularity, at least in part due to various government green policies and tax breaks.

[Gonzho] has been busy the last few years working on his own Arduino Powered Open Source heat pump controller, and the project logs show some nice details of what it takes to start experimenting with heat pumps in general, if that’s your game. Or you could use this to give an old system a new lease of life with an Arduino brain transplant.

In essence they are very simple devices; some kind of refrigerant is passed through a source of heat, absorbing some of it, it then flows elsewhere, and is compressed, which increases its temperature, before that increased heat is lost where the increase in temperature is desired.

This heat source could be a river, a mass of pipes buried in the ground, or simply the air around you. The source and quality of the heat source as well as the desired system operating temperature dictate the overall efficiency, and with ground-source systems it’s even possible to dump excess heat directly into the ground and store it for when required later. This could be the result of a residential cooling system, or even directly sourced from a solar heated setup.

This heat pumping process is reversible, so it is possible to swap the hot and cold ends, just by flipping some valves, and turn your space heater into a space cooler. This whole process can trace its roots back to the super talented Scottish professor, William Cullen who in 1748 was the first person on record to demonstrate artificial refrigeration.

The power needed to run the compressor pump and control gear is usually electrically derived, at least in non-vehicular applications, but the total power required is significantly less than the effective heating (or cooling) power that results.

We’ve covered a few heat pump hacks before, like this guy who’s been heating his house geothermally for years, but not so many platforms designed for experimentation from the ground up.

The associated GitHub project provides the gerber files as well as the Arduino code, so you’ve got a great starting point for your own heat pumping builds.

What the Antikythera workshop may have looked like

Clickspring Imagines The Workshop That Built The Antikythera Mechanism

When you look at the mechanisms of antiquity, it’s hard not to wonder, “How did they ever do that?” Just a look around our own shops shows how many things are bought from suppliers that benefit from the latest in automated machinery, computer control, and clean, safe electrical power. And that’s not to mention the high-tech stuff like electronics, which were centuries in the future for the ancient master craftsmen.

And yet, they built. Granted, not every artifact was as complex as the Antikythera mechanism, but still, this ancient astronomical computer exists, and must have come from someone’s workshop. What did that place look like? That’s the question [Chris], aka [Clickspring], sets out to answer in his new video.

Like any good academician would, he relies on evidence locked in the device itself to provide clues as to how it was produced, and to make educated guesses as to the contents of the shop (or shops) that made it. For example, the intricacy of the work would have required ample lighting, so the shop was likely at least partially open-air. There must have been a source of heat for working the brass and bronze materials of the original. There had to be workbenches, storage for stock, and probably places for apprentices to turn their hands to simple tasks under their master’s watchful eye. In short, it probably would have been quite recognizable to our eyes, and probably would have been a model of ergonomic efficiency.

[Chris] kindly gave us a sneak peek at the video and a few hours of exclusivity before it goes live to the general public, and we really appreciate that. We’re really looking forward to more of the Antikythera build, and can’t wait to see the finished product.

Continue reading “Clickspring Imagines The Workshop That Built The Antikythera Mechanism”