If you own a CNC and have kept tabs on metal prices these past few years (honestly months), you might shed a small tear as you watch chips fly off your work and into the trash. With a sigh, these flecks and pieces are consigned to be the cost of machining a part. Thankfully, the fine folks at [ActionBox] have been working on a 3d printed plaster forge for recycling their metal scraps.
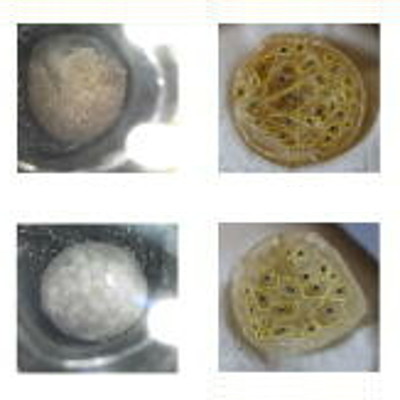
The team ordered some graphite crucibles of a few sizes from a large online bookstore and started 3D printing some molds for crucible holders. They started with a smaller version to try the method. While the walls were too thin in that initial version, the approach was proven. With slightly thicker walls, the medium-sized version worked much better. The goal of the forge was to smelt copper as they had a lot of thick copper wire lying around. Armed with several propane torches, they started melting aluminum and brass, which worked reasonably well. However, the melting point of copper continued to elude them (1984°F or 1085°C). To counter this, the [ActionBox] team bought some new torches that provided significantly higher BTU output, while still fitting the holes in the mold. This did the trick!
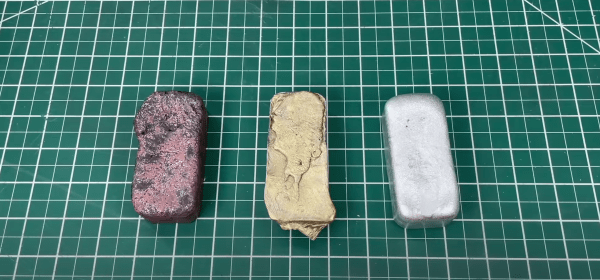
The mold to accommodate the large crucible was massive and printed in four sections. The team did melt copper successfully and had four ingots to show off. We want to stress how dangerous molten copper and other metals are, particularly regarding things you might not realize have moisture soaked up inside. Proper PPE is essential to use these things without getting hurt. [ActionBox] has some helpful pointers in that area, but they admit they are relatively new to forging and casting themselves. Perhaps version two can incorporate a flip lid for added safety.
Video after the break.
Continue reading “3D Printed Forge For Recycling”


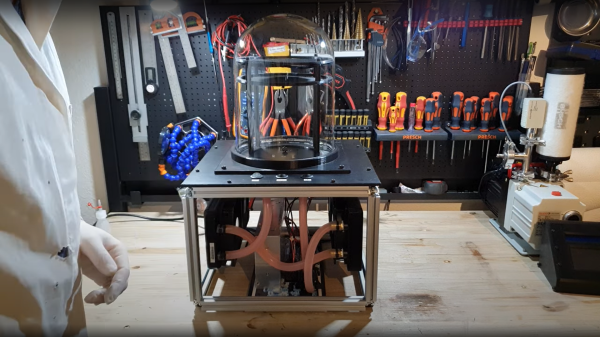
 heat pump, so you need to dump the hot-side heat elsewhere. The method [Advanced Tinkering] chose here was to use a pair of off-the-shelf water cooling blocks, mounted into a 3D printed plate. The hot side dumps into a pair of fan-cooled radiators. Four double-layer Peltier modules are wired in parallel to a 60A power supply, which seems like a lot, but Peltier modules are hungry little things. A reasonable amount of power is needed to drive the cooling fans and water pump. The vapor source is a simple pad of liquid alcohol at the top of the stack, just above a metal screen which is held at a high voltage. The vertical electric field allows visualization of the charge of emitted particles, which will curve up or down depending on their polarity.