Animatronic Puppetry Controller Skips Joystick Or Keyboard

One of the major challenges of animatronics is creating natural looking motion. You can build something with an actuator for every possible degree of freedom, but it will still be disappointing if you are unable to control it to smoothly play the part. [Mr. Volt] has developed a passion for animatronic projects, but found programming them tedious, and manual control with keyboard or controller difficult to do right. As an alternative, he is building Waldo, an electronic puppetry controller.

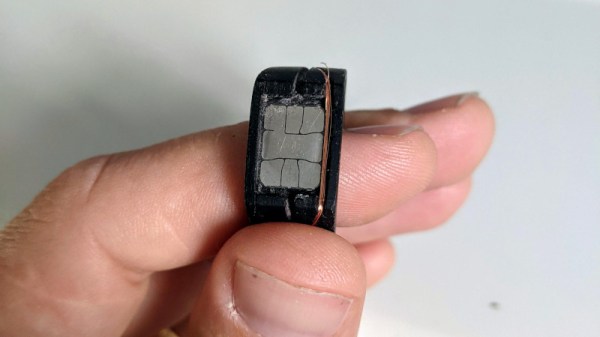
The Waldo rig is being developed in conjunction with [Mr. Volt]’s build of Wheatley, the talkative ball-shaped robot from the Portal 2 game. The puppetry rig consists of a series of rings for [Mr Volt]’s hand, with the position of each being read by angle sensors. This allows him to control Wheatley’s orientation of the body and eyeball, eyelids, and handles. Wheatley and Waldo both still need a few refinements, but we look forward to seeing the finished project in action.

The Portal games have inspired several featured projects, including GLaDOS, the turrets, and of course more Wheatly builds.

Continue reading “Animatronic Puppetry Controller Skips Joystick Or Keyboard”

Getting Back Into Hackerspaces

Last week, I got my first chance to get out and about among the hackers in what feels like forever. Hackerspaces here in Germany are finally able to re-open for business-as-almost-usual, allowing access to reasonable numbers of people providing they’re immunized or tested, and wearing masks of course. And that meant that I got to take up [Andreas’] invitation to come see his Stereo Ninja inspection microscope project in person.

Stereo Ninja basically makes clever use of two Raspberry Pi cameras, swaps out the optics for greater enlargement, and displays the results on a 3D monitor — to be viewed with shutter glasses. This is one of those projects that you really have to see in person to “get it”. He’s still working on stripping the build down to make it simpler and more affordable, to make the project more accessible to the average hacker.

We talked about DIYing a 3D monitor. It turns out that the shutter glasses are cheap, and it looks like they’re synced by an IR pulse to the monitor. There should be a hacker solution for 3D to work with a fast gaming monitor at least. [Andreas] also pointed me to this great breakout board for the Raspberry Pi CM4 that breaks out both camera lanes for easy stereo / 3D capture. I got the tour of the FabLab, and we talked welding, metal 3D printing, software, hardware and assorted nerdy stuff. [Alex] showed up on his way out of town for the weekend — it’d been ages since we hung out.

In short, I remembered how it used to be in the before-times, when visits with other hackers, and to other hackerspaces, were possible. There’s this spontaneous and mutually inspirational kind of chat that’s just impossible remotely, and is tremendously important.

We’re not done with the COVID pandemic yet, I fear, and different parts of the world have entirely different trajectories. If you told me two years ago that I would be visiting hackerspaces with a mask and proof-of-vaccination, I would have thought you were crazy. But at the same time this brief visit gave me a little boost of hope for the future. We will get through all of this, and we’ll all meet up again at our local hackerspaces.

a man sits on top of a motorcycle simulation rig

Motorcycle Simulation Rig Is Off To The Races

Many arcade machines can be emulated and handily controlled with the standard joystick and button combos. However, a few don’t feel quite right without some extra equipment, motorcycle racing games being one of them. So, no longer content to go to an arcade to get his fix, [The Q] welded his own motorcycle simulation rig for playing racing games at home.

After an initial design was sketched out, rectangular tube steel was cut to size and welded together with a MIG welder. A central shaft linked to some secured bearings made the central pivot point. A few pistons offered the resistance needed for leaning into the curves. To the central shaft, a seat and an old bicycle fork were attached. A clever linkage from the handlebars to the base causes the bike to tilt when turning the handlebars and vice versa.

The bike was ready for prime time after some grinding, orange paint, a license plate, and some lights and grips. [The Q] just needed to get the angle of the bike into the simulation of their choice. While we expected a teensy or other microcontroller emulating a controller, [The Q] went for a somewhat simpler approach, and 3D printed a cradle to hold a PlayStation controller. Little levers pull strings to articulate the joystick, and a cable from the throttle grip pulls back the trigger on the controller. All in all, the experience looks pretty decent, particularly when you’re comparing it to a motocross arcade machine. What it really needs are some fans blowing for the effect of the air stream coming at you.

If you’re thinking about busting out the MIG to make a rig of your own, maybe consider making a homemade car racing rig to complement the bike.

Continue reading “Motorcycle Simulation Rig Is Off To The Races”

A homemade seven-segment OLED display

Making OLED Displays In The Home Lab

Just a general observation: when your project’s BOM includes ytterbium metal, chances are pretty good that it’s something interesting. We’d say that making your own OLED displays at home definitely falls into that category.

Of course, the making of organic light-emitting diodes requires more than just a rare-earth metal, not least of which is the experience in the field that [Jeroen Vleggaar] brings to this project. Having worked on OLEDs at Philips for years, [Jeroen] is well-positioned to tackle the complex process, involving things like physical vapor deposition and the organic chemistry of coordinated quinolones. And that’s not to mention the quantum physics of it all, which is nicely summarized in the first ten minutes or so of the video below. From there it’s all about making a couple of OLED displays using photolithography and the aforementioned PVD to build up a sandwich of Alq3, an electroluminescent organic compound, on a substrate of ITO (indium tin oxide) glass. We especially appreciate the use of a resin 3D printer to create the photoresist masks, as well as the details on the PVD process.

The displays themselves look fantastic — at least for a while. The organic segments begin to oxidize rapidly from pinholes in the material; a cleanroom would fix that, but this was just a demonstration, after all. And as a bonus, the blue-green glow of [Jeroen]’s displays reminds us strongly of the replica Apollo DSKY display that [Ben Krasnow] built a while back. Continue reading “Making OLED Displays In The Home Lab”

The Retro Shield, an Arduino Proto Shield for making many different circuits.

Retro Shield Replaces Springs With Jumpers, Includes Blinkenlights!

Is it an AM radio? Yes. It is a 555 LED flashing circuit? Yep. How about a hex counter with a 7 segment display? That too. Five different colored LED’s to satisfy your need for blinkenlights? Even that! What is this magical contraption? Is it one of those old school 30-in-1 or 50-in-1 “Science Fair” kits with the jumper wires and the springs? Almost!

When [grandalf]’s friend showed them a project where a 555 timer was installed on an Arduino shield, they realized two things: This whole “could have done that with a 555 timer” meme is a lot of fun, and “I’ve got an old 556 chip, I wonder if I can build one?” The answer is yes, and so much more.

Starting with the 556 timer, and inspired by the old spring-and-jumper kits of the past, [grandalf]’s “556 on a Proto Shield” project evolved into a creation they call the Retro Shield. Snowballing like so many hacker projects, it now includes several built in circuits and components. Breadboard jumpers are used to connect components through strategically placed pin headers, of which there are quite a few!

To make it all fit, some parts were substituted with more compact pieces such as an LM386 instead of an LM380.  The AM radio portion is supplied by an all-in-one radio chip, the ZN414. With the scope creep picking up steam, [grandalf] eventually added so called sidecars- bits of board that contain controls and a speaker hanging off the side of the Proto Shield.

It is not mentioned if the Retro Shield integrates with the Arduino or not. All the same, the Retro Shield has been used to pick up local AM stations, blink LED’s and amplify audio with the LM386. Like [grandalf] we’re sure that the Retro Shield can be used for much more. We hope that [grandalf] expands on the concept and inspires future hackers to answer the question “I wonder what happens if I try this.” 

If you haven’t set eyes on one of the all-in-one kits, check out this 200-in-1 kit teardown and review. And of course, if you have your own hacked up projects to share, be sure to let us know through the Tip Line!

Smooth Servo Motion For Lifelike Animatronics

Building an animatronic robot is one thing, but animating it in a lifelike fashion is a completely different challenge. Hobby servos are cheap and popular for animatronics, but just letting it move at max speed isn’t particularly lifelike. In the video after the break, [James Bruton] demonstrates how to achieve natural motion with a simple animatronic head and a few extra lines of code.

Very little natural body movement happens at a constant speed, it’s always accelerating or decelerating. When we move our heads to look at something around us, our neck muscles accelerate our head sharply in the chosen direction and then slows down gradually as it reaches its endpoint. To do this in Arduino/C code, a new intermediate position for the servo is specified for each main loop until it reaches the final position. The intermediate value is the sum of 95% of the current position, and 5% of the target position. This gives the effect of the natural motion described above. The ratios can be changed to suit the desired speed.

The delay function is usually one of the first timing mechanisms that new Arduino programmers learn about, but it’s not suited for this application, especially when you’re controlling multiple servos simultaneously. Instead, the millis function is used to keep track of the system clock in the main loop, which fires the position update commands at the specified intervals. Adafruit wrote an excellent tutorial on this method of multitasking, which [James] based his code on. Of course, this should be old news to anyone who has been doing embedded programming for a while, but it’s an excellent introduction for newcomers.

Like most of [James]’s projects, all the code and CAD files are open source and available on GitHub. His projects make regular appearances here on Hackaday, like his mono-wheel balancing robot and mechanically multiplexed flip-dot display.

Continue reading “Smooth Servo Motion For Lifelike Animatronics”

An Earthquake Display To Keep You Abreast Of Rumblings Worldwide

The Internet has brought us the ability to share data all over the globe, and nearly instantaneously at that. It’s revolutionized the sharing of science across the world, and taking advantage of this global data network is this earthquake display from [AndyGadget].

The build relies on an ESP32 fitted with an ILI9486 TFT display. The screen is in color and has a nice 480×320 resolution. This enables it to display a reasonably legible world map using the Web Mercator projection to fit the rectangular screen. The microcontroller then pulls in information from Seismic Portal, a site that aggregates data from seismographs and other sensors scattered all over the world.  Data from the site is pulled into the device live and overlaid on the world map, allowing the viewer to see the location of any current earthquakes at a glance.

It’s a great project, and one that we reckon would make a great addition to any university geology department. If it’s sparked an interest, consider diving deeper into the world of seismic analysis and data yourself!