Gaming Twitter’s Trending Algorithm To Make A Point

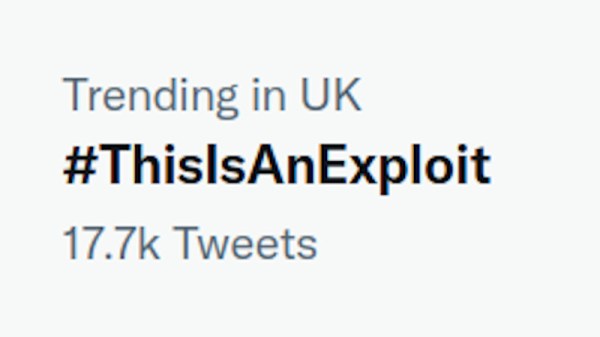
If you have ever taken to Twitter to gauge the zeitgeist, you’ll have noticed that among the trending hashtags related to major events of the day there are sometimes outliers of minority interest associated with single-issue causes. When a cause with a distasteful pedigree was cited one as proof of widespread public support in a debate in the UK’s House of Lords there were concerns raised that a flaw in the ranking algorithm might be responsible, and it was left to [Mallory Moore] to prove the hypothesis by getting a #ThisIsAnExploit hashtag trending without a groundswell of popular support.

Some previous detective work had established that equal ranking might be awarded equally not simply for Tweeting a hashtag but also for retweeting it. The exploit takes advantage of this by means of a relatively small cadre of people all Tweeting the tag a number of times, then retweeting all other instances of it. The resulting rank gain is then in the order of the square of the number of accounts interacting with the tag, and thus hugely inflated over the number of real participants. To test this she created the #ThisIsAnExploit tag and asked her followers to do just that: Tweet it and retweet all others containing it. In a short time the exploit succeeded, beating a very high-profile tag associated with the travails of the British Prime Minister in the process, and with most of the effort due to only 50 accounts.

Our world is now significantly influenced by social media because for many it appears more trustworthy than the old-style mass media with a print origin. Work like this is important because a reminder that transferring the message from newspaper proprietors to tech barons does not confer credibility is sorely needed. Meanwhile now the weakness is in the wild we wonder how Hackaday readers might have fun with it. Does anyone want to see a #RaiseTheJollyWrencher hashtag top the pile?

The Weirdest Hack

I was on the FLOSS podcast (for the Episode of the Beast no less!) and we were talking all about Hackaday. One of the hosts, secretly Hackaday’s own Jonathan Bennett in disguise, asked me what the weirdest hack I’d ever seen on Hackaday was. Weird?!?!

I was caught like a deer in headlights. None of our hacks are weird! Or maybe all of them are? I dunno, it certainly depends on your perspective. Is it weird to build a box that makes periodic meowing noises to hid in a friend’s closet? Is it weird to design new and interesting wheels for acrobats to roll themselves around in? Is it weird to want a rainbow-colored USB DIP switch? Is it weird that these are all posts from the last week?

OK, maybe we are a little bit weird. But that’s the way we like it. Keep it weird and wonderful, Hackaday. You’ve got enough normal stuff to do eight hours a day!

1960s Stereo Console Gets An Upgrade

Faced with an old console stereo from the 1960s that was barely functional, [Sherman Banks] aka W4ATL decided to upgrade its guts while keeping its appearance as close to the original as possible. This stereo set is a piece of mahogany furniture containing an AM/FM stereo receiver and an automatic turntable from JCPenny’s Penncrest line. As best [Sherman] can determine, it is most likely a 1965 model. The old electronics were getting more and more difficult to repair and the tuner was drifting off-station every 15 minutes. He didn’t want to throw it away, so he decided to replace all the innards.

The first thing was to tear out the old electronics while retaining the chassis proper. The new heart of the entertainment center is a modern Denon AV stereo receiver. This unit can be controlled over Ethernet, has a radio tuner, inputs for SiriusXM and a turntable, and supports Bluetooth streaming. [Sherman] next replaced the 1965 turntable, and then turned his attention to connecting up the controls and indicators.

The potentiometers were replaced with equivalent ones of lower resistance, the neon stereo indicator was replaced with an LED, but the linear tuning dial proved to be a nearly two month challenge and resulted in a cool hack. In brief, he connected an optical rotary encoder to the tuning knob and used a stepper motor with a linear actuator to control the dial indicator. All this is controlled from an Arduino Mega 2560 with three shields for I/O and LAN. But there was still one remaining issue — without vacuum tubes to warm up, the radio would play immediately after power-on. [Sherman] fixed that by programming the Arduino to slowly ramp up the volume at the same rate as the original tube receiver. And finally, he installs a small HDMI monitor in the corner to display auxiliary information and metadata from the Denon receiver.

Check out the videos below the break. We wrote about a couple of similar conversions in the past: this one from 2018 was also a Penncrest, and from last year this COVID isolation project that emphasized the addition of a new liquor cabinet.

Continue reading “1960s Stereo Console Gets An Upgrade”

How To Spot A Fake Op-Amp

We’re all aware that there are plenty of fake components to be found if you’re prepared to look in the right places, and that perhaps too-good-to-be-true chip offers on auction sites might turn out to have markings which rub off to reveal something completely different underneath. [IMSAI Guy] saw a batch of OP-07 laser-trimmed op-amps at a bargain price, so picked them up for an investigation. You can take a look at the video below the break.

A perfect op-amp has a zero volt output when both of its inputs are at the same voltage, but in practice no real device approaches this level of perfection. It’s referred to as the offset voltage, and for instrumentation work where a low offset voltage is important there are parts such as the OP-07 which have each been adjusted using a laser to trim their components for the lowest offset. This process is expensive, so naturally so are genuine OP-07s.

Identifying real versus fake op-amps in this case is as simple as hooking the chip up as a unity gain non-inverting amplifier and measuring the voltage on the output (we can’t help a tinge of envy at that Keithley 2015 THD multimeter!), from which measurement the fakes should be clearly visible. First up are some 741s with their > 1 mV offsets (though an outlier 741 had a 40μV offset) to show what a cheap op-amp could be expected to do, then we see the OP-07s. Immediately with an offset of > 1.2 mV  we can tell that they’re fake, which as he admits for the price is hardly a surprise. Meanwhile we’ll keep an eye out for Korean-made 741s like the outlier low-offset device.

If you’re interested by op-amp internals may we suggest a look at the first IC op-amp, meanwhile this isn’t the first fake chip we’ve seen.

Continue reading “How To Spot A Fake Op-Amp”

CadQuery Comes Of Age

Now, we know what some of you are going to say — “Oh man, not another programmatic CAD tool, what’s wrong with OpenSCAD?” — and you may be right, but maybe hold on a bit and take a look at this one, because we think that it’s now pretty awesome! OpenSCAD is great, we use it all the time round these parts, but it is a bit, you know, weird in places. Then along comes CadQuery, and blows it out of the water ease-of-use and functionality wise. Now, we’ve seen a few mentions of CadQuery over the years, and finally it’s become a full-blown toolset in its own right, complete with a graphical frontend/editor, CQ-editor. No odd dependencies on FreeCAD to be seen! That said, installing FreeCAD is not a bad thing either.

The goal is to have the CadQuery script that produces this object be as close as possible to the English phrase a human would use.

Continue reading “CadQuery Comes Of Age”

Resuming a print

Multiple Ways Of Recovering A Failed Print

It’s a special gut-dropping, grumbly moment that most who use 3d printers know all too well. When you check on your 13-hour print, only to see that it failed printing several hundred layers ago. [Stephan] from [CNC Kitchen] has a few clever tricks to resume failed prints.

It starts when you discover your print has failed and whether the part is still attached to the bed. If it has detached, the best you can do is whip out your calipers to get a reasonably accurate measurement of how much has been printed. Then slice off the already printed section, print the remainder, and glue the two parts together. If your part is attached to your print bed and you haven’t shifted the plate (if it is removable), start by removing any blemishes on the top layer. That will make it smooth and predictable as it’s starting a new print, just on top of an existing one. Measuring the height that has been printed is tricky since you cannot remove it. Calipers of sufficient length can use their depth function, but you might also be able to do a visual inspection if the geometry is unique enough. After you load up your model in a G-Code viewer, go through it layer by layer until you find what matches what has already been printed.

The last (and perhaps most clever) is to use the printer as a makeshift CMM (coordinate measuring machine). You manually step the printer until it touches the top of the part, then read the z-axis height via a screen or M114 command. A quick edit to the raw G-Code gives you a new file that will resume precisely what it was doing before. If you can’t rehome because the head can’t clear the part, [Stephan] walks you through setting the home on your printer manually.

If all the doesn’t work, and the print is still unrecoverable, perhaps you can look into recycling the plastic into new filament.

3D Printed Radiation Shields Get Put To The Test

Don’t get too excited, a 3D printed radiation shield won’t keep you from getting irradiated during WWIII. But until the Doomsday Clock starts clanging its midnight bell, you can use one to improve the accuracy of your homebrew weather monitoring station by keeping the sun from heating up your temperature sensor. But how much does it help, and what material should you load up in your extruder to make one? Those questions, and more, are the topic of a fascinating whitepaper included in the upcoming volume of HardwareX.

Design and Implementation of 3-D Printed Radiation Shields for Environmental Sensors not only tests how effective these low-cost shields are when compared to an uncovered sensor, but addresses specific concerns in regards to leaving 3D printed parts out in the elements. Readers who’ve squirted out a few rolls worth of the stuff will know that common polylactic acid (PLA) filament, while easy to work with and affordable, isn’t known for its resilience. In fact, one of the advertised properties of the renewable plastic is that it’s biodegradable (theoretically, at least), so leaving it outside for any length of time sounds like it’s bound to go poorly.

PLA’s mechanical strength dropped rapidly.

To make a long story short, it does. While the team demonstrated that the PLA printed radiation shield absolutely helped preserve the accuracy of the temperature and humidity sensors mounted inside of it, the structure itself began to deform rapidly from UV exposure. Further tests determined that the mechanical strength of the PLA showed a notable reduction in as little as 30 days, and a sharp decline after 90 days.

Luckily, there was more than one plastic horse in the race. In addition to the PLA printed shield, the team also tested a version printed in acrylonitrile styrene acrylate (ASA) which fared far better. There was no visible deformation of the shield, and after 90 days, the reduction in mechanical strength was negligible. It even performed a bit better when it came to shielding the temperature sensor, which the team believes may be due to the material’s optical transmission properties.

So there you have it: a 3D printed radiation shield will absolutely improve the accuracy of your weather sensors, but if you want it to last outside, PLA just isn’t going to cut it. On the other hand, you could also save yourself a whole lot of time by just using a stack of plant saucers. Whatever works.

Thanks to [tahnok] for the tip.