Playing the guitar requires speed, strength, and dexterity in both hands. Depending on your mobility level, rocking out with your axe might be impossible unless you could somehow hold down the strings and have a robot do the strumming for you.
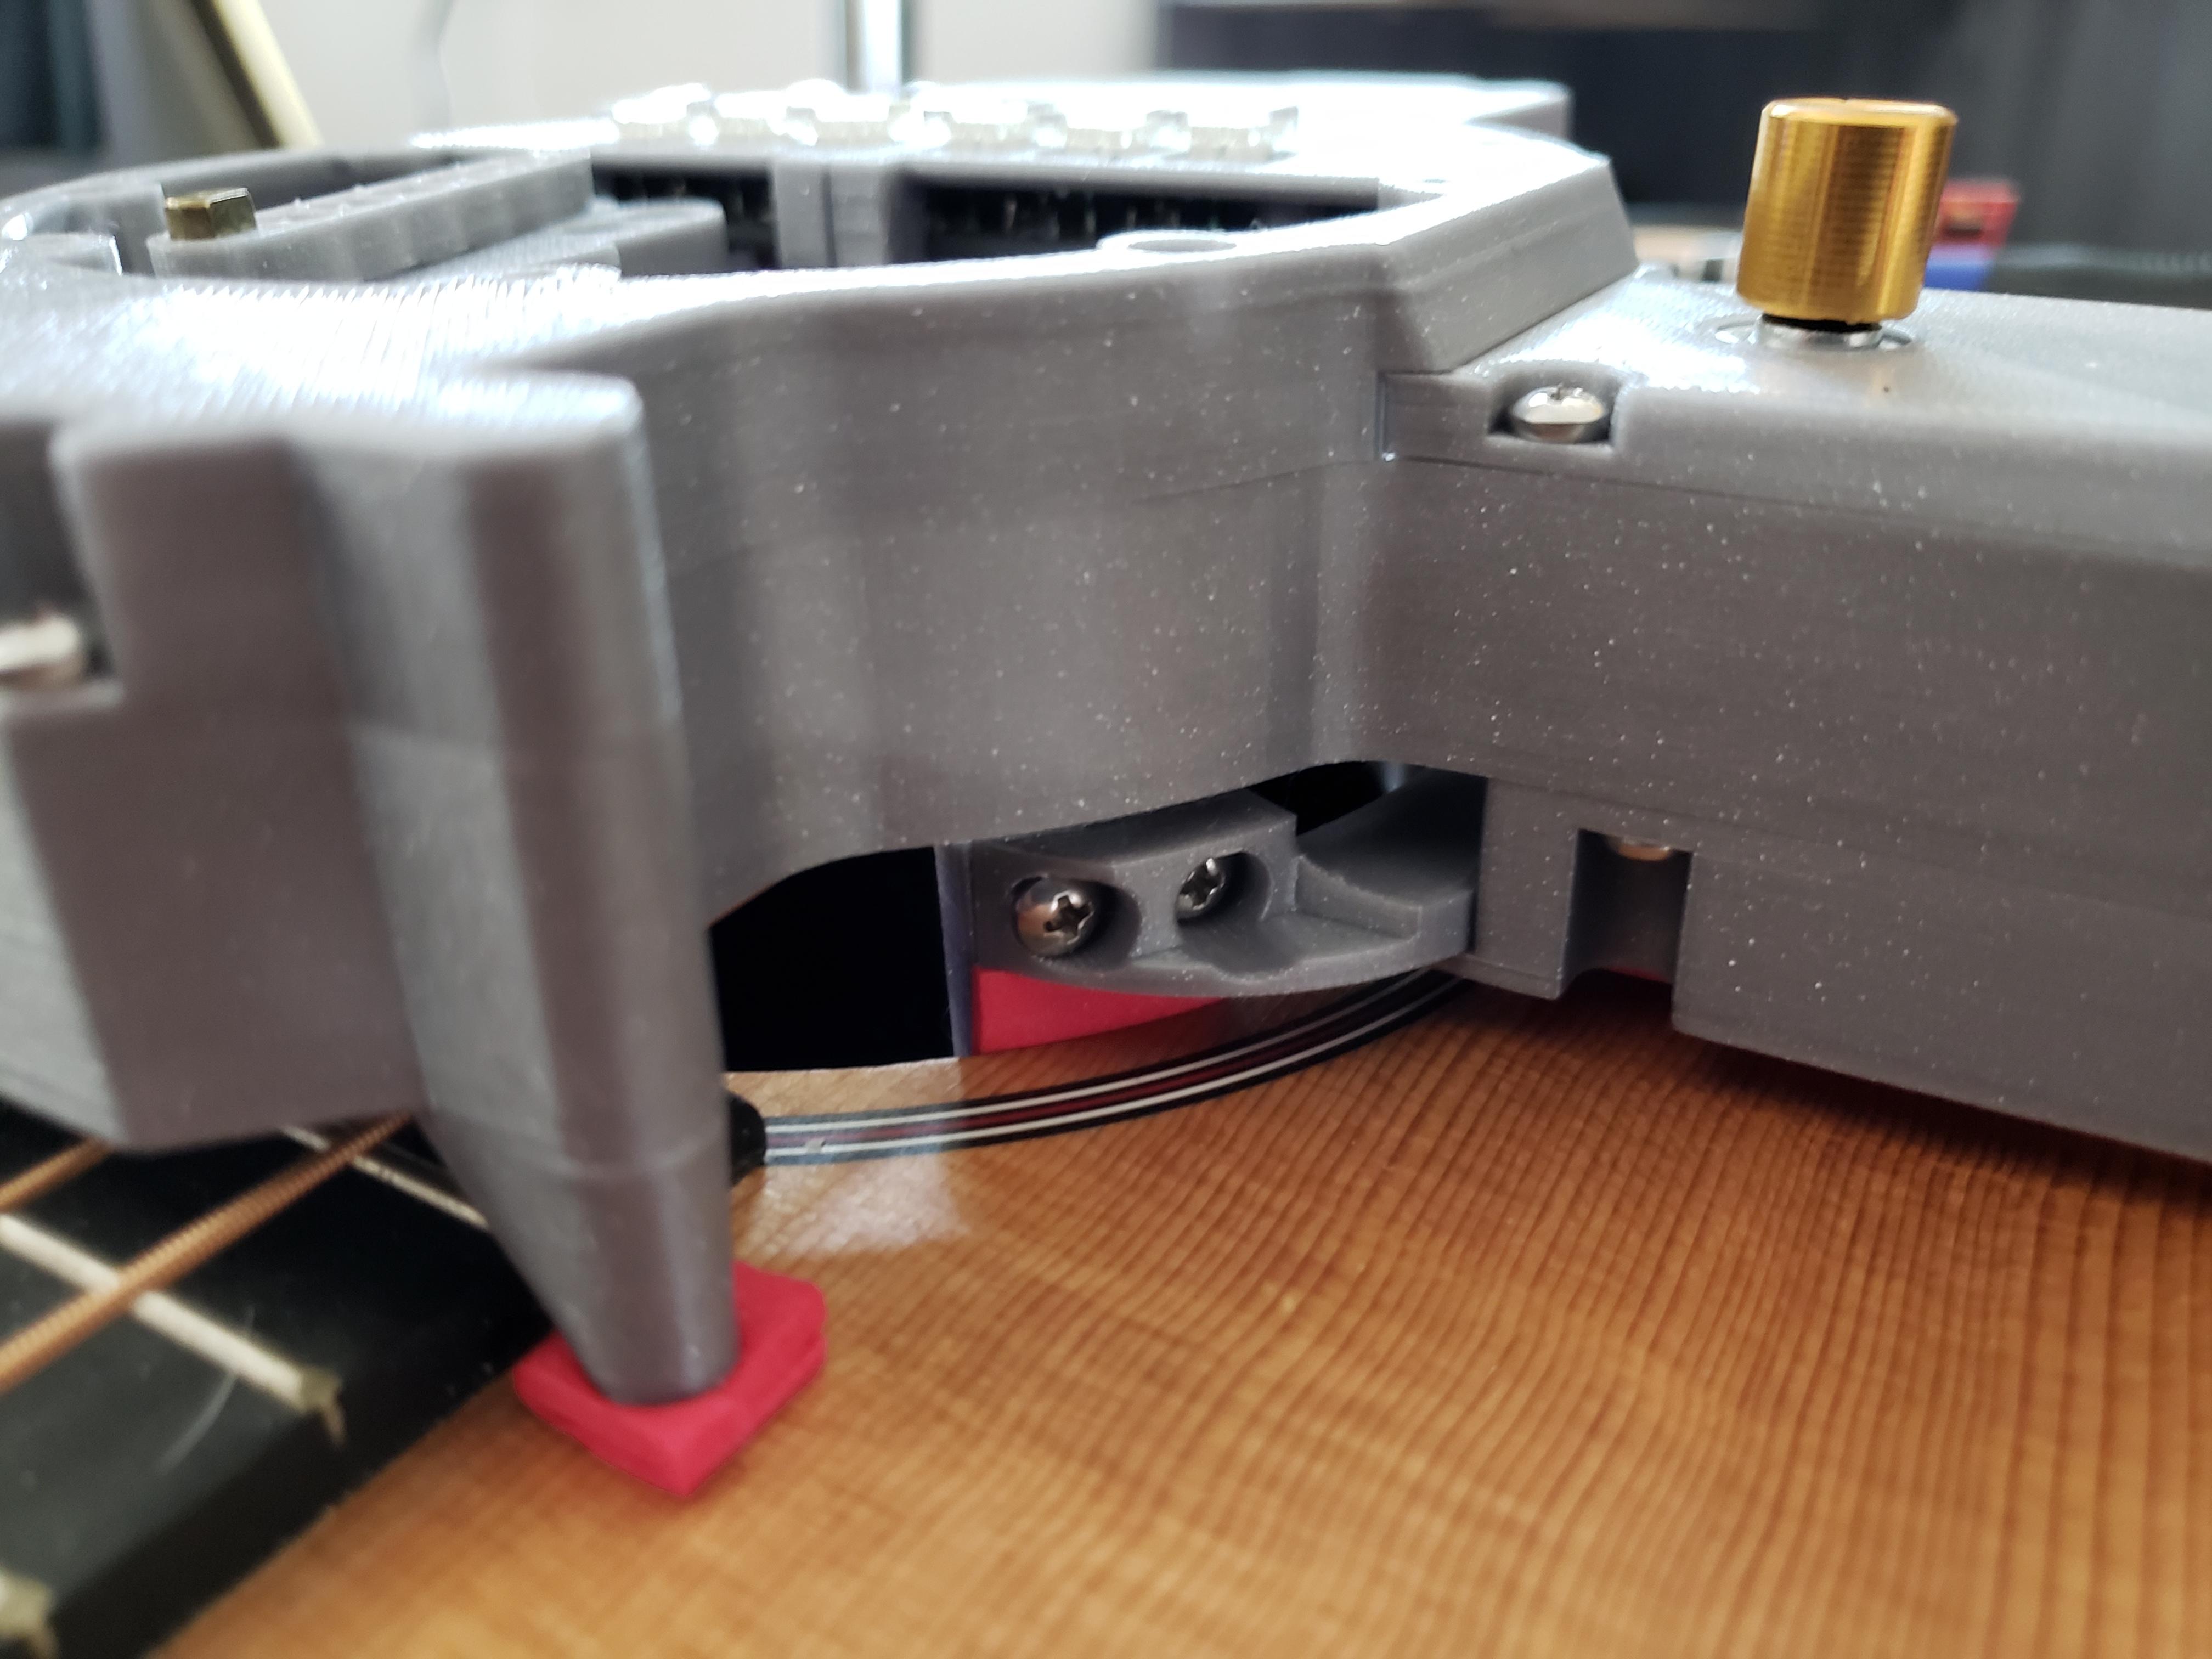
[Jacob Stambaugh]’s Auto Strummer uses six lighted buttons to tell the hidden internal pick which string(s) to strum, which it does with the help of an Arduino Pro Mini and a stepper motor. If two or more buttons are pressed, all the strings between the outermost pair selected will be strummed. That little golden knob near the top is a pot that controls the strumming tempo.
[Jacob]’s impressive 3D-printed enclosure attaches to the guitar with a pair of spring-loaded clamps that grasp the edge of the sound hole. But don’t fret — there’s plenty of foam padding under every point that touches the soundboard.
We were worried that the enclosure would block or muffle the sound, even though it sits about an inch above the hole. But as you can hear in the video after the break, that doesn’t seem to be the case — it sounds fantastic.
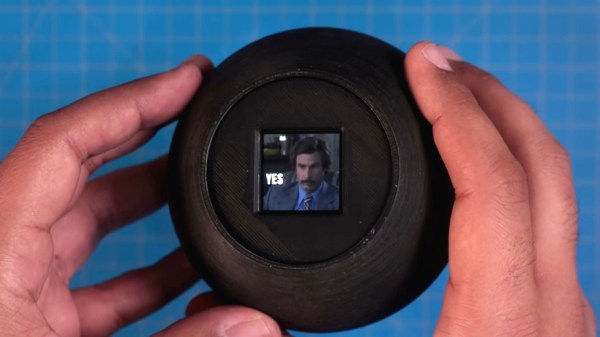
When you need quick answers to life’s burning yes or no questions, most reasonable people reach for a Magic 8-Ball. But since we all have most of those answers memorized at this point, has the Magic 8-Ball sunk to a cliche and become less useful in the present day? Signs point to yes. Yeah, maybe.
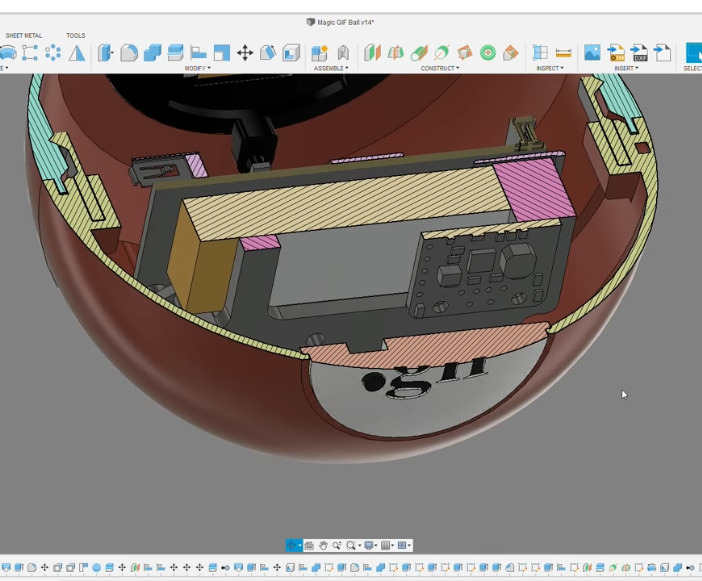
Not to worry, because [DJ Harrigan] has given the Magic 8-Ball a modern makeover by redesigning it to serve up suitable GIFs instead. Inside that beautifully-engineered snap-together shell lives a Raspberry Pi 3, and it displays the GIFs on a 240 x 240 IPS LCD screen. [DJ] wanted to use a round screen, but couldn’t find one with a good enough refresh rate. Maybe someday. We love this build either way.
Our favorite part is probably the power button, which is incorporated as the period in the ‘.gif’ logo. Although it takes a bit longer to get this 8-Ball ready to answer questions, it’s worth the wait. And besides, the splash screen is nice.
Once it’s booted up and ready to go, you still have to shake it — for this, [DJ] used a simple DIY spring-based tilt switch. Check out the demo and build video after the break. If you want to build one for yourself, the files are up on the project site.
It would seem that for as long as there have been ships on the ocean, there’s been smuggling. The International Maritime Organisation requires ships to have AIS, the automatic identification system which is akin to a transponder on an airplane. However, if you don’t want to be found, you often turn off your AIS. So how do governments and insurance companies track so-called dark ships? Using satellite technology. A recent post in Global Investigative Journal tells the story of how lower-cost satellites are helping track these dark ships.
Optical tracking is the obvious method, but satellites that can image ships can be expensive and have problems with things like clouds. Radar is another option, but — again — an expensive option if you aren’t a big military agency with money to spend. A company called HawkEye 360 uses smallsats to monitor ship’s RF emissions, which is much less expensive and resource-intensive than traditional methods. Although the data may still require correlation with other methods like optical sensing, it is still cost-effective compared to simply scanning the ocean for ships.
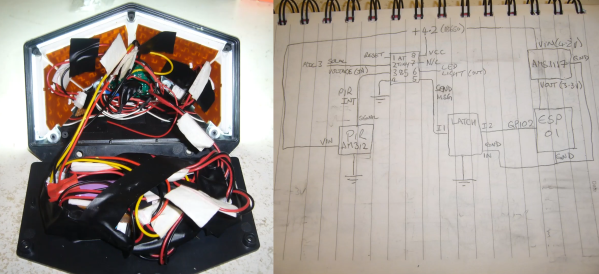
The size and price of the ESP wifi modules have quickly made them into one of the preferred building blocks for IoT devices. Unfortunately they are not particularly well suited for very low power applications. [LittlePetieWheat] wanted to add MQTT to a cheap PIR solar light, so he paired an ESP with an Attiny85 to hold it to a strict power budget.
Most of these lights contain some sort of no-name microcontroller that monitors the analog PIR sensor, and turns on the LEDs as required. [LittlePetieWheat] replaced the PIR sensor with one that gives a digital output for simpler interfacing. The Attiny serves as the low power brains of the project. Its tasks include reading the solar panel and battery voltages, and PIR output. When movement is detected by the sensor, it activates a clever little latching power circuit to power on the ESP01 just long enough to send a MQTT message. The LEDs are only turned on if there is no power coming from the solar panel. The solar power is stored in a 18650 battery.
What happens when you mix over 23,000 coffee stirrers and a Raspberry Pi camera together? Probably nothing except for a mess, unless you very specifically pack the plastic straws and orient the camera just right. In that case, you get this very cool lenless digital straw camera that takes artfully ghostly images.
Image of Yoda photographed through many straws
Actually, lensless is a bit of a reach for [Adrian Hanft]’s creation. While the camera he’s using to grab the image has a lens, the objective, for lack of a better term, is just a tightly packed bundle of straws. We’ve seen this approach to photography before, but there the camera used film placed at the back of the straw bundles to capture the pixelated image.
Here, a ground glass screen stands in for the film; a long lightproof box behind that provide a place to mount a camera to capture the images. Cleverly, [Adrian] built the camera mount from Lego, allowing cameras and lenses to be quickly swapped out. A Nintendo gamepad controller talks to custom software running on a Raspberry Pi and allows the photographer to control exposure and scroll through pictures using a smartphone as a display. There’s a short build video below, for those who can’t get enough of straw-packing techniques.
As with the film version of this camera, we just love the look of the photographs that come from this — the texture of the straw honeycomb and the defocused subject make for a striking effect.
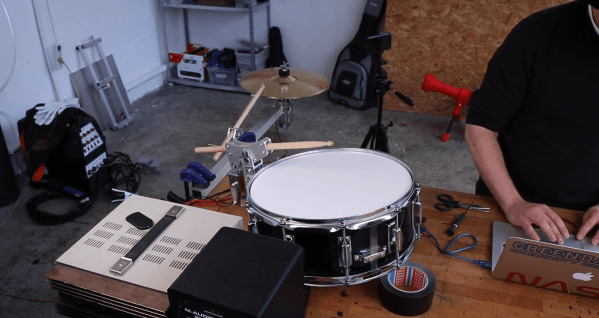
Learning to play a musical instrument well requires a significant time investment. [Ivan Miranda] had dreamt of doing this but made peace with the fact that his talents and motivation lay in building machines. However, he has decided to play to his strengths and is building a robotic band. See the videos after the break.
So far he has mechanized a hi-hat, snare drum, and a very basic guitar. The guitar is nothing more than a single string stretched across an aluminum frame, with an electronic pickup. Most of the work has gone into the solenoid-driven picking mechanism. He wanted to avoid picking the string when the solenoid is turned of, so he created a simple little mechanism that only comes in contact with the string when it’s moving in one direction. A bistable solenoid might be a simpler option here.
For the high hat, [Ivan] built a custom stand with two bistable solenoids to lift and drop the top cymbal. A solenoid-driven drumstick was also added. The snare drum uses a similar mechanism, but with a larger solenoid. So far he hasn’t really worked on a control system, focusing mainly on electronics.
You don’t have to look very hard to find another rousing success by SpaceX. It’s a company defined by big and bold moves, and when something goes right, they make sure you know about it. From launching a Tesla into deep space to the captivating test flights of their next-generation Starship spacecraft, the private company has turned high-stakes aerospace research and development into a public event. A cult of personality has developed around SpaceX’s outlandish CEO Elon Musk, and so long as he’s at the helm, we can expect bigger and brighter spectacles as he directs the company towards its ultimate goal of putting humans on Mars.
Of course, things don’t always go right for SpaceX. While setbacks are inevitable in aerospace, the company has had a few particularly embarrassing failures that could be directly attributed to their rapid development pace or even operational inexperience. A perfect example is the loss of the Israeli AMOS-6 satellite during a static fire of the Falcon 9’s engines on the launch pad in 2016, as industry experts questioned why the spacecraft had even been mounted to the rocket before it had passed its pre-flight checks. Since that costly mistake, the company has waited until all engine tests have been completed before attaching the customer’s payload.
SpaceX’s concept art for propulsive landing
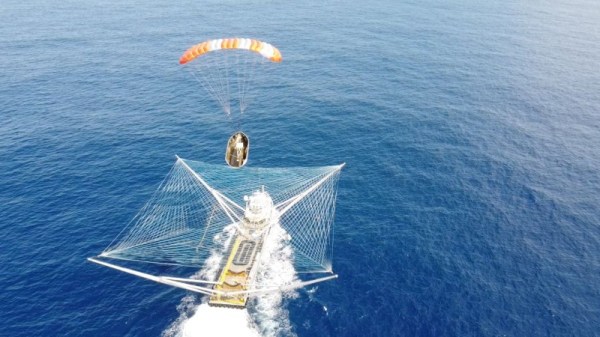
But sometimes the failure isn’t so much a technical problem as an inability for the company to achieve their own lofty goals. Occasionally one of Musk’s grand ideas ends up being too complex, dangerous, or expensive to put into practice. For instance, despite spending several years and untold amounts of money perfecting the technology involved, propulsive landings for the Crew Dragon were nixed before the idea could ever fully be tested. NASA was reportedly uncomfortable with what they saw as an unnecessary risk compared to the more traditional ocean splashdown under parachutes; it would have been an impressive sight to be sure, but it didn’t offer a substantive benefit over the simpler approach.
A similar fate recently befell SpaceX’s twin fairing recovery ships Ms. Tree and Ms. Chief, which were quietly retired in April. These vessels were designed to catch the Falcon’s school bus sized payload fairings as they drifted down back to Earth using massive nets suspended over their decks, but in the end, the process turned out to be more difficult than expected. More importantly, it apparently wasn’t even necessary in the first place.

 [Jacob Stambaugh]’s Auto Strummer uses six lighted buttons to tell the hidden internal pick which string(s) to strum, which it does with the help of an Arduino Pro Mini and a stepper motor. If two or more buttons are pressed, all the strings between the outermost pair selected will be strummed. That little golden knob near the top is a pot that controls the strumming tempo.