A few years ago we talked about the chance that the first known extrasolar visitor — Oumuamua — might be a derelict solar sail. That notion has been picking up steam in the popular press lately, and it made us think again about the chances that the supposed rock was really a solar sail discarded or maybe even a probe flying with a solar sail. At the same time, Mars is as close as it ever gets so there is a gaggle of our probes searching the red planet, some of them looking for signs of past life.
All this makes us think: if we did find life or even artifacts of intelligent life, would we realize it? Sure, we can usually figure out what’s alive here on Earth. But to paraphrase Justice Potter Stewart, “We know it when we see it.” Defining life turns out to be surprisingly tricky, recognizing alien technology would be even harder.
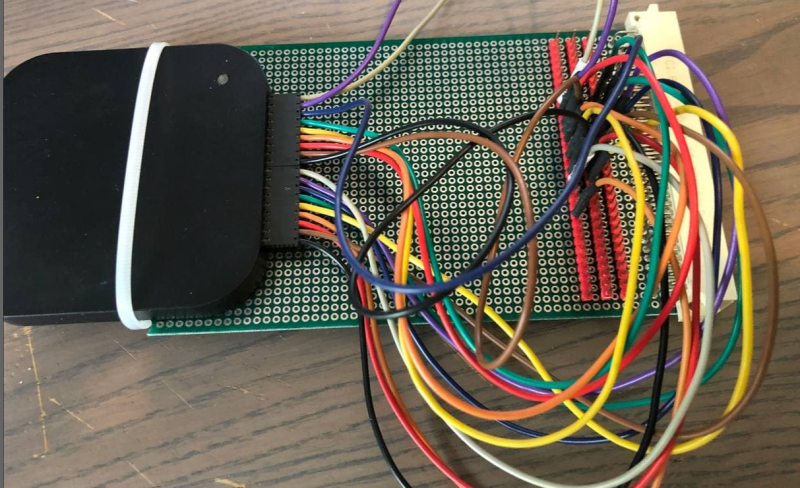
Among security professionals, a “drop box” is a device that can be covertly installed at a target location and phone home over the Internet, providing a back door into what might be an otherwise secure network. We’ve seen both commercial and DIY versions of this concept, and as you might expect, one of the main goals is to make the device look as inconspicuous as possible. Which is why [Walker] is hoping to build one into a standard USB wall charger.
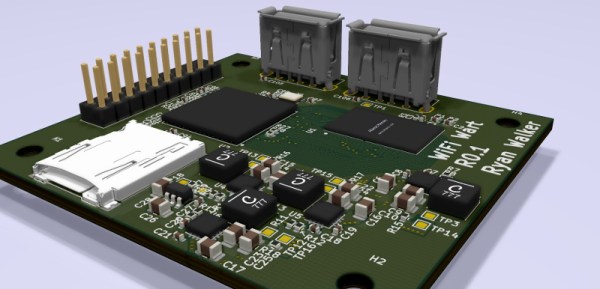
This project is still in the early stages, but we like what we see so far. [Walker] aims to make this a 100% free and open source device, starting from the tools he’s using to produce the CAD files all the way up to the firmware the final hardware will run. With none of the currently available single-board computers (SBCs) meeting his list of requirements, the first step is to build a miniature Linux machine that’s got enough processing power to run useful security tools locally. Obviously such a board would be of great interest to the larger hacker and maker community.
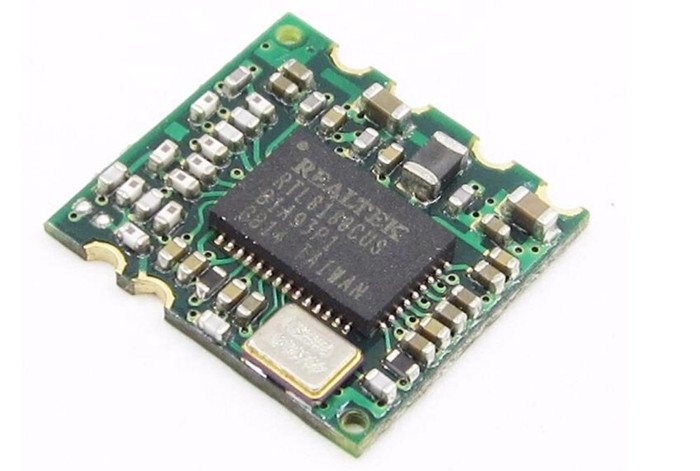
The RTL8188CUS is likely to get integrated later on.
So far, [Walker] has decided on his primary components and is working on a larger development board before really going all-in on the miniaturization process. As of right now he’s planning on using the Allwinner A33 to power the board, a sub-$10 USD chipset most commonly seen in low-cost Android tablets.
The A33 boasts a quad-core Cortex-A7 clocked at 1.2 GHz, and offers USB, I2C, and SPI interfaces for expansion. It will be paired with 1 GB of DDR3 RAM, and an SD card to hold the operating system. Naturally a device like this will need WiFi, but until [Walker] can decide on which chip to use, the plan is to just use a USB wireless adapter. The Realtek RTL8188CUS is a strong contender, as the fact that it comes in both USB and module versions should make its eventual integration seamless.
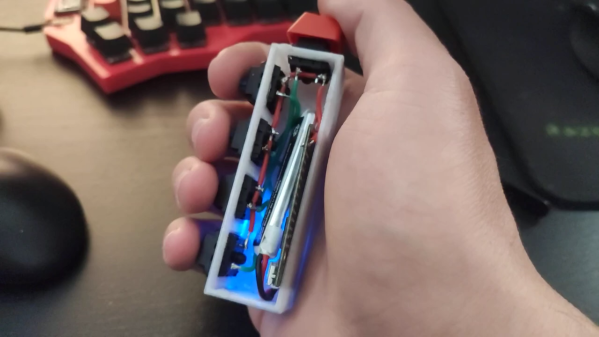
Most people think of a keyboard as a flat, vaguely rectangular thing with around 100ish different keys. A mechanical keyboard enthusiast would heartily disagree and point out various tenkeyless, 75%, 60%, or 40% keyboards that strip down the idea of what a keyboard is by taking keys out. [Stavros Korokithakis] takes that notion and turns it on its side by creating the five-button vertical keyboard known as Keyyyyyyyys.
This keyboard, or keystick, is designed to be onehanded and to be eye-contact-free. With just five keys, it makes heavy use of chording to output all the characters needed. It has a maximum of 32 possible states and taking out pressing nothing as a no-op leaves 31 possible key combinations. So [Stavros] had to get creative and laid out the letters according to their frequency in the English language. The brains of Keyyyyyyyys is the ubiquitous ESP32, emulating a Bluetooth keyboard while being wrapped in a simple 3d printed box. The code is hosted on GitLab.
If you don’t know how hard it is to learn a five-key chording keyboard from scratch, definitely check out [Stavros]’ video embedded below. “C’mon h.” We have heard reports that you can learn these things, though.
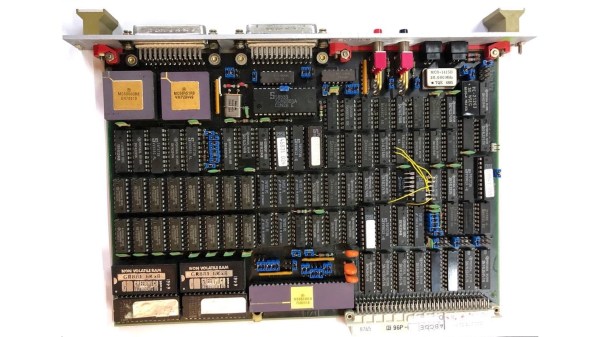
With some free time on his hands waiting for delayed parts to arrive, [Rik] set out to reverse engineer an old VME system he had acquired. VMEbus computers are based on the standard Eurocard PCB format, which defines a wide range of card sizes — the most common being 6U height like [Rik]’s system. They usually consist of a rack-mounted card cage with a passive backplane. Originally, Motorola 68000-based CPU cards were used in VMEbus systems, but any processor could be used as long as you provided the right signals and timings to the system bus. Eurocard systems are less common these days, but are still used in some applications. In fact, if you’re into synthesizers, you may be using Eurocards today — the Eurorack standard is based on the standard 3U card size.
Back to [Rik]’s project, he had no idea what this system was nor how to use it. A bit of probing around and he found two UARTs, a system monitor, and a way to load and dump S-record files. He documents the process quite well, as the internal layout and memory map of the system is unlocked piece by piece. We also like his method of instrumenting the VMEbus signals — logic analyzers are so small today, you can just mount one inside the rack.
Spoiler alert: [Rik] succeeds in mapping out the memory, writes some small programs in 68k assembly language, and even builds his own LED accessory card so he can blink some lights (as one must do).
We wrote about modularity recently, and VMEbus + Eurocard systems are good examples of modular design. You could quickly put together a robust assembly using entirely off-the-shelf cards, or mix in your own custom cards. But technology advancements in clock speeds and miniaturization have made these card cage, passive backplane systems less and less relevant today. Do any of you still use the VMEbus, or have you designed with them in the past? Let us know down in the comments below.
All feats of engineering build on a proper understanding of the basic engineering concepts. Learning these concepts from a book or class tends to be a rather uninspiring exercise, unfortunately. To make this task a lot more enjoyable, [The Efficient Engineer] has produced a series of high-quality, easy-to-watch videos on the concepts.
The videos focus mainly on mechanical and structural engineering and contain excellent animations and just enough math to give you a basic understanding. There are 22 videos so far and cover a wide variety of topics, including FEA analysis, stress and strain, aerodynamics, and Young’s modulus. Each video starts with the basics, then digs down into the topic, all the while visualizing the subject being discussed. For example, for FEA he starts with the applications, then covers discretization (meshing) and how to solve the calculations.
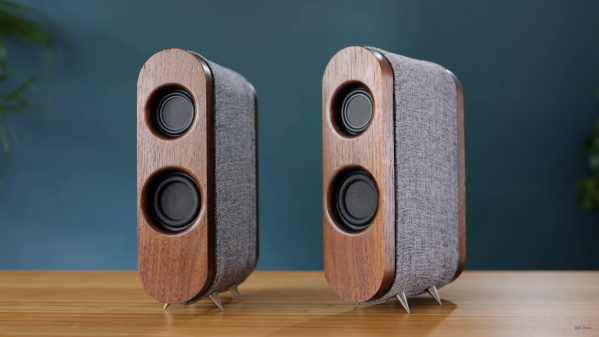
Building a Bluetooth speaker is easy with the availability of cheap Bluetooth receivers, but surprisingly there isn’t a simple way to build a pair of truly wireless stereo speakers. [Matt] from DIY Perks realized that modern Bluetooth earbuds contain all the electronics to do just that.
Due to the popularity of these earbuds, a broken pair can be picked up very cheaply on eBay. Usually, it’s only the battery or speaker unit that give out, neither of which are required for this build. [Matt] goes through the process of taking a pair of earbuds apart, and then soldering on battery and speaker wires. The speaker wires are connected to an audio amp, which drives a mid-range and treble speaker driver, and a subwoofer. The outputs to the amp are also filtered to match the speakers. Power is provided by a set of four 18650 cells.
[Matt] housed the driver and electronics in some attractive CNC machined wood enclosures. In the video, he places a lot of emphasis on properly sealing all the gaps to get the best possible audio quality. As with all of his projects, the end result looks and performs like a high-end commercial product. We’re almost surprised that he didn’t add any brass to the speakers, as he did on his USB-C monitor or PS5 enclosure build. Continue reading “A Wireless Speaker Pair From Dead Earbuds”→
Motorcyclist’s vulnerability to bodily harm and weather has spawned several enclosed motorcycle designs over the years. Fascinated by the idea, [Meanwhile in the garage] finally got around to building his own. (Video, embedded below.)
The vehicle started life as a 125cc scooter, stripped of all the unnecessary bits, he welded a steel cockpit onto it. A windshield, doors, and side windows were also added. The ends of the handlebars were cut off and reattached at 90 degrees to fit inside the narrow cockpit. A pair of retractable “training wheels” keep the vehicle upright and at slow speeds.
Legalities aside, we can’t help but think that the first test drives should not have been on a public road. It almost ended in disaster when a loose axle nut on the front wheel caused steering oscillations which caused the vehicle to tip over. Fortunately, there were no injuries and only light cosmetic damage, so a more successful test followed the first.
While many companies have tried, enclosed motorcycles have never achieved much commercial success. Probably because they inhabit a no-mans-land between the rush and freedom of riding a motorcycle and the safety and comfort of a car.