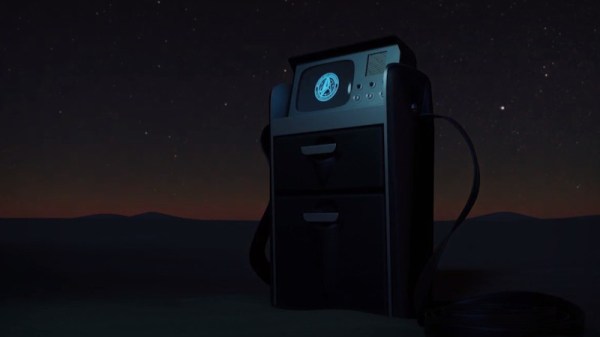
Signal The End Of A Print With MIDI Of Your Choice

The end of every 3D print should be a triumphant moment, and deserves a theme song. [FuseBox2R] decided to make it a reality, and wrote tool for converting MIDI tracks to G-code that uses the buzzer on your 3D printer.

The tool is up on GitHub, and uses the M300 speaker command that is available in Marlin and some other 3D printer firmware packages. It takes the form of a static HTML page with in-line JavaScript that converts a midi track to series of speaker commands with the appropriate frequency and duration parameters, using the Tone.js framework. Simply add to your slicer G-code to add a bit of spice to your prints. You can also build a MIDI jukebox using the RAMPS board and LCD you probably have gathering dust somewhere. See the video after the break for a demonstration, including a rendition of the DOOM theme song, and off course Mario Bros.

For more quarantine projects, you can also play MIDI using the stepper motors on your printer, or build a day clock if time is becoming too much of a blur.

Continue reading “Signal The End Of A Print With MIDI Of Your Choice”

In-Depth Design Of A Flyback Converter

It is tempting to think of analogue and digital domains as entirely distinct, never to touch each other except like a cold war Checkpoint Charlie, through the medium of an ADC or DAC. In reality there are plenty of analogue effects upon digital circuitry which designers must be aware of, but there is one field in which the analogue and the digital are intricately  meshed. Switch mode power supplies use digital techniques to exploit the analogue properties of components such as inductors and capacitors, and can be astoundingly clever in the way they do this to extract the last fraction of a percent efficiency from their conversion. Thus their design can be something of a Dark Art, so it’s always interesting to have a good read explaining some of the intricacies. [James Wilson] has built a flyback step-up converter to power Nixie tubes, and his write-up follows the whole process in great depth.

This type of converter seems at first glance to be a simple step-up design with a transformer that has a primary and secondary, where in fact it relies on the collapse in magnetic field during the off period of its duty cycle to provide a spike in voltage and thus a step-up beyond that you’d expect from the transformer alone. The write-up takes us through all this starting from a theoretical perspective, and then goes further into the realm of component selection and the effects of component properties on the waveforms involved. If you have ever battled ringing in a switch mode power supply you may recognise some of this.

If this field interests you, then there is probably no better place to send you for a start than Jim Williams’ 1987 app note 25 for Linear Technology: “Switching Regulators for Poets“.

Raspberry Pi Cluster Shows You The Ropes

Raspberry Pi clusters are a common enough project, but a lot of the builds we see focus on the hardware side of the cluster. Once it’s up and running, though, what comes next? Raspberry Pis aren’t very powerful devices, but they can still be a great project for learning how to interact with a cluster of computers or for experimental test setups. In this project from [Dino], four Pis are networked together and then loaded with a basic set of software for cluster computing.

The first thing to set up, after the hardware and OS, is the network configuration. Each Pi needs a static IP in order to communicate properly. In this case, [Dino] makes extensive use of SSH. From there, he gets to work installing Prometheus and Grafana to use as monitoring software which can track system resources and operating temperature. After that, the final step is to install Ansible which is monitoring software specifically meant for clusters, which allows all of the computers to be administered more as a unit than as four separate devices.

This was only part 1 of [Dino]’s dive into cluster computing, and we hope there’s more to come. There’s a lot to do with a computer cluster, and once you learn the ropes with a Raspberry Pi setup like this it will be a lot easier to move on to a more powerful (and expensive) setup that can power through some serious work.

Odd Crosley Radios From The 1920s

You may sometimes see the Crosley name today on cheap record players, but from what we can tell that company isn’t connected with the Crosley Radio company that was a powerhouse in the field from 1921 to 1956. [Uniservo] looks at two of the very early entries from Crosley: the model VIII and the XJ. You can see the video of both radios, below.

The company started by making car parts but grew rapidly and entered the radio business very successfully in 1921. We can only imagine what a non-technical person thought of these radios with all the knobs and switches, for some it must have been very intimidating.

Continue reading “Odd Crosley Radios From The 1920s”

GPU Turned Into Radio Transmitter To Defeat Air-Gapped PC

Another week, another exploit against an air-gapped computer. And this time, the attack is particularly clever and pernicious: turning a GPU into a radio transmitter.

The first part of [Mikhail Davidov] and [Baron Oldenburg]’s article is a review of some of the basics of exploring the RF emissions of computers using software-defined radio (SDR) dongles. Most readers can safely skip ahead a bit to section 9, which gets into the process they used to sniff for potentially compromising RF leaks from an air-gapped test computer. After finding a few weak signals in the gigahertz range and dismissing them as attack vectors due to their limited penetration potential, they settled in on the GPU card, a Radeon Pro WX3100, and specifically on the power management features of its ATI chipset.

With a GPU benchmarking program running, they switched the graphics card shader clock between its two lowest power settings, which produced a strong signal on the SDR waterfall at 428 MHz. They were able to receive this signal up to 50 feet (15 meters) away, perhaps to the annoyance of nearby hams as this is plunk in the middle of the 70-cm band. This is theoretically enough to exfiltrate data, but at a painfully low bitrate. So they improved the exploit by forcing the CPU driver to vary the shader clock frequency in one megahertz steps, allowing them to implement higher throughput encoding schemes. You can hear the change in signal caused by different graphics being displayed in the video below; one doesn’t need much imagination to see how malware could leverage this to exfiltrate pretty much anything on the computer.

It’s a fascinating hack, and hats off to [Davidov] and [Oldenburg] for revealing this weakness. We’ll have to throw this on the pile with all the other side-channel attacks [Samy Kamkar] covered in his 2019 Supercon talk.

Continue reading “GPU Turned Into Radio Transmitter To Defeat Air-Gapped PC”

A CR2032 Battery Eliminator

Back when batteries were expensive and low-capacity, it was common to buy a “battery eliminator” that could substitute for common battery configurations. [David Watts] must remember those, because he decided to make an eliminator for all the CR2032 battery-driven gear he has. He got some brass blanks about the size of the battery, and you can see the results on the video below.

His first attempt seemed to work fairly well, a sandwich of two brass disks, each with a Velcro spacer and wires soldered on to connect to a power supply. The fake battery looks as though it might be a little thick, but it did work once the battery holder was persuaded to accept it.

Continue reading “A CR2032 Battery Eliminator”

Queue Up Your Tracks With A Well Placed Hexagon

Besides a few stalwart holdouts, most of us have have switched over listening to music in digital form, often via an online stream. As long as no data caps stand in your way, it’s a quick and easy way to listen to your favorite artists or discover new ones. But there’s something visceral about act of loading a piece of physical media into a player that can’t be replicated by just clicking or tapping on a screen.

Which is why [InfiniteVideo] put together this RFID playlist launcher peripheral. There’s an important distinction to be made here, as this device isn’t actually playing or even storing audio. A nearby Raspberry running Volumio handles the actual playback. This device is just an RFID reader with some clever tokens that the listener can use to select their favorite artists and albums with physical tokens. It’s certainly not a new concept, but we think the nuances of this particular build warrant a closer look.

The “player” consists of a ESP8266 with a MFRC522 RFID reader wired directly to the GPIO pins. The pair are housed in a rather large 3D printed enclosure, which at first might seem a bit excessive. But it turns out that [InfiniteVideo] is actually trying to replicate a crowd sourced project called Qleek which is based around a similarly chunky reader.

Likewise, the hexagon tiles are also lifted from the Qleek concept. But rather than being made out of wood as in the original, [InfiniteVideo] is printing those as well. Halfway during the process, the print is paused and an RFID sticker is placed in the middle of the hexagon. Once resumed, the RFID tag becomes permanently embedded in the tile with no visible seams to reveal how the trick was pulled off. With the addition of a suitable label, each printed hexagon gets associated with the desired album or artist in software.

This project is notable for its convenience and visual flair, but using RFID tags for media identification can also be a practical choice. It can be used as an assistive technology, or as a way for young children to easily interact with devices.