Improving 3D Printed Supports With A Marker

Anyone who’s spent some quality time with a desktop 3D printer is familiar with the concept of supports. If you’re working with a complex model that has overhanging features, printing a “scaffolding” of support material around it is often required. Unfortunately, supports can be a pain to remove and often leave marks on the finished print that need to be addressed.

Looking to improve the situation, [Tumblebeer] has come up with a very unique modification to the traditional approach that we think is certainly worthy of closer examination. It doesn’t remove theĀ need for support material, but it does make it much easier to remove. The method is cheap, relatively simple to implement, and doesn’t require multiple extruders or filament switching as is the case with something like water-soluble supports.

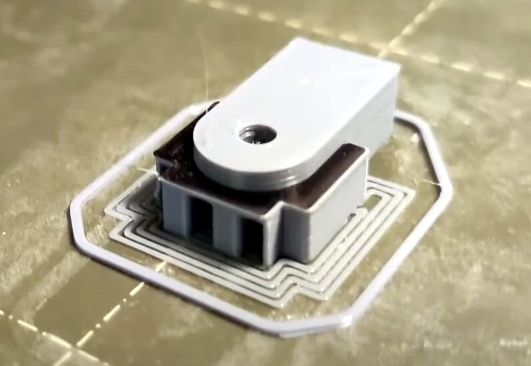
The trick is to use a permanent marker as a release agent between the top of the support and the area of the print it’s actually touching. The coating of marker prevents the two surfaces from fusing, while still providing the physical support necessary to keep the model from sagging or collapsing.

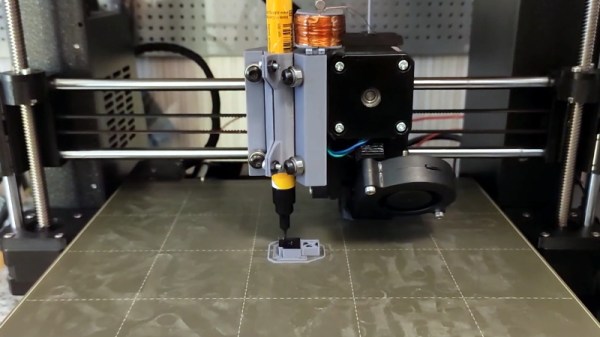
To test this concept, [Tumblebeer] has outfitted a Prusa i3 MK3S with a solenoid actuated marker holder that hangs off the side of the extruder assembly. The coil is driven from the GPIO pins of a Raspberry Pi running OctoPrint, and is engaged by a custom command in the G-code file. It keeps the marker out of the way during normal printing, and lowers it when its time to lay down the interface coating.

[Tumblebeer] says there’s still a bit of hand-coding involved in this method, and that some automated G-code scripts or a custom slicer plugin could streamline the process considerably. We’re very interested in seeing further community development of this concept, as it seems to hold considerable promise. Having a marker strapped to the side of the extruder might seem complex, but it’s nothing compared to switching out filaments on the fly.

Continue reading “Improving 3D Printed Supports With A Marker”

Hacking Dell Laptops To Use Off-Brand Chargers

Dell, along with many other manufacturers, have begun to implement smart features into their laptop charging circuitry. This leaves the user out of luck if they wish to use an off-brand part, or get caught short when their original charger fails. [Neutrino] was in just such a position, and decided to hack around the problem.

The laptop verifies the identity of the attached charger by a third pin. This communicates with a One-Wire IC embedded in the charger, which reports the charger’s identity when queried by the laptop. When [Neutrino]’s charger broke, an attempt was made to use an off-brand charger, with the third pin hooked up to the original failed unit. This tricked the laptop into charging successfully.

For a more permanent workaround, [Neutrino] harvested the One-Wire IC from inside the original charger, and instead hooked it up inside the laptop, directly to the charge port. Thus, the laptop always thinks a Dell charger is connected when power is applied. There is some risk, in that if the user plugs in a lower-power charger than the original, there could be an overload event, but that’s just the risk inherent in the hack.

It’s a tidy workaround for an annoying problem that is all too common in the post-DRM world. Laptop chargers are often prime candidates for failure too; we’ve seen fixes as creative as repairing a Magsafe with a pistacchio nut before!

[Thanks to Levi for the tip]

Ewon Is An Expressive Robot With Google Assistant

Had too much self-quarantine? [Sharathnaik] had, so he decided to build a robot companion named Ewon. Using a Raspberry Pi, Ewon isn’t a robot that moves around, but rather an expressive Google assistant. Using some servo-driven ears and a display, Ewon reacts to you based on keywords you use in your queries. For example, it might perk up and smile at the mention of ice cream. Or look unhappy if you mention sadness.

The project is simple because of the Google Assistant API. However, we liked the 3D printed body and some of the additional features the robot adds.

Continue reading “Ewon Is An Expressive Robot With Google Assistant”

Assemble Your (Virtual) Robotic Underground Exploration Team

It’s amazing how many things have managed to move online in recent weeks, many with a beneficial side effect of eliminating travel making them more accessible to everyone around the world. Though some events had a virtual track before it was cool, among them the DARPA Subterranean Challenge (SubT) robotics competition. Recent additions to their “Hello World” tutorials (with promise of more to come) have continued to lower the barrier of entry for aspiring roboticists.

We all love watching physical robots explore the real world, which is why SubT’s “Systems Track” gets most of the attention. But such participation is necessarily restricted to people who have the resources to build and transport bulky hardware to the competition site, which is just a tiny subset of all the brilliant minds who can contribute. Hence the “Virtual Track” which is accessible to anyone with a computer that meets requirements. (64-bit Ubuntu 18 with NVIDIA GPU) The tutorials help get us up and running on SubT’s virtual testbed which continues to evolve. With every round, the organizers work to bring the virtual and physical worlds closer together. During the recent Urban Circuit, they made high resolution scans of both the competition course as well as participating robots.

There’s a lot of other traffic on various SubT code repositories. Motivated by Bitbucket sunsetting their Mercurial support, SubT is moving from Bitbucket to GitHub and picking up some housecleaning along the way. Together with the newly added tutorials, this is a great time to dive in and see if you want to assemble a team (both of human collaborators and virtual robots) to join in the next round of virtual SubT. But if you prefer to stay an observer of the physical world, enjoy this writeup with many fun details on systems track robots.

Telco Curio Hacked Into Simple Counter

The tikkenteller was a device used to measure the duration of telephone use. 70 Volts were sent down the telephone line at 50Hz to run an electromechanical counter, and the devices were often used in communal areas where several users shared a single phone. [Charles Babbadge] decided to repurpose the stout 1950s hardware into a simple counter.

The build uses an ATtiny13 to generate pulses for the original hardware, when receiving inputs from the tikkenteller’s buttons. A solid state relay is triggered by the microcontroller, which connects the original solenoid to mains power to jog the counter. An HLK-PM01 5V power supply is used to run the micro, allowing the entire project to run off a single mains supply.

It’s a big, heavy, beautiful hunk of metal, built in a style that we simply don’t see anymore. It’s in no way the cheapest or most efficient counter you could build, but it’s got a charm you can’t find on more modern hardware. You could use such a device to track your Youtube subs, that is… if the API hadn’t broken that for everyone. Video after the break.

Continue reading “Telco Curio Hacked Into Simple Counter”

Breathing New Life Into Old School ThinkPad Keyboards

The ThinkPad is generally considered the unofficial laptop of hackerdom, so it’s no surprise that we see plenty of projects focused on repairing and modifying these reliable workhorses. But while we usually see folks working on relatively modern incarnations of this iconic line of computers, this project by [Frank Adams] and [Brian Chan] shows that the hacker’s love affair with the ThinkPad stretches back farther than many might realize.

As explained on the project’s Hackaday.io page, the duo have produced an open hardware board that will allow you to take the keyboard and trackpoint from a late ’90s ThinkPad 380ED and use it as a standard USB input device on a modern computer. According to [Frank], the keyboards on these machines are notable for having full-size keys rather than the “chicklet” boards that are so common today.

Now you may be wondering why this is significant. After all, we’ve seen plenty of projects that hook up an old keyboard to a USB-equipped microcontroller to get them speaking the lingua franca. Well, the trick here is that the trackpoint on these older ThinkPads actually required additional circuitry on the motherboard to function. The keyboard features three separate FPC connections for the matrix, the trackpoint buttons, and the analog strain gauges in the trackpoint itself.

After a considerable amount of reverse engineering, [Frank] and [Brian] have developed a board that uses the Teensy 3.2 to turn this plethora of pins into something useful. In the video after the break, you can see the new composite USB device working perfectly on a modern Windows computer.

It will probably come as little surprise to find that [Frank] is no stranger to hacking ThinkPad keyboards. In 2018 we covered a similar adapter he built for the far more modern T61, which was an absolute cakewalk by comparison.

Continue reading “Breathing New Life Into Old School ThinkPad Keyboards”

Simple Sprite Routines Ease Handheld Gaming DIY

Making your own handheld games is made much easier with [David Johnson-Davies’] simple sprite routines for the Adafruit PyBadge and PyGamer boards. Sprites can be thought of as small, fixed-size graphical objects that are drawn, erased, moved, and checked for collision with other screen elements.

xorSprite() plots an 8×8 sprite, moveSprite() moves a given sprite by one pixel without any flicker, and hitSprite() checks a sprite for collision with any screen elements in a given color. That is all it takes to implement a simple game, and [David] makes them easy to use, even providing a demo program in the form of the rolling ball maze shown here.

These routines work out-of-the-box with the PyBadge and PyGamer, but should be easy to adapt to any TFT display based on the ST7735 controller. The PyGamer is the board shown here, but you can see the PyBadge as it was used to create an MQTT-enabled conference badge.

If you really want to take a trip down the rabbit hole of sprite-based gaming graphics, you simply can’t miss hearing about the system [Sprite_TM] built into the FPGA Game Boy badge.