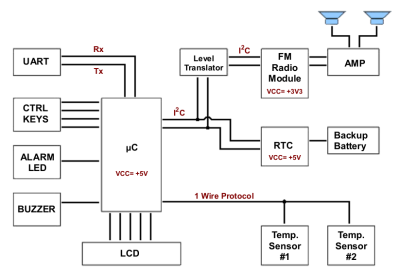
[CoreWeaver] creates an alarm clock that includes features one might expect in such a project, including an FM radio, snooze button inputs and a display, but goes beyond the basic functionality to include temperature sensing and a PC connection, opening the way for customizable functionality.
An Atmega328 is used for the main microcontroller which communicates via I2C both to a DS1307 real time clock (RTC) and a TEA5767 FM module. The main power comes from a 9V power source with an LM317 and LM7805 linear regulators providing a 3.3V and 5V power rail, respectively. Most of the electronics are powered using 5V except for the TEA5767, which is powered from the 3.3V rail and has its I2C communication levels shifted from 5V to 3.3V. The audio output of the TEA5767 feeds directly into the TDA7052 audio amplifier to drive the speakers. Since the RTC has an auxiliary coin cell battery for power, the alarm clock can keep accurate time even when not plugged in. Continue reading “IO Connected Radio Alarm Clock”→
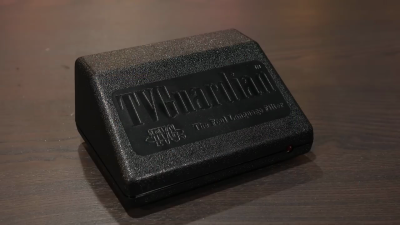
The recent flurry of videos and posts about the TVGuardian foul language filter brought back some fond memories. I was the chief engineer on this project for most of its lifespan. You’ve watched the teardowns, you’ve seen the reverse engineering, now here’s the inside scoop.
Back in 1999, my company took on a redesign project for the TVG product, a box that replaced curse words in closed-captioning with sanitized equivalents. Our first task was to take an existing design that had been produced in limited volumes and improve it to be more easily manufactured.
The original PCB used all thru-hole components and didn’t scale well to large quantity production. Replacing the parts with their surface mount equivalents resulted in Model 101, internally named Gumby for reasons long lost. If you have a sharp eye, you will have noticed something odd about two parts on the board as shown in [Ben Eater]’s video. The Microchip PIC and the Zilog OSD chip had two overlapping footprints, one for thru-hole and one for SMD. Even though we preferred SMD parts, sometimes there were supply issues. This was a technique we used on several designs in our company to hedge our bets. It also allowed us to use a socketed ICs for testing and development. Continue reading “The Story Behind The TVGuardian Curse Catcher”→
Electric vehicles are now commonplace on our roads, and charging infrastructure is being built out across the world to serve them. It’s the electric equivalent of the gas station, and soon enough, they’re going to be everywhere.
However, it raises an interesting problem. Gas pumps simply pour a liquid into a hole, and have been largely standardized for quite some time. That’s not quite the case in the world of EV chargers, so let’s dive in and check out the current state of play.
AC, DC, Fast, or Slow?
Since becoming more mainstream over the past decade or so, EV technology has undergone rapid development. With most EVs still somewhat limited in range, automakers have developed ever-faster charging vehicles over the years to improve practicality. This has come through improvements to batteries, controller hardware, and software. Charging tech has evolved to the point where the latest EVs can now add hundreds of miles of range in under 20 minutes.
However, charging EVs at this pace requires huge amounts of power. Thus, automakers and industry groups have worked to develop new charging standards that can deliver high current to top vehicle batteries off as quickly as possible.
As a guide, a typical home outlet in the US can deliver 1.8 kW of power. It would take an excruciating 48 hours or more to charge a modern EV from a home socket like this.
In contrast, modern EV charge ports can carry anywhere from 2 kW up to 350 kW in some cases, and require highly specialized connectors to do so. Various standards have come about over the years as automakers look to pump more electricity into a vehicle at greater speed. Let’s take a look at the most common options out in the wild today. Continue reading “EV Charging Connectors Come In Many Shapes And Sizes”→
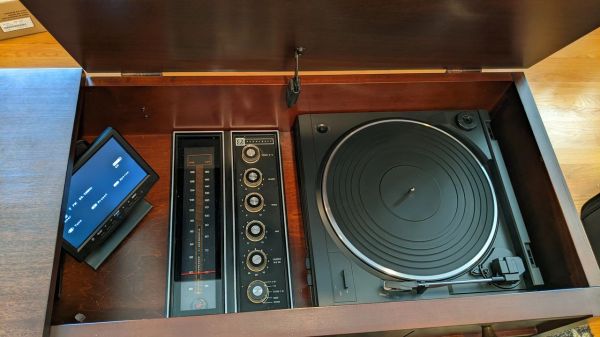
Faced with an old console stereo from the 1960s that was barely functional, [Sherman Banks] aka W4ATL decided to upgrade its guts while keeping its appearance as close to the original as possible. This stereo set is a piece of mahogany furniture containing an AM/FM stereo receiver and an automatic turntable from JCPenny’s Penncrest line. As best [Sherman] can determine, it is most likely a 1965 model. The old electronics were getting more and more difficult to repair and the tuner was drifting off-station every 15 minutes. He didn’t want to throw it away, so he decided to replace all the innards.
The first thing was to tear out the old electronics while retaining the chassis proper. The new heart of the entertainment center is a modern Denon AV stereo receiver. This unit can be controlled over Ethernet, has a radio tuner, inputs for SiriusXM and a turntable, and supports Bluetooth streaming. [Sherman] next replaced the 1965 turntable, and then turned his attention to connecting up the controls and indicators.
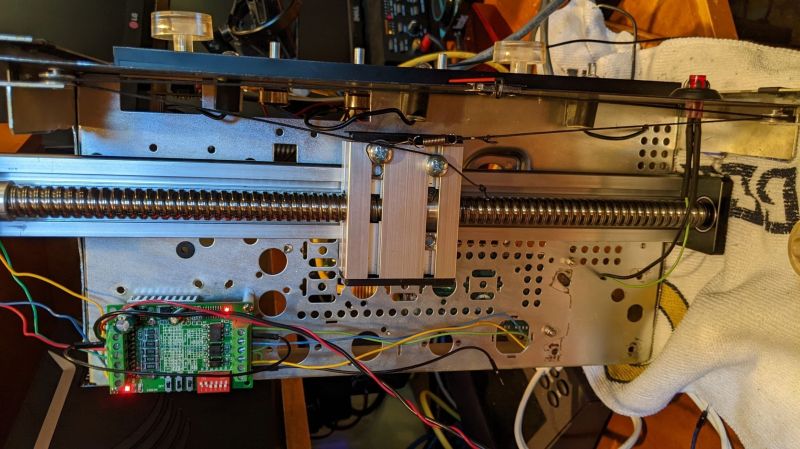
The potentiometers were replaced with equivalent ones of lower resistance, the neon stereo indicator was replaced with an LED, but the linear tuning dial proved to be a nearly two month challenge and resulted in a cool hack. In brief, he connected an optical rotary encoder to the tuning knob and used a stepper motor with a linear actuator to control the dial indicator. All this is controlled from an Arduino Mega 2560 with three shields for I/O and LAN. But there was still one remaining issue — without vacuum tubes to warm up, the radio would play immediately after power-on. [Sherman] fixed that by programming the Arduino to slowly ramp up the volume at the same rate as the original tube receiver. And finally, he installs a small HDMI monitor in the corner to display auxiliary information and metadata from the Denon receiver.
When facing a malware situation, the usual “guaranteed solution” is to reinstall your OS. The new developments in malware world will also require you to have a CH341 programmer handy. In an arguably inevitable development, [Kaspersky Labs] researchers have found an active piece of malware, out in the wild, that would persist itself by writing its bootstrap code into the BIOS chip. It doesn’t matter if you shred the HDD and replace it with a new one. In fact, so-called MoonBounce never really touches the disk at all, being careful to only store itself in RAM, oh, and the SPI flash that stores the BIOS code, of course.
MoonBounce is Microsoft-tailored, and able to hook into a chain of components starting from the UEFI’s DXE environment, through the Windows Loader, and finishing as a part of svchost.exe, a process we all know and love.
This approach doesn’t seem to be widespread – yet, but it’s not inconceivable that we’ll eventually encounter a ransomware strain using this to, ahem, earn a bit of extra cash on the side. What will happen then – BIOS reflashing service trucks by our curbsides? After all, your motherboard built-in BIOS flasher UI is built into the same BIOS image that gets compromised, and at best, could be disabled effortlessly – at worst, subverted and used for further sneaky persistence, fooling repairpeople into comfort, only to be presented with one more Monero address a week later.
Will our hardware hacker skills suddenly go up in demand, with all the test clip fiddling and SOIC-8 desoldering being second nature to a good portion of us? Should we stock up on CH341 dongles? So many questions!
This week’s installment of “threat vectors that might soon become prevalent” is fun to speculate about! Want to read about other vectors we might not be paying enough attention to? Can’t go wrong with supply-chain attacks on our repositories! As for other auxiliary storage-based persistence methods – check out this HDD firmware-embedded proof-of-concept rootkit. Of course, we might not always need the newfangled ways to do things, the old ways still work pretty often – you might only need to disguise your malicious hardware as a cool laptop accessory to trick an average journalist, even in a hostile environment.
Although the Nintendo 64 console has in the minds of many been relegated to the era of ‘firmly obsolete graphics’, since its graphic processor’s (GPU’s) lineage traces directly to the best which SGI had to offer in the 1990s, it too supports a range of modern features, including dynamic shadows. In a simple demo, [lambertjamesd] demonstrates how this feature is used.
As can be seen in the demonstration video (linked after the break), this demo features a single dynamic light, which casts a shadow below the central object in the scene, with a monkey object floating around that casts its own shadow (rendered into an auxiliary frame buffer). This auxiliary buffer is then blended into the main buffer, as explained by [ItzWarty] over at /r/programming on Reddit.
This effectively means that the main scene uses a shadow volume, which was used extensively with Doom 3. The primary reasons for why the N64 didn’t use shadow volumes all over the place was due to the limitations this places on the shadow caster (objects) in the scene, such as the need to be convex, and overlap is likely to lead to artifacts and glitches.
Doom 3 would fix this with the use of a stencil buffer that would further refine the basic dynamic lighting support on the N64, which ultimately would lead to the fancy video game graphics we have today. And which no doubt will look properly obsolete in another decade again, as usual.
If you’re an automotive enthusiast of taste, you can’t stand the idea of fitting a janky aftermarket stereo into your nice, clean ride. Flashy, modern head units can spoil the look of a car’s interior, particularly if the car is a retro, classic, or vintage ride.
Thus, we’re going to look at how to modify your existing stock car stereo to accept an auxiliary cable input or even a Bluetooth module. This way, you can pump in the latest tunes from your smartphone without a fuss, while still maintaining an all-original look on the dash.
Fundamentals
A simple Bluetooth module designed for wiring into car audio systems. There are two wires for 12 V power from the vehicle, and the audio signal is sent out over the RCA plugs. The RCA plugs can be cut off and the module hard wired inside your stereo if you have room. Cutting off the plastic case can help too.
Depending on your choice of audio player, you may prefer a 3.5 mm aux jack, or you might want to go with Bluetooth audio if your smartphone no longer has a headphone port. Whichever way you go, the process of modifying the stereo is largely the same. To achieve your goal, you need to find a way of injecting the audio signal into the head unit’s amplifier stage, while making sure no other audio sources are getting sent there as well.
Whether that audio source is a 3.5 mm jack or a Bluetooth module doesn’t matter. The only difference is, in the latter case, you’ll want to buy a Bluetooth module and hardwire it in to the auxiliary input you create, while also splicing the module into the stereo’s power supply. In the case of a simple headphone jack input, you simply need to wire up an aux cord or 3.5 mm jack somewhere you can get to it, and call it done.
This guide won’t cover every stereo under the sun, of course. Edge cases exist and depending on the minute specifics of how your original car radio works, these exact methods may or may not work for you. However, this guide is intended to get you thinking conceptually about how such mods are done, so that you can investigate the hardware in front of you and make your own decisions about how to integrate an external audio input that suits your usage case. Continue reading “How To Modify Your Car Stereo For Bluetooth Or Aux-In”→