A silver front loader cargo bike sits in a parking lot in front of an electric vehicle charger. A cable runs from the charger to the bike.

Fast Charging A Cargo Bike From An Electric Car Charger

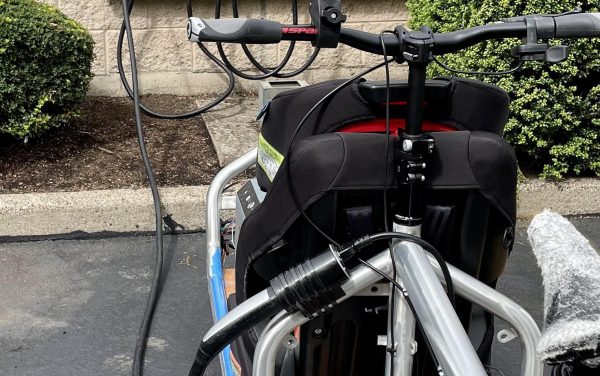
Fast charging is all the rage with new electric cars touting faster and faster times to full, but other EVs like ebikes and scooters are often left out of the fun with exceedingly slow charging times. [eprotiva] wanted to change this, so he rigged up a fast charging solution for his cargo bike.

Level 2 electric vehicle chargers typically output power at 7 kW with the idea you will fill up your electric car overnight, but when converted down to 60 V DC for a DJI Agras T10 battery, [eprotiva] is able to charge from 20% to 100% capacity in as little as 7 minutes. He originally picked this setup for maxing the regen capability of the bike, but with the high current capability, he found it had the added bonus of fast charging.

The setup uses a Tesla (NACS) plug since they are the most plentiful destination charger, but an adapter allows him to also connect to a J1772 Type 1 connector. The EV charging cable is converted to a standard 240 V computer cable which feeds power to a drone charger. This charger can be set to “fast charge” and then feeds into the battery unit. As an added bonus, many chargers that do cost money don’t start charging until after the first five minutes, so the bike is even cheaper to power than you’d expect.

For some reason, you can watch him do this on TikTok too.

If you too want to join the Personal EV Revolution, be sure to checkout how to choose the right battery for your vehicle and a short history of the Segway.

A Paste Extruder For Normal Printers

In the bright sunshine of a warm spring afternoon at Delft Maker Faire, were a row of 3D printers converted with paste extruders. They were the work of [Nedji Yusufova], and though while were being shown printing with biodegradable pastes made from waste materials, we were also interested in their potential to print using edible media.

The extruder follows a path set by similar ones we’ve seen before in that it uses a disposable syringe at its heart, this time in a laser-cut ply enclosure and a lead screw driven by a stepper motor. It’s part of a kit suitable for run-of-the-mill FDM printers that’s available for sale if you have the extra cash, but happily they’ve also made all the files available.

We’ve seen quite a few syringe extruders and at least one food printer, so there’s nothing particularly new about this one. What it does give you is a relatively straightforward build and a ready integration with some mass market printers you might be familiar with. Perhaps the most interesting part of this project isn’t even the extruder itself but the materials, after all having a paste extruder gives you the opportunity to experiment with new recipes. We like it.

Fool A Drone With A Fixed Battery

Lithium-ion and lithium-polymer rechargeable batteries have given us previously impossible heights of electronics power and miniaturization, but there’s a downside they have brought along with them. When a battery pack has to contain electronics for balancing cells, it’s very easy for a manufacturer to include extra functions such as locking down the battery. Repair a battery, replace cells, or use a third-party battery, and it won’t work. [Zolly] has this with a DJI Mavic Mini pack, and shares with us a method for bypassing it.

The pack talks to the multi-rotor with a serial line, and the hack involves interrupting that line at the opportune moment to stop it telling its host that things are amiss. Which is a good start — but we can’t help hacing some misgivings around the rest of the work. Disconnecting the balance line between the two cells and fooling the Battery Management System (BMS) with a resistive divider seems to us like a recipe of disaster, as does bypassing the protection MOSFETs with a piece of wire. It may work, and in theory the cells can be charged safely with an external balance charger, but we’re not sure we’d like to have a pack thus modified lying around the shop.

It does serve as a reminder that BMS boards can sometimes infuriatingly lock their owners out. We once encountered this with a second-generation iBook battery that came back to life after a BMS reset, but it’s still not something to go into unwarily. Read our guide to battery packs and BMS boards to know more.

Continue reading “Fool A Drone With A Fixed Battery”

Hackaday Links Column Banner

Hackaday Links: October 9, 2022

Don’t you just hate it when you walk out of the bathroom with toilet paper stuck to your shoe? That’s a little bit like what happened when the Mars helicopter Ingenuity picked up a strange bit of debris on one of its landing pads. The foreign object was spotted on the helicopter’s down-pointing navigation camera, and looks for all the world like a streamer of toilet paper flopping around in the rotor wash. The copter eventually shed the debris, which wafted down to the Martian surface with no further incident, and without any apparent damage to the aircraft. NASA hasn’t said more about what the debris isn’t — aliens — than what it is, which of course is hard to say at this point. We’re going to go out on a limb and say it’s probably something we brought there, likely a scrap of plastic waste lost during the descent and landing phase of the mission. Or, you know, it’s getting to be close to Halloween, a time when the landscape gets magically festooned with toilet paper overnight. You never know.

Continue reading “Hackaday Links: October 9, 2022”

R2Home Is Ready To Bring Back Your High Altitude Payload

With high-altitude ballooning, you are at the mercy of the winds, which can move your payload hundreds of kilometers and deposit it in some inaccessible spot. To solve this [Yohan Hadji] created R2Home, an autonomous parachute-based recovery system that can fly a payload to any specified landing site within its gliding range.

We first covered R2Home at the start of 2021, when he was still in the early experimental phases, but the project has matured massively since then. It just completed its longest and highest test flight. Descending autonomously from a release altitude of 3500 m, with an additional radiosonde payload, it landed within 5 m of the launch point.

R2Home electronics with it's insulated enclosure
R2Home electronics with its insulated enclosure

R2Home can fly using a variety of steerable canopies, even a DIY ram-air parachute, as demonstrated in an earlier version. [Yohan] is currently using a high-performance wing for RC paragliders.

A lot of effort went into developing a reliable parachute deployment system. The main canopy is packed carefully in a custom “Dbag”, which is attached to a drogue chute to stabilize the system during free-fall and deploy the main canopy at a preset altitude. This is done with a servo operated release mechanism, while steering is handled by a pair of modified winch servos intended for RC sailboats.

All the electronics are mounted on a stack of circular 3D printed brackets which fit in a tubular housing, bolted together with threaded rods. With the help of a design student [Yohan] also upgraded the simple tube housing to a lockable, foam-insulated design to help it handle temperatures at high altitudes.

The flight main flight computer is a Teensy 4.1  plugged into a custom PCB to connect all the navigation, communication, and flight systems. The custom Arduino-based autopilot takes inputs from a GPS receiver, and pilots the system to the desired drop zone, which it circles until touchdown.

The entire project is extremely well documented, and all the design files and code are open source and available on Github. Continue reading “R2Home Is Ready To Bring Back Your High Altitude Payload”

Old Printer Becomes Direct Laser Lithography Machine

What does it take to make your own integrated circuits at home? It’s a question that relatively few intrepid hackers have tried to answer, and the answer is usually something along the lines of “a lot of second-hand equipment.” But it doesn’t all have to be cast-offs from a semiconductor fab, as [Zachary Tong] shows us with his homebrew direct laser lithography setup.

Most of us are familiar with masked photolithography thanks to the age-old process of making PCBs using photoresist — a copper-clad board is treated with a photopolymer, a mask containing the traces to be etched is applied, and the board is exposed to UV light, which selectively hardens the resist layer before etching. [Zach] explores a variation on that theme — maskless photolithography — as well as scaling it down considerably with this rig. An optical bench focuses and directs a UV laser into a galvanometer that was salvaged from an old laser printer. The galvo controls the position of the collimated laser beam very precisely before focusing it on a microscope that greatly narrows its field. The laser dances over the surface of a silicon wafer covered with photoresist, where it etches away the resist, making the silicon ready for etching and further processing.

Being made as it is from salvaged components, aluminum extrusion, and 3D-printed parts, [Zach]’s setup is far from optimal. But he was able to get some pretty impressive results, with features down to 7 microns. There’s plenty of room for optimization, of course, including better galvanometers and a less ad hoc optical setup, but we’re keen to see where this goes. [Zach] says one of his goals is homebrew microelectromechanical systems (MEMS), so we’re looking forward to that.

Continue reading “Old Printer Becomes Direct Laser Lithography Machine”

Slick Keyboard Built With PCB Magic

Sometimes a chance conversation leads you to discover something cool you’ve not seen before, and before you know it, you’re ordering parts for yet another hardware build. That’s what happened to this scribe the other day when chatting on some random discord, to QMK maintainer [Nick Brassel aka tzarc] about Djinn, a gorgeous 64-key split mechanical keyboard testbed. It’s a testbed because it uses the newest STM32G4x microcontroller family, and QMK currently does not have support for this in the mainline release. For the time being, [Nick] maintains a custom release, until it gets merged.

Hardware-wise, the design is fabulous, with a lot of attention to detail. We have individual per-key RGB LEDs, RGB underglow, a rotary encoder, a five-way tactile thumb switch, and a 240×320 LCD per half. The keyboard is based on a three PCB stack, two of which are there purely for structure. This slick design has enough features to keep a fair few of us happy.

Interestingly, when you look at the design files (KiCAD, naturally) [Nick] has chosen to take a mirrored approach to the PCB. That means the left and right sides are actually the same PCB layout. The components are populated on different sides of the PCB depending on which half you’re looking at! By mirroring footprints on both PCB sides, and hooking everything up in parallel, it’s possible to do it all with a single master layout.

This is a simple but genius idea that this scribe hadn’t come across before (the shame!) Secondarily it keeps costs down, as your typical Chinese prototyping house will not deal in PCB quantities below five, so you can make two complete keyboards on one order, rather than needing two orders to make five. (Yes, there are actually three unique PCBs, but we’re simplifying the situation, ok?)

Now, if only this pesky electronics shortage could abate a bit, and we could get the parts to build this beauty!

Obviously, we’ve covered many, many keyboards over the years. Here’s our own [Kristina’s] column all about the things. If you need a little help with your typing skills, this shocking example may be the one for you. If your taste is proper old-school clackers, there’s something for everyone.