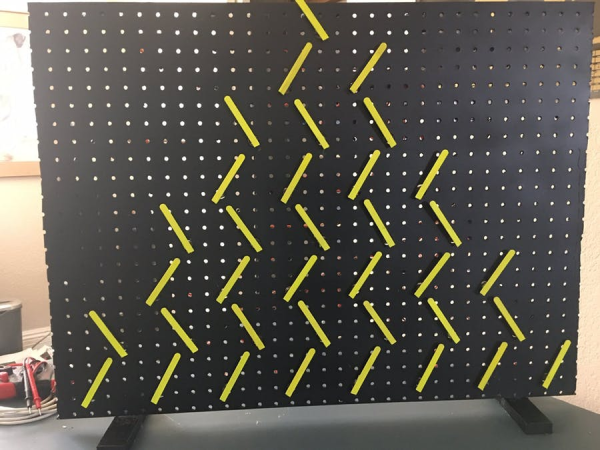
There Are 200 Electronic Kits In That Box

If you grew up in the latter part of the 20th century, you didn’t have the Internet we have today — or maybe not at all. What you did have, though, was Radio Shack within an hour’s drive. They sold consumer electronics, of course, but they also sold parts and kits. In addition to specific kits, they always had some versions of a universal kit where lots of components were mounted on a board and you could easily connect and disconnect them to build different things. [RetoSpector78] found a 200-in-1 kit at a thrift store that was exactly like the one he had as a kid and he shares it with us in the video below.

This was a particularly fancy model since it has a nice looking front panel with a few knobs and displays. The book shows you how to make the 200 different projects ranging from metronomes to rain detectors. The projects really fell into several categories. There were practical circuits like radio receivers, test equipment, and transmitters. Then there were games or circuits even the manual called “silly.” In addition, there were circuits to build simply to understand how they work, like flip flops or counters.

Continue reading “There Are 200 Electronic Kits In That Box”

This 3D Printed LED Softbox Really Shines

Generally speaking, objects made on desktop 3D printers are pretty small. This is of course no surprise, as filament based printers are fairly slow and most don’t have very large beds to begin with. Most people don’t want to wait days for their project to complete, so they use 3D printed parts where it makes sense and supplement them with more traditional components such as aluminum extrusion wherever possible. But not always…

This 3D printed photography softbox created by [Nicholas Sherlock] doesn’t take the easy way out for anything. With the exception of the LEDs and the electronics to drive them, everything in the design has been printed on his Prusa i3. It wasn’t the easiest or fastest way to do it, but it’s hard to argue with the end result. Perhaps even more impressive than the final product is what it took to get there: he actually had to develop a completely new style of part infill he’s calling “Scattered Rectilinear” to pull it off.

Overall the design of the light itself isn’t that complex, ultimately it’s just a box with some LEDs mounted at the back and a pretty simple circuit to control their intensity. The critics will say he could have just used a cardboard box, or maybe wood if he wanted something a little bit stronger. But the point of this project was never the box itself, or the LEDs inside it. It’s all about the diffuser.

[Nicholas] forked Prusa’s version of Slic3r to add in his “Scattered Rectilinear” infill pattern, which is specifically designed to avoid the standard “ribs” inside of a 3D printed object. This is accomplished with randomized straight infill passes, rather than the traditionally overlapped ones. The inside of the print looks very reminiscent of fiberglass mat, which is perhaps the best way to conceptualize its construction. In terms of the final part strength, this infill is abysmal. But on the plus side, the light from the LEDs passing through it emerges with a soft pleasing look that completely obscures the individual points of light.

Anyone with a big enough 3D printer can run off their own copy of his light, as [Nicholas] has released not only his forked version of Slic3r but all of the STL files for the individual components. He’s also put together an exceptionally well documented Thingiverse page that has instructions and detailed build photos, something that’s unfortunately very rare for that platform.

If you’re in the market for a DIY softbox and don’t have a 3D printer handy, fear not. We’ve covered a few that you can build with more traditional methods, as well as several tips and tricks which you can use to get the most out of your photos and videos.

Automated Radiosonde Tracking Via Open Source

Meteorological organisations across the world launch weather balloons on a regular basis as a part of their work in predicting whether or not it will rain on the weekend. Their payloads are called radiosondes, and these balloons deliver both telemetry and location data throughout their flightpath. Hobbyists around the globe have devoted time and effort to tracking and decoding these signals, and now it’s possible to do it all automatically, thanks to Radiosonde Auto RX.

The basis of the project is the RTL-SDR, everyone’s favourite low-cost software defined radio receiver. In this case, software is used to first hunt for potential radiosonde signals, before then decoding them and uploading the results to a variety of online services. Some of these are designed for simple tracking, while others are designed for live chase and recovery operations. Currently, the software only covers 3 varieties of radiosonde, but the team are eager to expand the project and have requested donations of other radiosondes for research purposes.

The team recently conducted a talk at linux.conf.au regarding the project, which goes into detail as to the decoding and tracking of the radiosonde data. If you’re eager to try it out, download the software, fetch your TV dongle and get cracking. You might also consider tracking cubesats while you’re at it. Video after the break.

via [crazyoperator], thanks to Slds Ernesto for the tip!

Continue reading “Automated Radiosonde Tracking Via Open Source”

Hidden LED Video Wall At The Oregon Museum Of Science

Glowing and blinking things are some of our favourite projects around these parts, and the bigger, the better. [Thomas] wrote to us recently to share the design and construction of a large LED wall at the Oregon Museum of Science, and the results are nothing short of impressive.

The concept involved a large LED wall that would be completely hidden when switched off. The team decided to approach this by hiding high-brightness LED panels using APA102 strings behind milky-white plexiglass panels covered with a woodgrain print. The screen has a total of 90,000 pixels, arranged in a 408×220 resolution display.

A lot of bespoke LED displays have some pre-coded patterns, or perhaps some basic reactive features. In this case, FPGA grunt was brought to bear on the problem and the display accepts standard HDMI input. Four Spartan 6 Mojo FPGA boards split up the task of addressing the panels, each receiving the same HDMI signal, but only crunching the pixels relevant to their area of the display. To make sure clean SPI signals get to each panel, special RS485 driver chips are used to send the signal over a differential pair from the FPGA, before breaking the signal back out to standard SPI at the destination.

Building such a large display takes special techniques, and [Thomas] notes that the help of a local construction company was imperative to making the construction of the final video wall look easy. It’s always interesting to see what goes into these large installations. Sometimes, a major build can even clear out world stocks of important components.

Kinematic Mount For 3D Printer Bed Shows Practical Design

Aluminum bed with new kinematic mount and base on printer Son of Megamax, at the Milwaukee Makerspace

[Mark Rehorst] has been busy designing and building 3D printers, and Son of Megamax — one of his earlier builds — needed a bed heater replacement. He took the opportunity to add a Kelvin-type kinematic mount as well. The kinematic mount and base efficiently constrain the bed in a controlled way while allowing for thermal expansion, providing a stable platform that also allows for removal and repeatable re-positioning.

After a short discussion regarding the heater replacement, [Mark] explains the design and manufacture of his kinematic mount. Of particular note are the practical considerations of the design; [Mark] aimed to use square aluminum tubing as much as possible, with machining requirements that were easily done with the equipment he had available. Time is a resource after all, and design decisions that help one get something working quickly have a value all their own.

If you’re still a bit foggy on kinematic mounts and how they work, you’re not alone. Check out our coverage of this 3D-printed kinematic camera mount which should make the concept a bit clearer.

Play Chess Like Harry Potter

If you are a Harry Potter fan, you might remember that one of the movies showed an Isle of Lewis chess set whose pieces moved in response to a player’s voice commands. This feat has been oft replicated by hackers and [amoyag00] has a version that brings together a Raspberry Pi, Arduino, Android, and the Stockfish chess engine in case you want to play by yourself. You can see a video of the game, below.

Interestingly, the system uses Marlin — the 3D printing software — to handle motion using the Arduino. We suppose moving chess pieces over a path isn’t much different than moving a print head. It is certainly a novel use of GCode.

Continue reading “Play Chess Like Harry Potter”

Power Supply Design For Clean Jazz Amps

Power supply design is a broad field, requiring entirely different tools and techniques depending on what you’re working with. Creating a low-cost and compact mobile phone charger is a completely different ball game to designing the power supply for a medium-sized laser cutter, for example. [Vasily Ivanenko] has been designing a power supply for a clean jazz guitar amplifier, and has helpfully documented the process.

For a guitar amplifier which prides itself on clean tones, it’s highly important to avoid all sources of noise, to let the natural sound of the guitar come through as clearly as possible. [Vasily] notes that this requires careful component selection, as well as consideration of the placement of key parts and the construction of the power supply. Strategies to minimise inductive and capacitive coupling are discussed, as well as grounding schemes to minimise undesirable hum or buzz during amplifier operation.

The article is the first of a three part series, in which [Vasily] will then cover the full design of the guitar amp, including a focus on the design of the power amplifier stage. We’ve seen some of [Vasily]’s work before, like this discussion of how to build high quality audio amplifiers for ham radio use.