Vacuum-Powered Rotary Tool Redux, This Time Machined

We love to see projects revisited, especially when new materials or methods make it worth giving the first design another go around. This twin-turbine vacuum-powered Dremel tool is a perfect example of what better tools can do for a build.

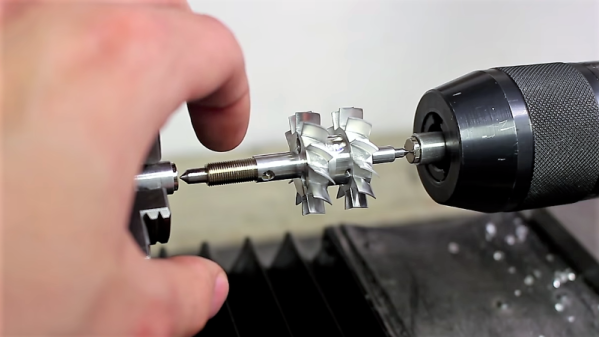
You may recall [JohnnyQ90]’s first attempt at a vacuum powered rotary tool. That incarnation, very similar in design to the current work, was entirely 3D-printed, and caused no little controversy in the comments about the wisdom of spinning anything made on an FDM printer at 43,000 RPM. Despite the naysaying, [Johnny] appears to have survived his own creation. But the turbo-tool did have its limitations, including somewhat anemic torque. This version, machined rather than printed and made almost completely from aluminum, seems to have solved that problem, perhaps thanks to the increased mass of the rotating parts. The twin rotors and the stator were milled with a 5-axis CNC machine, which has been a great addition to [JohnnyQ90]’s shop. The turbine shaft, looking like something from a miniature jet engine, was meticulously balanced using magnets mounted in the headstock and tailstock of a lathe. The video below shows the build and a few tests; we’re not big fans of the ergonomics of holding the tool on the end of that bulky hose, but it sure seems to work well. And that sound!

We first noticed [JohnnyQ90] when he machined aluminum from soda cans to make a mini Tesla turbine. His builds have come a long way since then, and we look forward to what he’ll come up with next.

Continue reading “Vacuum-Powered Rotary Tool Redux, This Time Machined”

Teardown Of A Luxury Bluetooth Nightlight

If you had asked us yesterday what peak nightlight technology looked like, we might have said one of those LED panels that you stick in the outlet. At least it beats one of those little wimpy light bulbs behind the seashell, anyway. But after looking at a detailed teardown of the “Glow Light” from Casper, we’ve learned a lot about the modern nightlight. Such as the fact that there are adults who not only sleep with nightlights, but are willing to pay $89 USD for one.

But more importantly, as [Tyler Mincey] demonstrates in his excellent look inside one of these high-end nightlights, they are gorgeous pieces of engineering. Even if a nightlight next to the bed has long since gone the way of pajamas with feet on them for you personally, we think you’ll be impressed just how much technology has gone into these softly glowing gadgets.

On the outside they might look like marshmallows, but the insides look far more like what you’d expect from an expensive piece of consumer gear. It’s based on the Nordic nRF52832 Bluetooth SoC which is becoming an increasingly common sight in consumer gadgets, and uses an inertial measurement unit (IMU) to detect when it’s moved or twisted and adjusts the light output accordingly. If you’ve got the disposable income for two of these things, they’ll even synchronize so that twisting one will dim its counterpart.

The teardown that [Tyler] did on the Glow Light is quite frankly one of the best we’ve ever seen, and while it might be a bit light on the gritty technical details, it more than makes up for that with the fantastic pictures that are about as close to actual hardware porn as you can get. The only question we have now is, how long until a hacker replicates this design with a 3D printed enclosure and an ESP?

[Thanks to Adrian for the tip.]

Zach Archer: Live Coding 500 Watts For ToorCamp

ToorCamp is a five-day open air tech camping event held every two years somewhere around the northwest corner of Washington state. Think of it as something like Burning Man, except you can survive for three hours without water, there aren’t a whole bunch of scenesters and Instagram celebs flying in on private planes, and everyone there can actually build something. Oh, and ToorCamp has delivery drones that will send you creme brulee. These mini creme brulees were probably made with the hot air gun hanging off a soldering station. Don’t worry, you’re getting fresh air that’ll balance out the heavy metal poisoning.

For last year’s ToorCamp, the biggest welcome sign was a 40-foot-long illuminated ToorCamp sign. This was designed, built and coded by Zach Archer, and he was at the 2018 Hackaday Superconference to give us the details on how he made it and how it was coded.

Continue reading “Zach Archer: Live Coding 500 Watts For ToorCamp”

Computer Algebra For Electronic Design

Don’t get me wrong. Like most people, there’s nothing I enjoy more than solving a long, involved math problem by hand. But, sometimes, a few pages of algebraic scratches on paper is just a means to an end. I find this especially true during electronic design sessions, be it circuit design or PCB layout; I just need the answer, and any time spent finding it distracts me from the larger task at hand. For me, at least, this seems to happen at least once a week, and about five years ago I decided to do something about it. I had heard of computer algebra packages, of course, but they weren’t taught as part of the undergraduate engineering curriculum when I went to school. So, I set about learning one: let the computers do the math!

The package I chose is wxMaxima, a document-based front-end to the Maxima computer-algebra system. Descended from code originally written in the late 1960s, it’s a general-purpose package supporting symbolic computation for algebra and calculus. There’s solid, mature code underneath with a modern UI veneer on top. Plus, it’s FOSS.

As I’ve progressed, I’ve found that some additional functions make the Maxima environment especially convenient for circuit design. A few are simple enough that I’d typically just re-create them as needed, so I never really got organized – there were several versions of my “library” floating around on various machines. I finally got my act together, cleaned up the most-frequently used functions, and put them into a GitHub repo.

Let’s have a look at how we can use them to take the tedium out of math for some design problems.

Continue reading “Computer Algebra For Electronic Design”

Anodize Aluminum Easily

We’ve all seen brightly-colored pieces of aluminum and can identify them as anodized. But what does that mean, exactly? A recent video from [Ariel Yahni] starring [Wawa] — a four-legged assistant — shows how to create pieces like this yourself. You can see [Wawa’s] new dog tag, below.

[Ariel] found a lot of how to information on using sulphuric acid, but that’s dangerous stuff. One web page we covered years ago, though, discussed a safer chemistry. The process requires lye and a common pool chemical used to decrease pH. Sodium hydroxide isn’t super safe, but it is much less problem to buy, store, and use than battery acid.

Continue reading “Anodize Aluminum Easily”

Threading 3D Printed Parts: How To Use Heat-Set Inserts

We can make our 3D-printed parts even more capable when we start mixing them with some essential “mechanical vitamins.” By combining prints with screws, nuts, fasteners, and pins, we get a rich ecosystem for mechanism-making with capabilities beyond what we could simply print alone.

Today I’d like to share some tips on one of my favorite functional 3D-printing techniques: adding heat-set inserts. As someone who’s been installing them into plastic parts for years manually, I think many guides overlook some process details crucial to getting consistent results.

Make no mistake; there are a handful of insert guides already out there [1, 2]. (In fact, I encourage you to look there first for a good jump-start.) Over the years though, I’ve added my own finishing move (nothing exotic or difficult) which I call the Plate-Press Technique that gives me a major boost in consistency.

Join me below as I fill in the knowledge gaps (and some literal ones too) to send you back to the lab equipped with a technique that will give you perfectly-seated inserts every time.

Continue reading “Threading 3D Printed Parts: How To Use Heat-Set Inserts”

Does WiFi Kill Houseplants?

Spoiler alert: No.

To come to that conclusion, which runs counter to the combined wisdom of several recent YouTube videos, [Andrew McNeil] ran a pretty neat little experiment. [Andrew] has a not inconsiderable amount of expertise in this area, as an RF engineer and prolific maker of many homebrew WiFi antennas, some of which we’ve featured on these pages before. His experiment centered on cress seeds sprouting in compost. Two identical containers were prepared, with one bathed from above in RF energy from three separate 2.4 GHz transmitters. Each transmitter was coupled to an amplifier and a PCB bi-quad antenna to radiate about 300 mW in slightly different parts of the WiFi spectrum. Both setups were placed in separate rooms in east-facing windows, and each was swapped between rooms every other day, to average out microenvironmental effects.

After only a few days, the cress sprouted in both pots and continued to grow. There was no apparent inhibition of the RF-blasted sprouts – in fact, they appeared a bit lusher than the pristine pot. [Andrew] points out that it’s not real science until it’s quantified, so his next step is to repeat the experiment and take careful biomass measurements. He’s also planning to ramp up the power on the next round as well.

We’d like to think this will put the “WiFi killed my houseplants” nonsense to rest – WiFi can even help keep your plants alive, after all. But somehow we doubt that the debate will die anytime soon.

Continue reading “Does WiFi Kill Houseplants?”