The Smallest Homebrewed TTL CPU In The World

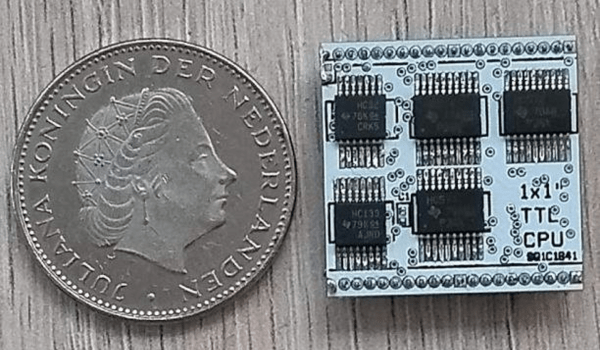
This may very well be the smallest homemade TTL CPU we’ve ever seen. Measuring at one square inch, this tiny chip boasts 40 connections, an 8-bit databus, a 16-bit address bus, a 64 kB memory space, reset and clock inputs, and 5 V power lines.

TTL (transistor transistor logic) logic chips are pretty outdated today, but they do have all of the basics necessary for building a computer – logic gates, counters, buffers, and registers. The transistors perform both the logic and amplifying, as compared to resistor-transistor logic (RTL) and diode-transistor logic (DTL). In the 60s, when the technology was still fairly new, TTL ICs were commonly used in computers and industrial controls. Even after the advent of VLSI, TTL ICs were still being used for interfacing more densely integrated chips. Even so, most TTL chips tend to be on the bulkier side, which is what makes [roelh]’s project so unique. The entire PCB is hardly any larger than a coin.

On top of the hardware specs, [roelh] also implemented several useful software features: zero page addressing, load/store/compare instructions, stacks, conditioning branching, subroutine calls, and memory-mapped I/O. The registers are also in RAM, which has been implemented in microprocessors in the past (see TMS9900) for speed considerations, but in this case was implemented for size constraints.

An ALU was also left out of the design in order to constrain its size, leaving only 8 ICs on either side of the 2-layer PCB.

Microprograms are stored in Flash memory and can be programmed with a Raspberry Pi. by saving the Assembly code to a memory card and downloading the assembled binary code. Once the Raspberry Pi is connected to the development board, you can burn the binary code onto the Flash memory of the board using a Python script. An online Javascript editor also exists for assembling the Assembly code for the chip and simulating the CPU.

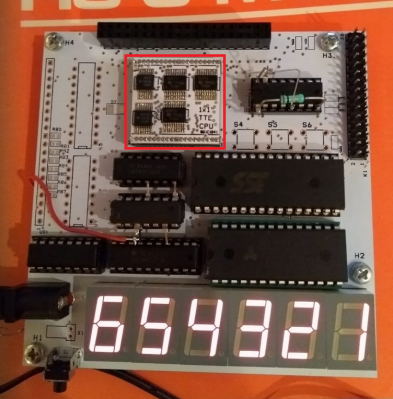
There is currently a development board made for the CPU, which includes six seven-segment displays and an I/O connector for running a digital clock and other applications. [roelh] has since built a retro TTL computer around the chip, which reintroduces the ALU and includes address registers, 256 KB of RAM, VGA video, PS/2 keyboard port, a sound system, and I/O pins. It’s a really exciting project that’s seriously pushing the constraints of retro computing.

RTFM: ADCs And DACs

It’s tough to find a project these days that doesn’t use an analog-to-digital converter (ADC) or digital-to-analog converter (DAC) for something. Whether these converters come as built-in peripherals on a microcontroller, or as separate devices connected over SPI, I2C, or parallel buses, all these converters share some common attributes, and knowing how to read the specs on them can save you a lot of headaches when it comes to getting things working properly.

There are some key things to know about these devices, and the first time you try to navigate a datasheet on one, you may find yourself a bit confused. Let’s take a deep dive into the static (DC) properties of these converters — the AC performance is complex enough to warrant its own follow-up article.

Continue reading “RTFM: ADCs And DACs”

DIY Video Microscopy

Owning a Microscope is great fun as a hobby in general, but for hackers, it is a particularly useful instrument for assembly and inspection, now that we are building hardware with “grain of sand” sized components in our basements and garages. [voidnill] was given an Eduval 4 microscope by a well-meaning friend during a holiday trip. This model is pretty old, but it’s a Carl Zeiss after all, made in Jena in the erstwhile GDR. Since an optical microscope was of limited use for him, [voidnill] set about digitizing it.

He settled on the Raspberry-Pi route. The Pi and a hard disk were attached directly to the frame of the microscope, and a VGA display connected via a converter. Finally, the Pi camera was jury-rigged to one of the eyepieces using some foam. It’s a quick and dirty hack, and not the best solution, but it works well for [voidnill] since he wanted to keep the original microscope intact.

The standard Pi camera has a wide angle lens. It is designed to capture a large image and converge it on to the small sensor area. Converting it to macro mode is possible, but requires a hack. The lens is removed and ‘flipped over’, and fixed at a distance away from the sensor – usually with the help of an extension tube. This allows the lens to image a very small area and focus it on the (relatively) large sensor. This hack is used in the “OpenFlexure” microscope project, which you can read about in the post we wrote earlier this year or at this updated link. If you want even higher magnification and image quality, OpenFlexure provides a design to mate the camera sensor directly to an RMS threaded microscope objective. Since earlier this year, this open source microscope project has made a lot of progress, and many folks around the world have successfully built their own versions. It offers a lot of customisation options such as basic or high-resolution optics and manual or motorised stages, which makes it a great project to try out.

If the OpenFlexure project proves to be an intimidating build, you can try something easier. Head over to the PublicLab where [partsandcrafts] shows you how to “Build a Basic Microscope with Raspberry Pi”. It borrows from other open source projects but keeps things simpler making it much easier to build.

In the video embed below, [voidnill] gives a brief overview (in German) of his quick hack. If you’ve got some microscope hacks, or have built one of your own, let us know in the comments section.

Continue reading “DIY Video Microscopy”

Pack Your Bags – Systemd Is Taking You To A New Home

Home directories have been a fundamental part on any Unixy system since day one. They’re such a basic element, we usually don’t give them much thought. And why would we? From a low level point of view, whatever location $HOME is pointing to, is a directory just like any other of the countless ones you will find on the system — apart from maybe being located on its own disk partition. Home directories are so unspectacular in their nature, it wouldn’t usually cross anyone’s mind to even consider to change anything about them. And then there’s Lennart Poettering.

In case you’re not familiar with the name, he is the main developer behind the systemd init system, which has nowadays been adopted by the majority of Linux distributions as replacement for its oldschool, Unix-style init-system predecessors, essentially changing everything we knew about the system boot process. Not only did this change personally insult every single Perl-loving, Ken-Thompson-action-figure-owning grey beard, it engendered contempt towards systemd and Lennart himself that approaches Nickelback level. At this point, it probably doesn’t matter anymore what he does next, haters gonna hate. So who better than him to disrupt everything we know about home directories? Where you _live_?

Although, home directories are just one part of the equation that his latest creation — the systemd-homed project — is going to make people hate him even more tackle. The big picture is really more about the whole concept of user management as we know it, which sounds bold and scary, but which in its current state is also a lot more flawed than we might realize. So let’s have a look at what it’s all about, the motivation behind homed, the problems it’s going to both solve and raise, and how it’s maybe time to leave some outdated philosophies behind us.

Continue reading “Pack Your Bags – Systemd Is Taking You To A New Home”

A Tamagotchi For WiFi Cracking

OK, let’s start this one by saying that it’s useful to know how to break security measures in order to understand how to better defend yourself, and that you shouldn’t break into any network you don’t have access to. That being said, if you want to learn about security and the weaknesses within the WPA standard, there’s no better way to do it than with a tool that mimics the behavior of a Tamagotchi.

Called the pwnagotchi, this package of artificial intelligence looks for information in local WiFi packets that can be used to crack WPA encryption. It’s able to modify itself in order to maximize the amount of useful information it’s able to obtain from whatever environment you happen to place it in. As an interesting design choice, the pwnagotchi behaves like an old Tamagotchi pet would, acting happy when it gets the inputs it needs.

This project is beyond a novelty though and goes deep in the weeds of network security. If you’re at all interested in the ways in which your own networks might be at risk, this might be a tool you can use to learn a little more about the ways of encryption, general security, and AI to boot. Of course, if you’re new to the network security world, make sure the networks you’re using are secured at least a little bit first.

Thanks to [Itay] for the tip!

Cordless Drill Sprouts Wings And Takes Flight

Brushless motors and lithium batteries were a revolution for remote control aircraft. No longer would nitro engines rule the roost, as flying became far cheaper and more accessible almost overnight. The same technology has also found its way into power tools, leading to [Peter Sripol] deciding to build a powerdrill into a flying aircraft in this video, embedded below.

An unmodified DeWalt drill is the heart of the build, serving as the propulsion unit of the craft. A servo is used to actuate the drill’s trigger to serve as the throttle. As power drills are geared down significantly compared to a typical hobby brushless motor, it was necessary to use a much larger prop than would be usual. This was custom machined out of wood with the help of [William Osman], and despite some mishaps, came out (mostly) in one piece. The airframe consists of foam wings with poplar spars, and an aluminium extrusion serves as the tail boom. A few 3D printed parts then tie everything together.

Despite the weight of the drill, the hacked-together craft is able to fly quite easily. The large wings and propeller help to make up for the shortcomings of the powertrain. Unfortunately, there wasn’t quite enough surplus lift to carry a payload of smartphones to capture in-flight footage, but overall the project could be considered a resounding success.

We’ve seen [Peter]’s work before, too – sometimes even putting himself in the pilots seat! Video after the break.

Continue reading “Cordless Drill Sprouts Wings And Takes Flight”

Recreating Lord Nikon’s Laptop From Hackers

The outlandish computers from 1995’s Hackers are easily one of the most memorable elements of the iconic cult classic. In the film, each machine is customized to reflect the individual hacker that operates it, and feature everything from spray painted camouflage paint schemes to themed boot animations based on the owner’s personal iconography. But what might not be so obvious is that the real-life props took a considerable amount of hardware hacking before they were ready for their big-screen debut.

A group of dedicated Hackers fans have created a website to document, and ideally recreate, all the custom work that went into the various pieces of tech featured in the film. As explained by [Nandemoguy], the group’s latest triumph is a screen-accurate build of Lord Nikon’s laptop. The final product not only looks just like the machine used in the film, but thanks to the internal Raspberry Pi, is far more powerful than the original computer would have been.

Unless you’re on the team over at HackersCurator.com, you might not know that the laptops in the film were handmade chimeras that combined the external cases of various PCs with (usually) the internals of an Apple Powerbook 180c. Why the prop masters of the film would have gone through so much trouble to create the character’s computers is not immediately clear, but if we had to guess, presumably it was due to the requirements of the over-the-top graphical interfaces that are featured so heavily in the film.

At any rate, the replica created by [Nandemoguy] is built in much the same way. At least for the parts you can see on the outside, anyway. He goes through the considerable case modifications required to replace the original keyboard on the Toshiba Satellite T1850 with a Powerbook keyboard, which as you might have guessed, has been converted into a USB HID device with a Teensy microcontroller. He even cuts the ports off the back of the Mac’s motherboard and glues them in place around the backside of the machine. But everything else, including the LCD, is all new hardware. After all, who really wants to go through all that trouble just to have a fancy Powerbook 180c in 2019?

Even if you weren’t a fan of Hackers, the level of detail and effort put into this build it absolutely phenomenal. It’s interesting to see the parallels between this replica and the burgeoning cyberdeck scene; it seems like with a Teensy, a Raspberry Pi, and enough Bondo, anything can be turned into a functional computer.

Continue reading “Recreating Lord Nikon’s Laptop From Hackers