We’ve seen our fair share of interesting knitting hacks here at Hackaday. There has been a lot of creative space explored while mashing computers into knitting machines and vice versa, but for the most part the resulting knit goods all tend to be a bit… two-dimensional. The mechanical reality of knitting and hobbyist-level knitting machines just tends to lend itself to working with a simple grid of pixels in a flat plane.
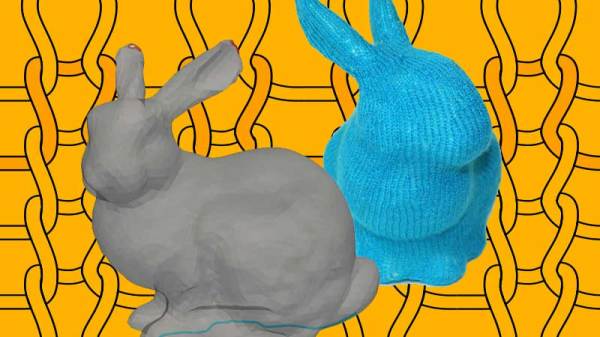
However, a team at the [Carnegie Mellon Textiles Lab] have been taking the world of computer-controlled knitting from two dimensions to three, with software that can create knitting patterns for most any 3D model you feed it. Think of it like your standard 3D printing slicer software, except instead of simple layers of thermoplastics it generates complex multi-dimensional chains of knits and purls with yarn and 100% stuffing infill.
The details are discussed and very well illustrated in their paper entitled Automatic Machine Knitting of 3D Meshes and a video (unfortunately not embeddable) shows the software interface in action, along with some of the stuffing process and the final adorable (ok they’re a little creepy too) stuffed shapes.
Since the publication of their paper, [the Textiles Lab] has also released an open-source version of their autoknit software on GitHub. Although the compilation and installation steps look non-trivial, the actual interface seems approachable by a dedicated hobbyist. Anyone comfortable with 3D slicer software should be able to load a model, define the two seams necessary to close the shape, which will need to be manually sewn after stuffing, and output the knitting machine code.
Previous knits: the Knit Universe, Bike-driven Scarf Knitter, Knitted Circuit Board.