This Is Your Solution For Open Source Motion Tracking

The HTC Vive Tracker adds real-world objects to your virtual world. While these real-world objects in virtual environments are now mostly limited to a Nintendo Zapper for a Duck Hunt clone and a tennis racket, the future is clear: we’re going to be playing Duck Hunt and Wii Sports while wearing headsets. The future is so bright, it burns.

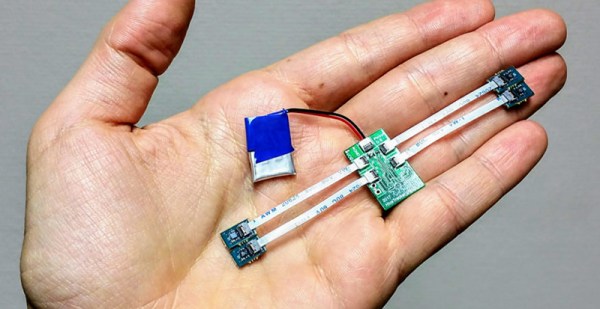
Of course, with any piece of neat computing hardware, there’s an opportunity for building an Open Source clone. That’s what [Drix] is doing with his Hackaday Prize entry. He’s created an Open Source Vive Tracker. It’s called the HiveTracker, and it is right now the best solution for tracking objects in a 3D space.

After a few missteps with ultrasonic and magnetic approaches, the team decided to piggyback on the HTC Vive lighthouses. These two base stations scan a laser beam across the room, first vertically, then horizontally. It’s an incredible piece of technology that [Alan Yates] talked about at the 2016 Hackaday Superconference.

While most microcontrollers don’t operate fast enough to see these laser sweeps, the team behind the HiveTracker found one microcontroller, with Bluetooth, and a feature called ‘PPI’. This programmable peripheral interconnect is kinda, sorta like a cross-bar, but designed for more real-time control of applications. With the right software, the team behind the HiveTracker was able to detect the lighthouses and send position and orientation data back to a computer.

This is a stupendous amount of work, and the results are remarkable. You can check out the video below and see that, yes, this is a real, Open Source Vive Tracker.

Continue reading “This Is Your Solution For Open Source Motion Tracking”

Printed It: Logitech C270 Conversion

One of the most practical applications for a home 3D printer is the ability to produce replacement parts; why wait a week for somebody to ship you a little plastic widget when you’ve got a machine that can manufacture a facsimile of it in a couple of hours? But what if your skills and passion for the smell of melting PLA push you even farther? You might move on from printing replacement parts to designing and building whole new devices and assemblies. Arguably this could be considered “peak” 3D printing: using a printer to create new devices which would otherwise be difficult or impractical for an individual to manufacture by more traditional means.

A perfect example is this fantastic total conversion for the Logitech C270 webcam designed by [Luc Eeckelaert]. Officially he calls it a “tripod”, and perhaps that’s how the design started, but the final product is clearly much more than that. It puts the normally monitor-mounted Logitech camera onto an articulated arm, greatly improving the device’s usability. The conversion even includes the ability to manually adjust the focus, a feature the original hardware doesn’t have. It turns the affordable and widely available Logitech C270 into an excellent camera to have on the workbench for documenting projects, or pointing at the bed of your 3D printer.

Continue reading “Printed It: Logitech C270 Conversion”

Superconference Submission Deadline Extended

Who among us doesn’t procrastinate from time to time? We can’t count the number of times that we’ve taken advantage of the Post Office staying open until midnight on April 15th. And when the 15th falls on a weekend? Two glorious additional days to put off the inevitable!

If you’ve been sitting on submitting your talk or workshop proposal to the 2018 Hackaday Superconference, we’ve got the next best thing for you: we’re extending the deadline until 5 pm PDT on September 10th.

The Hackaday Superconference is a singularity of hardware hackers: more of the best people in the same space at the same time than anywhere else. And that means that your ideas and experiences will be shared with the people most likely to appreciate them. From heroic hacks to creative robotics or untold hardware histories, if there’s a crowd who’ll appreciate how a serial console saved your bacon, it’s this one.

And if you give a talk or workshop, you get in free. But it’s more than that — there’s a different experience of a convention, even a tight-knit and friendly one like Hackaday’s Supercon, when you’re on the other side of the curtain. Come join us! We’d love to hear what you’ve got to say. And now you’ve got a little more time to tell us.

(If you want to get in the old-fashioned way, tickets are still available, but they won’t be once we announce the slate of speakers. You’ve been warned.)

Interactive KiCAD BOMs Make Hand Assembly A Breeze

We’ve all been there; you finally get the last DigiKey box and now your desk is covered in parts to stuff into a shiny new PCB you’ve been working on. First stop? Passive town, population endless waves of 1uF capacitors. The first one goes in the upper left, then a little below that, then… once you get to C157 it’s getting pretty hard to remember exactly which parts go where. Enter the literally named InteractiveHtmlBom (IHB) to smooth this process out.

IHB makes the frustrating task of mapping lines in a BOM to a physical position on a board easy. The classic method is of course, to look at the BOM, then search the board for that designator and place the component. (You left the designators in the silk, right?) Or to look at the BOM, ask your CAD package to search for that part in the layout, then place. IHB generates a document that does this automagically.

A sample file from a familiar project

Run the tool, either standalone or as a plugin for KiCAD 5.0, and you get a folder with the new interactive BOM in it. There are a few view options but generally it presents a view of the BOM with designators and value in one pane and a wonderful render of the top and/or bottom of the board in another pane. When you hover over a BOM line it highlights the relevant parts in the board view! There are toggles for filtering by top and bottom of board, marking which parts have been placed, light and dark mode, etc. Plus the ability to filter and sort by designator and value. We would have been impressed if it was just a generator/viewer for those slick scrollable/pannable board renders!

Check out a very long GIF demo after the break, or explore one of many pre-created demo BOMs here. We’re partial to the OSPx201.

Thanks [GregDavill] for the tip!

Continue reading “Interactive KiCAD BOMs Make Hand Assembly A Breeze”

When Are Dumb LEDs The Smart Choice?

A couple years ago I got into making electronic conferences badges by building a device for DEFCON 25 shaped like a dragonfly. Like all badges the most important design factor was quite literally how flashy it was, and two years ago I delivered on that with ten RGB LEDs. At the time I planned to hand-assemble each and every of the 105 badges at my kitchen table. Given those constraints, and a desire for electrical and programmatic simplicity, I landed on using APA102s (DotStar’s in Adafruit parlance) in the common 5050 sized package. They were easy to place, easy to design with electrically, simple to control, and friendly to a human pick-n-place machine. Though by the end of the production run I had discovered a few problems, the APA102s were a success.

This year I made a new and improved version of the dragonfly, but applying my lessons learned led me to choose a very different LED architecture than 2017. I swapped out the smart LEDs for dumb ones.

Continue reading “When Are Dumb LEDs The Smart Choice?”

Pushing Tin Remotely: The Start Of Flight Control In The Cloud

In a 1999 movie (Pushing Tin), a flight controller is a passenger on a plane and tells the flight attendant that he needs to speak to the person controlling the plane. The flight attendant tells him the pilot is very busy to which the controller responds, “…you really think the pilot is controlling this plane? That would really scare me.” We wonder what that fictional character would think flying into Loveland Colorado. Their Colorado Remote Tower Project. While there’s still a human flight controller, they aren’t physically located at the airport and rely on remote cameras and radar so the controller can be located elsewhere.

The subject airport is the Northern Colorado Regional Airport and is the state’s busiest airport that has no tower. While the concept — generically known as Remote and Virtual Tower or RVT — dates back to 2002, its adoption is only now starting to pick up steam. An airport in Sweden was the first to go live for normal use in April of 2015, but the Colorado installation is the first approved in the United States. If the official site is a little too dry for you, there’s a CBS report with a video that gives you a quick overview of what’s happening. Or dive in with the demonstration video you can see below.

Continue reading “Pushing Tin Remotely: The Start Of Flight Control In The Cloud”

sigrok I2C screenshot

Doing Logic Analysis To Get Around The CatGenie’s DRM

The CatGenie is an amazing device to watch in action, basically a self-cleaning litter box for cats that even does away with the need to replace the litter. It’s comparable to what the indoor flush toilet is for humans compared to maintaining a composting toilet. However, there is a problem. It uses costly soap cartridges which have to be replaced because an RFID reader and a usage counter prevent you from simply refilling them yourself.

CatGenie and Arduino

[David Hamp-Gonsalves] reverse engineered the electronics so that he didn’t have to pay for the cartridges anymore. This has been done before and one of those who did it created a product called the CartridgeGenius, but it’s made and sold as a parttime project and there were none in stock. The cartridges have an RFID tag and another solution which we’ve covered before is to replace the RFID reader board with an Arduino. That’s the solution [David] adopted. So why write this post if this isn’t new?

The RFID reader board communicates with the rest of the CatGenie using I2C and he needed to know what was being transmitted. To do that he learned how to use a cheap logic analyzer to read the signals on the I2C wires, which makes this an interesting story. You can see the logic analyser output on his blog and GitHub repository along with mention of a timing issue he ran into. From what he learned, he wrote up Arduino code which sends the same signals. He and his cat are now sitting pretty.

What he didn’t do is make a video. But the CatGenie really is amazing to watch in action as it goes through its rather complex 30-35 minute process so we found a video of it doing its thing, shown at 3.5x speed, and included that below.  If you’re into that sort of thing.

Continue reading “Doing Logic Analysis To Get Around The CatGenie’s DRM”