Some time back we ran a post on those cheap USB soldering irons which appeared to be surprisingly capable considering they were really under powered, literally. But USB Type-C is slated to change that. Although it has been around for a while, we are only now beginning to see USB-C capable devices and chargers gain traction. USB-C chargers featuring the USB-PD option (for power delivery) can act as high power sources allowing fast charging of laptops, phones and other devices capable of negotiating the higher currents and voltages it is capable of sourcing. [Julien Goodwin] shows us how he built a USB-C powered soldering iron that doesn’t suck.
He is able to drive a regular Hakko iron at 20 V and 3 Amps, providing it with 60 W of input power from a USB-C charger. The Hakko is rated for 24 V operating voltage, so it is running about 16% lower power voltage. But even so, 60 W is plenty for most cases. The USB-C specification allows up to 5 A of current output in special cases, so there’s almost 100 W available when using this capability.
It all started while he was trying to consolidate his power brick collection for his various computers in order to reduce the many types and configurations of plugs. Looking around, he stumbled on the USB-PD protocol. After doing his homework, he decided to build a USB Type-C charger board with the PD feature based on the TI TPS65986 chip – a very capable USB Type-C and USB PD Controller and Power Switch. The TI chip is a BGA package, so he had to outsource board assembly, and with day job work constantly getting in the way, it took a fair bit of time before he could finally test it. Luckily, none of the magic smoke escaped from the board and it worked flawlessly the first time around. Here is his deck of slides about USB-C & USB-PD [PDF] that he presented at linux.conf.au 2017 Open Hardware Miniconf early this year. It provides a nice insight to this standard, including a look at the schematic for his driver board.
Being such a versatile system, we are likely to see USB-C being used in more devices in the future. Which means we ought to see high power USB Soldering Irons appearing soon. But at the moment, there is a bit of a “power” struggle between USB-C and Qualcomm’s competing “Quick Charge” (QC) technology. It’s a bit like VHS and Betamax, and this time we are hoping the better technology wins.
There is an old saying: “In theory, theory and practice are the same. In practice, they are not.” We spend our time drawing on paper or a computer screen, perfect wires, ideal resistors, and flawless waveforms. Alas, the real world is not so kind. Components have all kinds of nasty parasitic effects and no signal looks like it does in the pages of a text book.
Consider the following problem. You have a sine wave input coming in that varies between 0 V and 5 V. You want to convert it to a square wave that is high when the sine wave is over 2.5 V. Simple, right? You could use a CMOS logic gate or a comparator. In theory…
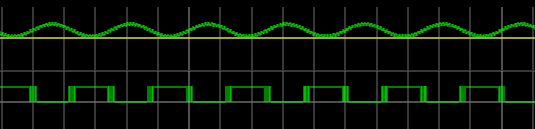
The problem is, the sine wave isn’t perfect. And the other components will have little issues. If you’ve ever tried this in real life, you’ll find that when the sine wave is right at the 2.5 V mark the output will probably swing back and forth before it settles down. This is exacerbated by any noise or stretching in the sine wave. You will wind up with something like this:
Notice how the edges of the square wave are a bit fat? That’s the output switching rapidly back and forth right at the comparator’s threshold.
Hysteresis
The answer is to not set the threshold at 2.5 V, or any other single value. Instead, impose a range outside of which it will switch, switching low when it leaves the low end of the range, and high when it exceeds the high end. That is, you want to introduce hysteresis. For example, if the 0 to 1 shift occurs at, say, 1.9 V and the 1 to 0 switch is at 0.5 V, you’ll get a clean signal because once a 0 to 1 transition happens at 1.9 V, it’ll take a lot of noise to flip it all the way back below 0.5 V.
You see the same effect in temperature controllers, for example. If you have a heater and a thermal probe, you can’t easily set a 100 degree set point by turning the heater off right away when you reach 100 and then back on again at 99.9999. You will usually use hysteresis in this case, too (if not something more sophisticated like a PID). You might turn the heater off at 99 degrees and back on again at 95 degrees, for example. Indeed, your thermostat at home is a prime example of a system with hysteresis — it has a dead-band of a few degrees so that it’s not constantly turning itself on and off.
Schmitt Triggers and How to Get One
A Schmitt Trigger is basically a comparator with hysteresis. Instead of comparing the incoming voltage with VCC / 2, as a simple comparator would, it incorporates a dead band to ensure that logic-level transitions occur only once even in the presence of a noisy input signal.
Assuming you want a Schmitt trigger in a circuit, you have plenty of options. There are ICs like the 74HC14 that include six (inverting) Schmitt triggers. On a schematic, each gate is represented by one of the symbols to the right; the little mark in the box is the hysteresis curve, and the little bubble on the output indicates logical negation when it’s an inverter.
You can also make them yourself out of transistors or even a 555 chip. But the easiest way by far is to introduce some feedback into a plain op amp comparator circuit.
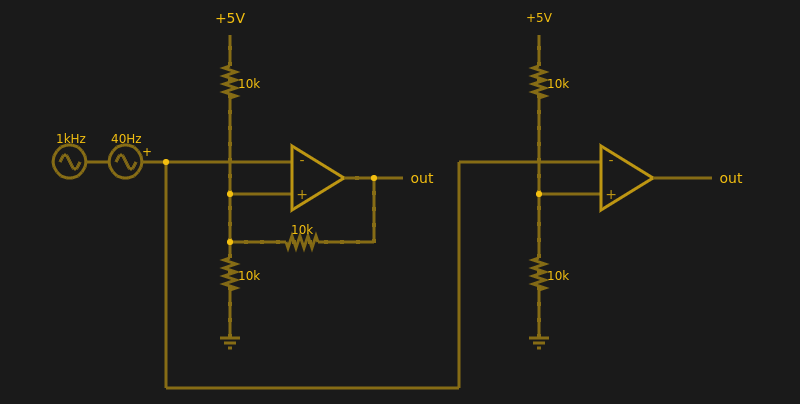
Below are two op amps, one with some positive feedback to make it act like a Schmitt trigger. The other is just a plain comparator. You can simulate the design online.
If you haven’t analyzed many op amp circuits, this is a good one to try. First, imagine an op amp has the following characteristics:
The inputs are totally open.
The output will do whatever it takes to make the inputs voltages the same, up to the power supply rails.
Neither of these are totally true (theory vs. practice, again), but they are close enough.
The comparator on the right doesn’t load the inputs at all, because the input pins are open circuit, and the output swings to either 0 V or 5 V to try, unsuccessfully, to make the inputs match. It can’t change the inputs because there is no feedback, but it does make a fine comparator. The voltage divider on the + pin provides a reference voltage. Anything under that voltage will swing the output one way. Over the voltage will swing it the other way. If the voltages are exactly the same? That’s one reason you need hysteresis.
The comparator’s voltage divider sets the + pin to 1/2 the supply voltage (2.5 V). Look at the Schmitt trigger (on top). If the output goes between 0 V and 5 V, then the voltage divider winds up with either the top or bottom resistor in parallel with the 10K feedback resistor. That is, the feedback resistor will either be connected to 5 V or ground.
Of course, two 10K resistors in parallel will effectively be 5K. So the voltage divider will be either 5000/15000 (1/3) or 10000/15000 (2/3) depending on the state of the output. Given the 5 V input to the divider, the threshold will be 5/3 V (1.67 V) or 10/3 V (3.33 V). You can, of course, alter the thresholds by changing the resistor values appropriately.
Practical Applications
Schmitt triggers are used in many applications where a noisy signal requires squaring up. Noisy sensors, like an IR sensor for example, can benefit from a Schmitt trigger. In addition, the defined output for all voltage ranges makes it handy when you are trying to “read” a capacitor being charged and discharged. You can use that principle to make a Schmitt trigger into an oscillator or use it to debounce switches.
If you want to see a practical project that uses a 555-based Schmitt, check out this light sensor. The Schmitt trigger is just one tool used to fight the imprecision of the real world and real components. Indeed, they’re nearly essential any time you want to directly convert an analog signal into a one-bit, on-off digital representation.
Hackaday and Tindie will be at SCALE Friday through Sunday, showing off the coolest parts of Hackaday, Hackaday.io, and our lovable robotic dog, Tindie. We’ll be handing out t-shirts and stickers, and we’ll be giving tours of the SupplyFrame Design Lab located just two blocks away from the convention center. The Design Lab is a crown jewel of our corporate overlord’s emphasis on Open Hardware, and if you want to see where the magic happens, this is your chance. We’ll be running tours of the Lab on Friday, so find the Hackaday and Tindie crew in the expo area around 3:40 PM.
In case you are still wondering about the SHA-1 being broken and if someone is going to be spending hundreds of thousands of dollars to create a fake Certificate Authority and sniff your OkCupid credentials, don’t worry. Why spend so much money when your credentials are being cached by search engines?… Wait, what?
A serious combination of bugs, dubbed Cloudbleed by [Tavis Ormandy], lead to uninitialized memory being present in the response generated by the reverse proxies and leaked to the requester. Since these reverse proxies are shared between Cloudflare clients, this makes the problem even worst, since random data from random clients was leaking. It’s sort of like Heartbleed for HTTP requests. The seriousness of the issue can be fully appreciated in [Tavis] words:
“The examples we’re finding are so bad, I cancelled some weekend plans to go into the office on Sunday to help build some tools to cleanup. I’ve informed cloudflare what I’m working on. I’m finding private messages from major dating sites, full messages from a well-known chat service, online password manager data, frames from adult video sites, hotel bookings. We’re talking full https requests, client IP addresses, full responses, cookies, passwords, keys, data, everything.”
According to Cloudflare, the leakage can include HTTP headers, chunks of POST data (perhaps containing passwords), JSON for API calls, URI parameters, cookies and other sensitive information used for authentication (such as API keys and OAuth tokens). An HTTP request to a Cloudflare web site that was vulnerable could reveal information from other unrelated Cloudflare sites.
Adding to this problem, search engines and any other bot that roams free on the Internet, could have randomly downloaded this data. Cloudflare released a detailed incident report explaining all the technicalities of what happened and how they fixed it. It was a very quick incident response with initial mitigation in under 47 minutes. The deployment of the fix was also quite fast. Still, while reading the report, a sense that Cloudflare downplayed this issue remains. According to Cloudflare, the earliest date that this problem could have started is 2016-09-22 and the leak went on until 2017-02-18, five months, give or take.
Just to reassure the readers and not be alarmist, there is no evidence of anyone having exploiting what happened. Before public exposure, Cloudflare worked in proximity with search engines companies to ensure memory was scrubbed from search engine caches from a list of 161 domains they had identified. They also report that Cloudflare has searched the web (!), in sites like Pastebin, for signs of leaks and found none.
On the other hand, it might be very well impossible to know for sure if anyone has a chunk of this data cached away somewhere in the aether. It’s impossible to know. What we would really like to know is: does [Tavis] get the t-shirt or not?
The year is 2016. Driving home from a day’s work in the engineering office, I am greeted with a sight familiar to any suburban dwelling Australian — hard rubbish. It’s a time when local councils arrange a pickup service for anything large you don’t want anymore — think sofas, old computers, televisions, and the like. It’s a great way to make any residential area temporarily look like a garbage dump, but there are often diamonds in the rough. That day, I found mine: the Ricoh Aficio 2027 photocopier.
It had spent its days in a local primary school, and had survived fairly well. It looked largely intact with no obvious major damage, and still had its plug attached. Now I needed to get it home. This is where the problems began.
Sometimes — despite impracticality, safety, failure, and general good sense — one has an urge to see a project through for the sake of it. When you’re sick of buttering your toast every morning, you might take a leaf out of Rick Sandc– ahem, [William Osman]’s book and build a toast-bot to take care of the task for you.
[Osman] — opting for nail the overkill quotient — is using a reciprocating saw motor to hold the butter while the toast moves underneath the apparatus on a platform controlled by a linear stepper motor. The frame and mounts for Toast-Bot were cut out of wood on his home-built laser cutter — affectionately named Retina Smelter 9000′ — and assembled after some frustration and application of zip-ties. The final result DOES butter toast, but — well — see for yourself.
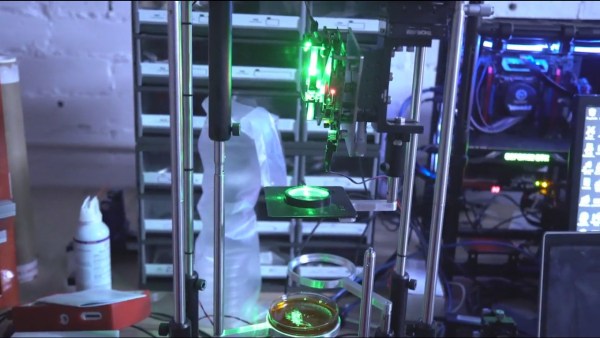
It’s the year 2260 and you’re being beamed from your starship to the planet below. Being a descendant of present day 3D printers, the transporter prints you out, slowly making one layer before moving on to the next, going from the ground up. The you-that-was hopes nothing spills out before you’re done. But what if you could print every atom in your body at the same time? If those transporters are descendant’s of Daqri’s holographic 3D printing technology then that’s just what will happen.
Daqri’s process is akin to SLA (stereolithography) and SLA/DLP (digital light processing). In SLA, a laser beam is shone onto a pool of resin, hardening the resin at the beam’s point. The laser scans across the resin’s surface, drawing one layer. More resin is added and then the next layer is drawn. In SLA/DLP, the light for an entire layer is projected onto the surface at once. While both methods involve stereolithography, the acronym SLA by itself is commonly used to refer to the laser approach.
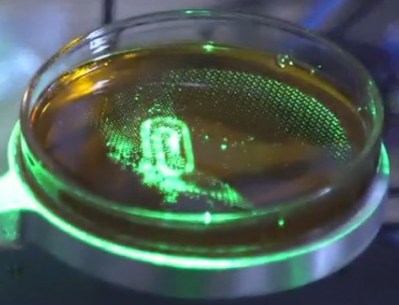
Holograhically 3D printing a paperclip
Daqri’s process however, uses a holographic chip of their own making to project the light for all the layers at the same time into the material, a light-activated monomer. Their chip is a silicon wafer containing a grid of tunable crystals. Those crystals control the magnitude and phase of light reflected down into the monomer, creating a 3D volume of interference patterns. The brief description of the process says that a laser is used to shine light onto the crystals, so there’s probably still some scanning going on. However, in the video, all of the object being printed appears illuminated at the same time so the scanning is likely very fast, similar to how a laser in a light show seemingly paints what appears to be a 2D shape on the side of a building, even though it’s really just a rapidly moving point. There’s also the possibility that the beam’s point is large enough to encapsulate all of the chip at once. You can see a demonstration of it in the video below.