New Part Day: ST’s 32-Bit 3D Printer Controller

There are a few 32-bit ARM-based 3D printer controller boards out there such as the Smoothieboard, the Azteeg X5 mini, [Traumflug]’s Gen5 electronics, whatever board is in the Monoprice MP Mini Select, and several others I will be criticized for not mentioning. All of these ARM boards provide smoother acceleration, better control, and ultimately better prints from whatever 3D printer they’re controlling. Now, out of the blue, there’s a new board. It’s an evaluation board from ST — much like those famous Discovery boards — that sells itself as a plug and play solution for 3D printers.

The heart of this board is an STM32F401 — not the king of the STM32 line or the fastest ARM microcontroller, but anything faster or more capable will add considerably more to the BOM for this board. This controller board features six of ST’s L6474 motor drivers with enough current for some beefy NEMA 23 stepper motors , a multi-zone heated bed, and connections for a WiFi module and external LCD and keypad. You can buy this board right now for $118. This board isn’t a game changer, but it is evidence the game has been changed.

As with all 3D printer controller boards, there are a few aspects that will leave users wanting more. This is a board meant for 12V heaters (except for the bed, which has a 24V, 20A output), and the stepper drivers can only go up to 16 microsteps. That said, there’s not much else to complain about. This offering comes with a 32-bit firmware called Marlin4ST. From a quick perusal, it looks like the familiar configuration.h is still there, and still does what it’s supposed to do.

This ST Discovery board is extremely capable, available now, and relatively cheap, but that’s not really the big story here. What this board represents is a reference design and working firmware for a 32-bit ARM-based printer controller. That’s the future, and with this board the future might come a little sooner.

Thanks [jagerboots] for sending this one in.

Hackerspaces Are Hard: Insurance

Do you dream of opening a hackerspace, makerspace, or co-working space? Maybe it’s in the works and you’re already scoping out locations, intoxicated by visions of all the projects that will emerge from it. Here’s a sobering thought: makerspaces are a great big pile of risk. If the doors of your ‘space are already open, perhaps you’ve come to realize that the initial insurance policy you signed doesn’t really fit the needs of your particular creative paradise. Even if it does, the protection you need will change as you acquire new toys.

So why should you even get insurance? For one thing, your landlord will probably require it. If you own the building, you should insure it to protect yourself and anyone who uses the space. Do it for the same reason you’d insure a car, your house, or your collection of vintage pinball machines: to mitigate risk. It takes a lot of hard work to open a makerspace, perform the day-to-day operations, and keep it growing and getting better. Whenever the unthinkable happens, insurance will protect your investment as well as the people who make it a great place to be.

In researching this article, I contacted several well-established makerspaces in the United States as well as most of the major insurance providers to get both sides of the story. My intent was not to make a how-to guide, but to simply explore the topic and provide a view of the process and the struggle.

Continue reading “Hackerspaces Are Hard: Insurance”

Never Gonna Give Up Free WiFi

Our conscience almost prevented us from posting this one. Almost.

What do people all around the world want most? Free WiFi. And what inevitable force do they want to avoid most, just after death and taxes? Rick Astley. As a getting-started project with the ESP8266, Hackaday.io user [jaime] built a “free WiFi portal” that takes advantage of people’s deepest desires. Instead of delivering sweet, high-bandwidth connectivity, once you click through the onerous terms and conditions, it delivers you a looped GIF with background music.

And all of this on $4 worth of hardware, with firmware assembled in the cloud and easily available to anyone. We live in a truly frivolous glorious age.

Digging through our archives, we found a number of Rickroll posts that we’d rather forget, but this steam-powered record player bears a second look.

Pokemon Go GPS Cheat (If You Don’t Fear Getting Banned)

Pokemon Go inherits a certain vulnerability to GPS location spoofing from it’s predecessor Ingress, but also the progress that has been made in spoof detection. Since taking advantage of a game’s underlying mechanisms is part of the winner’s game, why not hook up your smartphone to Xcode and see if you can beat Niantic this time? [Dave Conroy] shows you how to play back waypoints and activate your Pokemon Go warp drive.

Continue reading “Pokemon Go GPS Cheat (If You Don’t Fear Getting Banned)”

Hackaday Prize Entry: What The Flux

Electromagnetism is the most difficult thing teach. Why is electromagnetism hard to teach? Well, when you’re asking a ‘why’ question (obligatory Richard Feynman video)

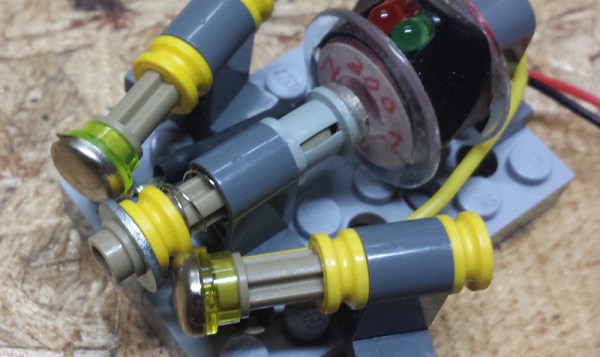
[Adam Smallcomb] might not be able to explain electromagnetism with perfect clarity, but he does have an idea to give students a hands-on feel for electrons and magnets. He’s building an Electromagnetic Teaching Aid that turns 30 gauge wire, springs, Lego, and bits of metal into a toolset for understanding magnets, solenoids, current, and magnetic fields.

The devices explained via [Adam]’s toolkit include a DC motor, stepper motor, speaker, solenoid, relay, transformer, microphone, and generator. That’s not to say [Adam] is building all these devices – a DC motor is just a generator in reverse, a relay is a solenoid with more electrical connections, and everything in this toolkit is basically just wire and magnets.

So far, [Adam] has a bunch of interesting applications for magnets, wire, and Lego including a DIY stepper motor and a nifty little tool that measures magnetic flux with a Hall effect sensor. Will it teach schoolkids electromagnetism? Very few things could, but at least this little toolkit will allow students to intuit electromagnetism a little better.

Soviet-Era Tank Gets The 3D Printed Treatment

3D printers are celebrated for their capacity to replace missing or broken parts. How about an entire T-62 tank?

Now hold on a second — this is only a model replica. It is, however another expression of the myriad uses for 3D printers. Designed in Maya and requiring almost three weeks to print all 62 parts from about 70 meters of PLA filament.  The assembly is not terribly involved, made easier by printing a few large sections such as the crew section and hull while the parts don’t get much smaller than the turret hatches. Nonetheless, he final product is about as true to life as you can get when designing the parts from scratch.

Continue reading “Soviet-Era Tank Gets The 3D Printed Treatment”

[CNLohr]’s Glass PCB Fabrication Process

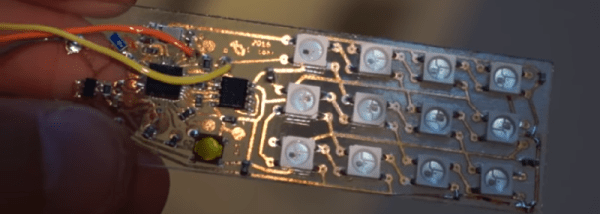
One of [CNLohr]’s bigger claims to fame is his process for making glass PCBs. They’re pretty much identical to regular, fiberglass-based PCBs, but [CNLohr] is building circuits on microscope slides. We’ve seen him build a glass PCB LED clock and a Linux Minecraft Ethernet thing, but until now, [CNLohr]’s process of building these glass PCBs hasn’t been covered in the depth required to duplicate these projects.

This last weekend, [CNLohr] put together a series of videos on how he turns tiny pieces of glass into functional circuits.

At the highest level of understanding, [CNLohr]’s glass PCBs really aren’t any different from traditional homebrew PCBs made on copper clad board. There’s a substrate, and a film of copper that is etched away to produce traces and circuits. The devil is in the details, and there are a lot of details for this build. Let’s dig deeper.

Continue reading “[CNLohr]’s Glass PCB Fabrication Process”