Electronic components are getting smaller and smaller, but the printed circuit boards we usually mount them on haven’t changed much. Stiff glass-epoxy boards can be a limiting factor in designing for environments where flexibility is a requirement, but a new elastic substrate with stretchable conductive traces might be a game changer for wearable and even implantable circuits.
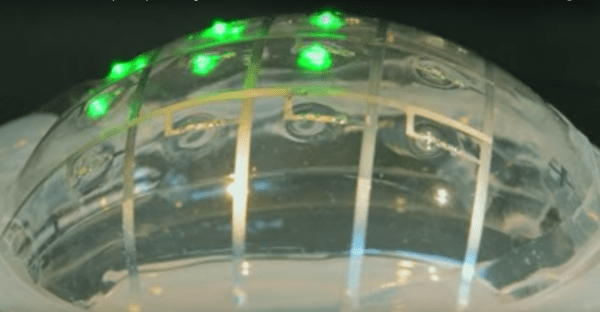
Researchers at the Center for Neuroprosthetics at the École Polytechnique Fédérale de Lausanne are in the business of engineering the interface between electronics and the human nervous system, and so have to overcome the mismatch between the hardware and wetware. To that end, [Prof. Dr. Stéphanie P. Lacour]’s lab has developed a way to apply a liquid metal to polymer substrates, with the resulting traces capable of stretching up to four times in length without cracking or breaking. They describe the metal as a partially liquid and partially solid alloy of gallium, with a gold added to prevent the alloy from beading up on the substrate. The applications are endless – wearable circuits, sensors, implantable electrostimulation, even microactuators.
Looks like progress with flexibles is starting to pick up, what with the conductive silicone and flexible phototransistors we’ve covered recently. We’re excited to see where work like this leads.
Last time on Embed with Elliot, I began my celebration of the make command’s 40th birthday next month. We discussed using the default rules and how to augment them with your own variables defined in a makefile. Next, I’ll walk you through some makefiles that can be used for real-world microcontroller code development. This week, we’ll focus on one for the AVR platform, and later on, I’ll run through a slightly more complicated version for the ST32M series of ARM Cortex micros.
Along the way, we’ll pick up a couple of tricks, but the aim is to keep the makefiles minimal, readable, and easily extensible. Once you get a little taste of the power of writing your own makefiles, you probably won’t be able to stop adding bells and whistles — custom routines for flashing, checking the size of binaries, generating assembly listings, etc. I’ll leave the extras up to you, but you’ll eventually find that anything you do can be automated with a makefile.
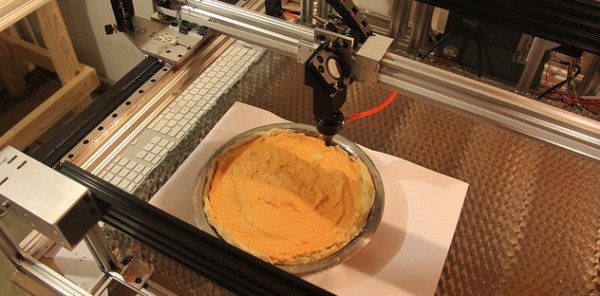
My “owl-hours” these last few months have been buried in the garage, chopping down aluminum extrusions for a homebrew laser cutter. Nevertheless, it’s time-well-spent. With the skeleton of the gantry now in place, what better way to give it a test-run other than engraving a few sweets?
(Goggles on, folks!)
Yesterday marked this year’s Pi Day, a time to commemorate our commitment to nerdom. I’m no baker; so when a couple friends put me to work on the assembly line of Pi-day pie-making, I couldn’t resist giving one a special touch.
This beloved journey towards building a laser cutter isn’t quite done, but it’s well on its way! Without fumigation, my only exceptions for cutting materials at this stage are paper, and food that smells great after burning it.
Without further ado, I’m honored to serve up a few digits of Pi-on-Pie.
To make the pattern, I generated a DXF vector file with Solidworks, and produced GCode with dxf2gcode. Admittedly, I wholeheartedly believe that this job better lends itself to GCMC, the open source GCode Metacompiler; but, sadly, time was against me. My only true regret: no raspberries in this pipeline.
From Wii-Motes to 3D sintered objects, we’ve seen some bizarre and fantastic objects enter and exit the hood of many laser cutters. If you’ve got a tale behind your build, we’d love to hear about some of your adventures. Join us on the IO and tell us your story as it happens!
There are very few things that are surrounded with as much hearsay and rumor as the origins of the QWERTY layout of typewriters and keyboards. The reason behind the QWERTY layout isn’t as simple as ‘so the bars for each letter don’t collide with each other.’ That’s nonsense – it would make far more sense to improve the mechanism before changing the arrangement of the keyboard around.
That’s not the only fallacious argument for the creation of QWERTY. It’s also been called a marketing ploy; Stephen Jay Gould popularized the idea of the QWERTY keyboard being as it is so a salesman could peck out TYPE WRITER on the top row [1]. This also makes little sense. Why would the top row and not the home row be so privileged as to contain all the letters the make up the name of the machine. For that matter, wouldn’t a sales pitch be more impressive if TYPE WRITER were typed with one hand?
This doesn’t mean there’s not a method behind the madness of QWERTY – it’s just not as simple as jammed typewriter mechanisms or appeasing the wishes of salesmen in the 1870s. QWERTY didn’t come out of thin air, though, but folk tale history of this keyboard layout is sadly deficient.
If you own a video projector, be it a module small enough to fit in a mobile phone or one designed for a cinema screen, the chances are it will have a DLP at its heart. An array of microscopic mirrors on an integrated circuit, the current state of the art in video projection technology.
Perhaps you own an older video projector, or maybe a cheaper new one. If so the chances are it’ll have a small LCD screen doing its work, taking the place of the Kodachrome in something very similar to your grandparents’ slide projector or their grandparents’ magic lantern.
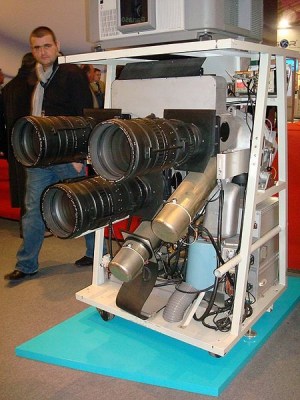
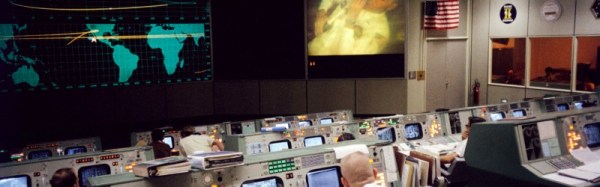
LCD technology was invented in the 1970s, while DLP was invented at the end of the 1980s. So how did the video projectors that were such a staple of televised spectaculars in the preceding decades work? For that matter, how did NASA project their status displays on the huge screen at Mission Control? Certainly not with CRT technology, even the brightest CRT projectors weren’t up to filling a cinema-sized screen.
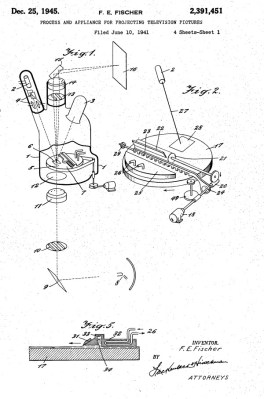
The answer came from the Eidophor (Greek: ‘eido’ and ‘phor’, ‘image’ and ‘bearer’), a device invented in the years before World War II by the Swiss physicist Dr. Fritz Fischer and granted a US patent in 1945. It featured a complex vacuum device in which an electron gun painted the video frames as a raster on an oil-covered mirror in the light path of a fairly conventional projector. High-voltage electric charges have the effect of deforming the surface of mineral oils, and it was this effect that was exploited to vary the effectiveness of the mirror as the raster was drawn. An unfortunate side-effect of tracing an oil surface with an electron beam is that a charge will build up on the oil surface, so the entire oil-covered mirror assembly had to rotate within its vacuum enclosure and pass under an electrode which removed any charge build-up.
You will probably be unaware of the exact date you last saw an eidophor performance. Quince Imaging tell us their last one was used at the TWA Dome in St Louis in July 2000. Eidophores may have become more compact over the decades but they remained costly to run, and through the 1990s they were suplanted by DLP devices that did substantially the same job with a lot less fuss.
It is not often that a search in the Hackaday archives for a technology returns no results, but the eidophor is one of those cases. Perhaps that is a fitting epitaph for a device that created its own show but never starred in it, that it is only its spectacular performances that live on.
We often see “logic analyzer” projects which are little more than microcontrollers reading data as fast as they can, sending it to a PC, and then plotting the results. Depending on how fast the microcontroller is, these projects range from adequate to not very useful.
At first glance, [esot.eric’s] logic analyzer project has an AVR in it, so it ought to be on the low end of the scale. Then you look at the specs: 32 channels at 30 megasamples per second. How does that work with an AVR in it?
The answer lies in the selection of components. The analyzer uses a 128MB SDRAM DIMM (like an older PC might use for main memory). That makes sense; the Arduino can’t store much data internally. However, it isn’t the storage capacity that makes this choice critical. It seems [esot.eric] has a way to make the RAM “free run”.
The idea is to use the Arduino (or other host microcontroller) to set up the memory. Some of the memory’s output bits feedback to the address and data lines. Then the microcontroller steps aside and the SDRAM clocks samples into its memory by itself at the prevailing clock rate for the memory.
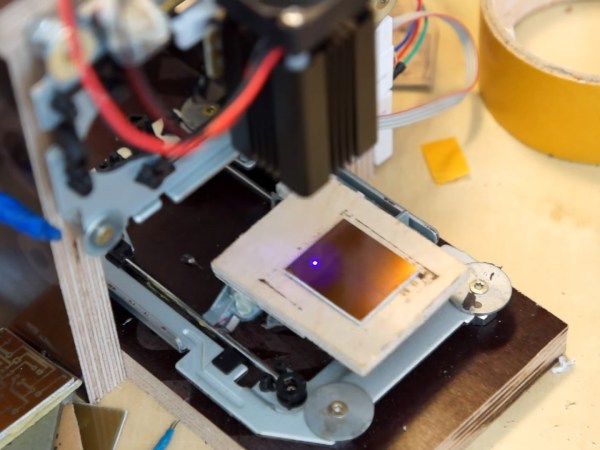
[Neumi] has built a CNC Laser using CD-ROM drives as the X and Y motion platforms. The small 405nm laser can engrave light materials like wood and foam. The coolest use demonstrated in the video is exposing pre-coated photo-resist PCBs.
With $61 US Dollars (55 Euro) for the Arduino, stepper drivers, and a laser in the project, [Nuemi] got a pretty capable machine after adding a few parts from the junk bin. He wanted to avoid using existing software in order to learn the concepts behind a laser engraver. In the end, he has a working software package which can send raster scans to an Arduino mega. The mega then controls the sync between the stepper and laser firings. The code is available on GitHub.
The machine can do a 30x30mm PCB in 10 minutes. It’s not about to set a record, but it’s cool and not at all bad for the price. You can see the failed PCBs lined up in the video from the initial tuning, but the final one produced a board very equivalent to the toner transfer method. Video after the break.
 Researchers at the Center for Neuroprosthetics at the École Polytechnique Fédérale de Lausanne are in the business of engineering the interface between electronics and the human nervous system, and so have to overcome the mismatch between the hardware and wetware. To that end, [Prof. Dr. Stéphanie P. Lacour]’s lab has developed a way to apply a liquid metal to polymer substrates, with the resulting traces capable of stretching up to four times in length without cracking or breaking. They describe the metal as a partially liquid and partially solid alloy of gallium, with a gold added to prevent the alloy from beading up on the substrate. The applications are endless – wearable circuits, sensors, implantable electrostimulation, even microactuators.

 LCD technology was invented in the 1970s, while DLP was invented at the end of the 1980s. So how did the video projectors that were such a staple of televised spectaculars in the preceding decades work? For that matter, how did NASA project their status displays on the huge screen at Mission Control? Certainly not with CRT technology, even the brightest CRT projectors weren’t up to filling a cinema-sized screen.