Printed Portable Computer Inspired By The Classics

These days, laptop computers are all more or less the same, at least externally. Some are thicker than others, they might come in different colors, or with a 360° hinge that lets you flip the screen around the back and use it as a tablet, but overall they’ve all got the same shape and proportions. The industry, and indeed the users, eventually agreed on the best way to make a computer portable and are now fully committed to it.

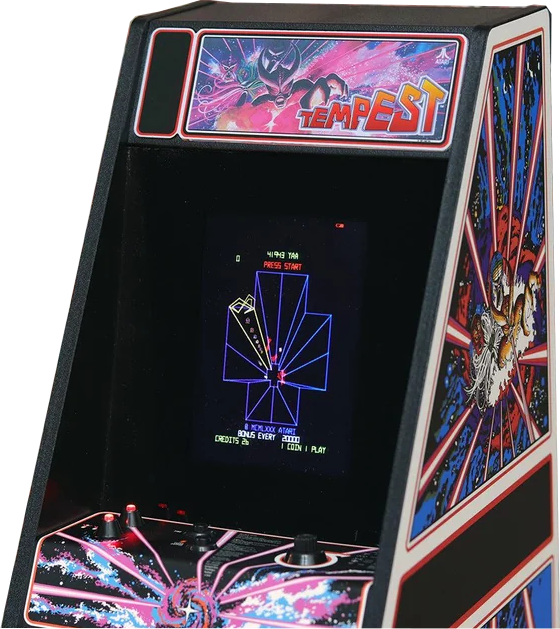
But that wasn’t always the case. In the 1980s there were a number of laptops from the likes of Toshiba, Tandy, and even IBM that took a slightly different approach to the clamshell design. These computers featured ultra-wide displays with a hinge located closer to the center of the computer, giving the machine a distinctive “trunk” in the back. It’s these classic machines that clearly inspired [Michael Mayer] to design the Portable Pi 84.

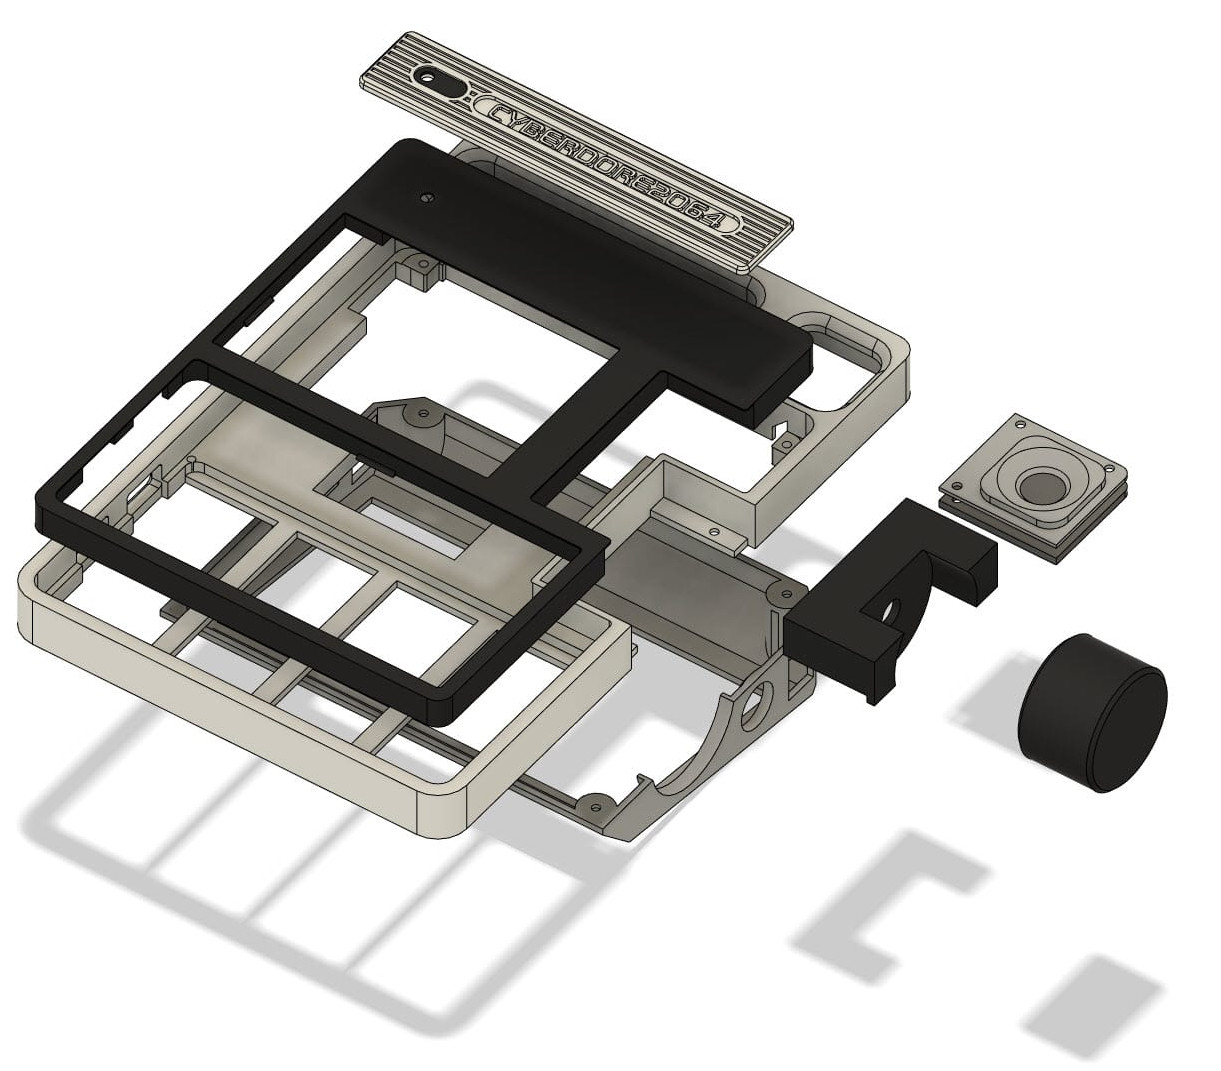
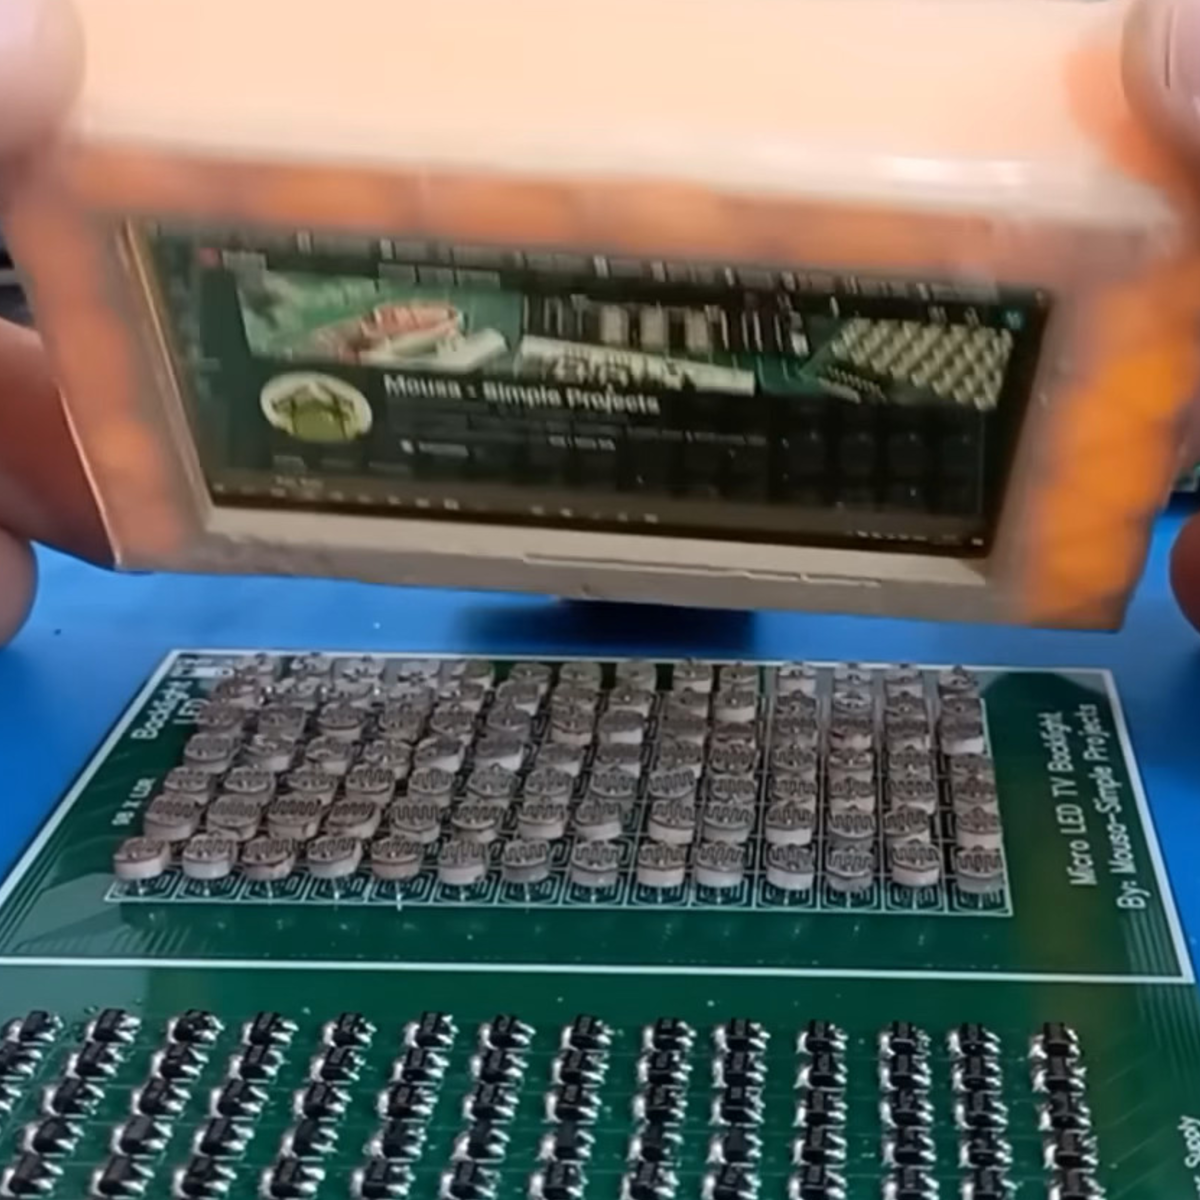
[Michael] says that the 3D printed enclosure was largely designed around the 40% ortholinear keyboard, which itself is based on the Happy-Keyboard from [Luis Alegría]. The rest apparently just fell into place, such as the fact that the 1600 x 600 Waveshare 9.3 inch display happens to be almost the perfect size to cover the keyboard below it.

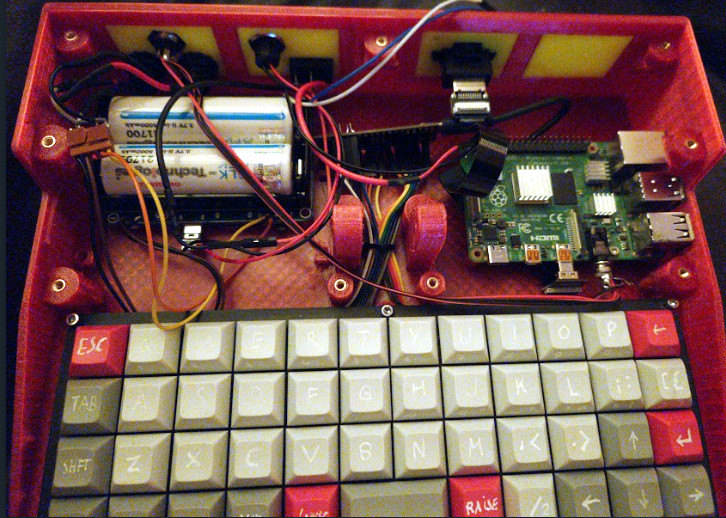
Compared to many of the other custom computer builds we’ve covered, the rear compartment of the Portable Pi 84 provides ample free space for the various system components. That includes the Raspberry Pi 4 that runs the show, a UPS “hat” that powers the system via a pair of 21700 batteries, and even a set of amplified speakers. It looks like there’s still plenty of room in the back for additional gear, such as an RTL-SDR or perhaps even a cartridge slot.

A particularly nice feature of this build are the inset panels on the rear of the machine, which allow for the various ports and connectors to be reconfigured by the user without having to re-print the entire case — one could imagine a replacement panel that features a connector for an external WiFi antenna, for example. We also like the use of heat-set inserts throughout the case, which will not only make the build sturdier, but means the case can be opened and closed regularly without fear of stripping out the screw holes.

So is this a computer or a cyberdeck? It’s hard to say. We tend to think that a proper deck needs to have a more unique physical layout, and technically this form factor was actually fairly popular at one point. But whatever you want to call builds like this, we’re stoked to see them become more common and better documented. Long live the truly personal computer.

Retro Inspired Cyberdeck Scrolls Around Cyberspace

It’s difficult to nail down exactly what counts as a “real” cyberdeck in this brave new era of bespoke computing. But at the minimum, most in the community would agree that a proper deck should have a non-traditional form factor, and be designed to meet the unique needs of the builder. If you’re looking for a fantastic example of both concepts, check out the Cyberdore 2064 from [Tommi L].

At first glance the 3D printed enclosure of the Cyberdore looks a bit like a Speak & Spell, but it’s really more of an amalgamation of everything that made 1980s computers so unique. You’ve got the vents, the chunky switches, the undersized display, and of course, the handle. The case might have been extruded in 2024, but it’s doing a fantastic impression of a piece of tech from 40 years ago.

One of the key external features of the Cyberdore 2064 is the side-mounted rotary encoder that allows for smoothly scrolling through online feeds (such as your favorite hardware hacking site) or long documents. The cheap and easy to work with KY-040 encoder has been converted to a USB input device by way of a Pi Pico, and has been paired with an over-sized 3D printed knob that really makes this build stand out — not only visually, but in terms of usability. These cyberdeck builds often rely on touch screens for input, but we always appreciate a physical interface.

Under the hood you’ve got a Raspberry Pi Zero and an 18650 cell to keep the whole thing running while on the go. Though the Zero is certainly showing its age compared to the more modern variants of the Pi, for a device like this, raw computing power isn’t really the driving concern. A mechanical keyboard usually rounds out these cyberdeck builds, but in this case, [Tommi] went with a fairly common Rii 518BT portable board that’s been skillfully integrated into the front of the Cyberdore.

All of the STL files necessary to print out your own Cyberdore 2064 are available on Printables, and while [Tommi] didn’t exactly provide build instructions, the write-up provides plenty of information to get you started.

So is it just us, or does looking at Cyberdore 2064 make you think it’s time for another Hackaday Cyberdeck Challenge?

Pnut: A Self-Compiling C Transpiler Targeting Human-Readable POSIX Shell

Shell scripting is one of those skills that are absolutely invaluable on especially UNIX and BSD-based systems like the BSDs, the two zillion Linux distributions as well as MacOS. Yet not every shell is the same, and not everybody can be bothered to learn the differences between the sh, bash, ksh, zsh, dash, fish and other shells, which can make a project like Pnut seem rather tempting. Rather than dealing with shell scripting directly, the user writes their code in the Lingua Franca of computing, AKA C, which is then transpiled into a shell script that should run in any POSIX-compliant shell.

The transpiler can be used both online via the main Pnut website, as well as locally using the (BSD 2-clause) open source code on GitHub. Here the main limitations are also listed, which mostly concern the C constructs that do not map nicely to a POSIX shell. These are: no support for floating point numbers and unsigned integers, no goto and switch nor taking the address of a variable with &. These and preprocessor-related limitations and issues are largely to be expected, as especially POSIX shells are hardly direct replacements for full-blown C code.

As a self-professed research project, Pnut seems like an interesting project, although if you are writing shell scripts for anything important, you probably just want to buckle down and learn the ins and outs of POSIX shell scripting and beyond. Although it’s a bit of a learning curve, we’d be remiss if we said that it’s not totally worth it, if only because it makes overall shell usage even beyond scripting so much better.

Keep Your Lungs Clean And Happy With A DIY Supplied-Air Respirator

The smell of resin SLA printing is like the weather — everybody complains about it, but nobody does anything about it. At least until now, as [Aris Alder] tackles the problem with an affordable DIY supplied-air respirator.

Now, we know what you’re thinking, anything as critical as breathing is probably best left to the professionals. While we agree in principle, most solutions from reputable companies would cost multiple thousands of dollars to accomplish, making it hard to justify for a home gamer who just doesn’t want to breathe in nasty volatile organic compounds. [Aris] starts the video below with a careful examination of the different available respirator options, concluding that a supplied air respirator (SAR) is the way to go.

His homebrew version consists of an affordable, commercially available plastic hood with a built-in visor. Rather than an expensive oil-free compressor to supply the needed airflow, he sourced a low-cost inline duct fan and placed it outside the work zone to pull in fresh air. Connecting the two is low-cost polyethylene tubing and a couple of 3D printed adapters. This has the advantage of being very lightweight and less likely to yank the hood off your head, and can be replaced in a few seconds when it inevitably punctures.

Another vital part of the kit is a pulse oximeter, which [Aris] uses to make sure he’s getting enough oxygen. His O2 saturation actually goes up from his baseline when the hood is on and powered up, which bodes well for the system. Every time we pick up the welding torch or angle grinder we wish for something like this, so it might just be time to build one.

Continue reading “Keep Your Lungs Clean And Happy With A DIY Supplied-Air Respirator”

Halfway Between Inspiration And Engineering

We see a lot of hacks where the path to success is pretty obvious, if maybe strewn with all sorts of complications, land-mines, and time-sinks. Then we get other hacks that are just totally out-of-the-box. Maybe the work itself isn’t so impressive, or even “correct” by engineering standards, but the inner idea that’s so crazy it just might work shines through.

This week, for instance, we saw an adaptive backlight LED TV modification that no engineer would ever design. Whether it was just the easiest way out, or used up parts on hand, [Mousa] cracked the problem of assigning brightnesses to the LED backlights by taking a tiny screen, playing the same movie on it, pointing it at an array of light sensors, and driving the LEDs inside his big TV off of that. No image processing, no computation, just light hitting LDRs. It’s mad, and it involves many, many wires, but it gets the job done.

Similarly, we saw an answer to the wet-3D-filament problem that’s as simple as it could possibly be: basically a tube with heated, dry air running through it that the filament must pass through on it’s way to the hot end. We’ve seen plenty of engineered solutions to damp filament, ranging from an ounce of prevention in the form of various desiccant storage options, to a pound of cure – putting the spools in the oven to bake out. We’re sure that drying filament inline isn’t the right way to do it, but we’re glad to see it work. The idea is there when you need it.

Not that there’s anything wrong with the engineering mindset. Quite the contrary: most often taking things one reasonable step at a time, quantifying up all the unknowns, and thinking through the path of least resistance gets you to the finish line of your project faster. But we still have to admire the off-the-wall hacks, where the way that makes the most sense isn’t always the most beautiful way to go. It’s a good week on Hackaday when we get both types of projects in even doses.

Build A DIY Spinner To Get Your Tempest Game Going

These days, controls in games are fairly standardized by genre. Most RTSs, FPSs, and RPGs all control more or less the same way. But one type of controller that has fallen by the wayside is the paddle, or spinner. [jesster88] is a big Tempest fan, however, and a spinner is crucial. Thus, what else is there to do but whip up one’s own?

Tempest is one of the more difficult classic games to categorize.

The build is based around a wired optical mouse. It’s pulled apart, with its main PCB installed into a 3D printed enclosure. Inside, the optical sensor is pointed at the base of a spinner constructed out of a printed drum and an off-the-shelf knob. The spinner is installed in a skateboard-style bearing for smooth rotation. As it spins, the optical sensor detects the motion and reports it as mouse movement via USB.

[jesster88] uses the device for playing Tempest with MAME. We imagine the technique could be adapted to work with other games that rely on spinner or paddle inputs, too. Meanwhile, if you’re whipping up your own retro game hacks at home, don’t hesitate to let us know!

Spinning Magnets Do Your Dice Rolling For You

Dice are about the simplest machines possible, and they’ve been used since before recorded history to generate random numbers. But no machine is so simple that a little needless complexity can’t make it better, as is the case with this mechanical spinning dice. Or die. Whatever.

Inspiration for the project came from [Attoparsec]’s long history with RPG and tabletop games, which depend on different kinds of dice to generate the randomness that keeps them going — that and the fortuitous find of a seven-segment flip-dot display, plus the need for something cool to show off at OpenSauce. The flip-dot is controlled by an array of neodymium magnets with the proper polarity to flip the segments to the desired number. The magnets are attached to an aluminum disk, with each array spread out far enough to prevent interference. [Attoparsec] also added a ring of magnets to act as detents that lock the disk into a specific digit after a spin.

The finished product ended up being satisfyingly clicky and suitably random, and made a good impression at OpenSauce. The video below documents the whole design and build process, and includes some design dead-ends that [Attoparsec] went down in pursuit of a multiple-digit display. We’d love to see him revisit some of these ideas, mechanically difficult though they may be. And while he’s at it, maybe he could spice up the rolls with a little radioactivity.

Continue reading “Spinning Magnets Do Your Dice Rolling For You”