A Lesson In K40 Laser Repair

The K40 laser cutter has become ubiquitous in hackerspaces and well-equipped home workshops over the past few years, as a relatively inexpensive introduction to laser cutting and a machine that is readily hackable. Tokyo Hackerspace have one, but sadly their laser tube failed after relatively little use. Replacing a laser tube might be a routine component change for some readers, but it’s still worth looking at in some detail.

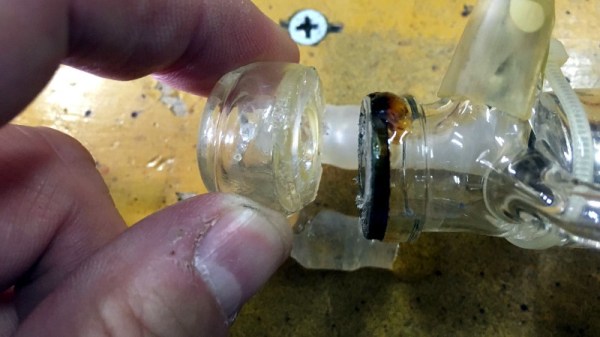
Their tube had failed at its output lens cooling cap, a component that is glued onto the end of the tube rather than bonded, and which had snapped off. There had been no mechanical stress upon it, but it was found  that the arrangement of their cooling system caused it to drain between uses and thus air bubbles could accumulate. The resulting cooling inefficiency caused enough thermal stress for the bond between the tube and the end piece to fail.

The in-depth analysis of what caused the failure and step-by-step description of the procedure should be of interest to any K40 owner. Little things such as ensuring that the tube is rotated to the right angle for all air bubbles to make their way out of it, or making sure that when the pump is switched off the water isn’t all pulled out of it by gravity seem obvious, but these are traps that will have caught more than one K40 owner.

We’ve covered many K40 stories over the years, but a good place to start for the novice might be this commissioning story, or even this tale of a hackerspace’s modifications to their model.

VCF East 2018: SDR On The Altair 8800

You’d be forgiven if you thought software defined radio (SDR) was a relatively recent discovery. After all, few outside of the hardcore amateur radio circles were even familiar with the concept until it was discovered that cheap USB TV tuners could be used as fairly decent receivers from a few hundred MHz all the way up into the GHz range. The advent of the RTL-SDR project in 2012 brought the cost of entry level SDR hardware from hundreds of dollars to tens of dollars effectively overnight. Today there’s more hackers cruising the airwaves via software trickery than there’s ever been before.

Continue reading “VCF East 2018: SDR On The Altair 8800”

The Hacky Throttle Repair That Got Me On The Road Again

Old cars are great. For the nostalgia-obsessed like myself, getting into an old car is like sitting in a living, breathing representation of another time. They also happen to come with their fair share of problems. As the owner of two cars which are nearing their 30th birthdays, you start to face issues that you’d never encounter on a younger automobile. The worst offender of all is plastics. Whether in the interior or in the engine bay, after many years of exposure to the elements, parts become brittle and will crack, snap and shatter at the slightest provocation.

You also get stuck bolts. This was the initial cause of frustration with my Volvo 740 Turbo on a cold Sunday afternoon in May. As I tried in vain to free the fuel rail from its fittings, I tossed a spanner in frustration and I gave up any hope of completing, or indeed, starting the job that day. As I went to move the car back into the driveway, I quickly noticed a new problem. The accelerator was doing approximately nothing. Popping the hood, found the problem and shook my head in resignation. A Volvo 740 Turbo is fitted with a ball-jointed linkage which connects the accelerator cable to the throttle body itself. In my angst, the flying spanner had hit the throttle body and snapped the linkage’s plastic clips. It was at this point that I stormed off, cursing the car that has given me so much trouble over the past year.

Continue reading “The Hacky Throttle Repair That Got Me On The Road Again”

Monitoring Air Quality, One Sleepy Meeting At A Time

To those of us in the corporate world, the conference room is where hope goes to die. Crammed into a space too small for the number of invitees, the room soon glows with radiated body heat and the aromas of humans as the time from their last shower gradually increases. To say it’s not a recipe for productivity is an understatement at best.

Having suffered through too many of these soporific situations, [Charles Ouweland] took matters into his own hands and built this portable air quality meter for meetings. With an OLED display on top and sensors inside, it displays not only the temperature, humidity, and barometric pressure, but also the CO₂ concentration and the levels of volatile organic compounds (VOC), noxious substances sometimes off-gassed from building materials, furniture upholstery, and coworkers alike.

The monitor quantifies his meeting misery, which we’re sure wins him points with his colleagues. For our part, though, what we find interesting is his design process. He started where many of us would, with an Arduino Uno. The sensor modules, a CCS811 for VOC and CO₂ as well as a BME280 for temperature, humidity, and pressure, both needed 3.3 volts, so he added a regulator to knock the Arduino’s 5-volt supply into range and some MOSFETs for level matching. Things were getting bulky, though, so he set about reducing the component count. The Uno went by stripping out its already programmed MCU. That killed the need for the regulator and MOSFETs, since everything would be happy with 3.3 volts. A few more rounds of optimization led to the final product, compact enough to run on a pair of AA batteries.

This is a great lesson in going from prototype to product. And it’s so compact, it could even ride on top of a Roomba to map the conference room’s floor-level air quality.

Their Battery Is Full Of Air

Storing electrical energy is a huge problem. A lot of gear we use every day use some form of battery and despite a few false starts at fuel cells, that isn’t likely to change any time soon. However, batteries or other forms of storage are important in many alternate energy schemes. Solar cells don’t produce when it is dark. Windmills only produce when the wind blows. So you need a way to store excess energy to use for the periods when you aren’t creating electricity. [Kris De Decker] has an interesting proposal: store energy using compressed air.

Compressed air storage is not a new idea. On a large scale, there have been examples of air compressed in underground caverns and then released to run a turbine at a future date. However, the efficiency of this is poor — around 40 to 50 percent — mainly because the air heats up during compression and often needs to be prewarmed (using energy from another source) prior to decompression to prevent freezing. By comparison, batteries can be 70 to 90 percent efficient, although they have their own problems, too.

The idea explored in this paper is not to try to store a power plant’s worth of energy in a giant underground cavern, but rather use smaller compressed air setups like you would use batteries to store power at the point of consumption. The technology is called micro-CAES (an acronym for compressed air energy storage).

Continue reading “Their Battery Is Full Of Air”

Programmable Air Makes Robotics A Breeze

[Amitabh] was frustrated by the lack of options for controlling air pressure in soft robotics. The most promising initiative, Pneuduino, seemed to be this close to a Shenzhen production run, but the creators have gone radio silent. Faced with only expensive alternatives, he decided to take one for Team Hacker and created Programmable Air, a modular system for inflatable and vacuum-based robotics.

The idea is to build the cheapest, most hacker-friendly system he can by evaluating and experimenting with all sorts of off-the-shelf pumps, sensors, and valves. From the looks of it, he’s pretty much got it dialed in. Programmable Air is based around $9 medical-grade booster pumps that are as good at making vacuums as they are at providing pressurization. The main board has two pumps, and it looks like one is set to vacuum and the other to spew air. There’s an Arduino Nano to drive them, and a momentary to control the air flow.

Programmable Air can support up to 12 valves through daughter boards that connect via right-angle header. In the future, [Amitabh] may swap these out for magnetic connections or something else that can withstand repeated use.

Blow past the break to watch Programmable Air do pick and place, control a soft gripper, and inflate a balloon. The balloon’s pressurization behavior has made [Amitabh] reconsider adding a flow meter, but so far he hasn’t found a reasonable cost per unit. Can you recommend a small flow meter that won’t break the bank? Let us know in the comments.

Continue reading “Programmable Air Makes Robotics A Breeze”

Video Of The Arduino FPGA Board Demo At Maker Faire

This week, Arduino announced a lot of new hardware including an exceptionally interesting FPGA development board aimed at anyone wanting to dip their toes into the seas of VHDL and developing with programmable logic. We think it’s the most interesting bit of hardware Arduino has released since their original dev board, and everyone is wondering what the hardware actually is, and what it can do.

This weekend at Maker Faire Bay Area, Arduino was out giving demos for all their wares, and yes, the Arduino MKR Vidor 4000 was on hand, being shown off in a working demo. We have a release date and a price. It’ll be out next month (June 2018) for about $60 USD.

But what about the hardware, and what can it do? From the original press releases, we couldn’t even tell how many LUTs this FPGA had. There were a lot of questions about the Mini PCIe connectors, and we didn’t know how this FPGA would be useful for high-performance computation like decoding video streams. Now we have the answers.

The FPGA on board the Arduino Vidor is an Altera Cyclone 10CL016. This chip has 16k logic elements, and 504 kB memory block. This is on the low end of Altera’s FPGA lineup, but it’s still no slouch. In the demo video below, it’s shown decoding video and identifying QR codes in real time. That’s pretty good for what is effectively a My First FPGA™ board.

Also on board the Vidor is a SAMD21 Cortex-M0+ microcontroller and a uBlox module housing an ESP-32 WiFi and Bluetooth module. This is a really great set of chips, and if you’re looking to get into FPGA development, this might just be the board for you. We haven’t yet seen the graphic editor that will be used to work with IP for the FPGA (for those who don’t care to write their own VHDL or Verilog), but we’re looking forward to the unveiling of that new software.