ESP32 Altair Emulator Gets Split Personality

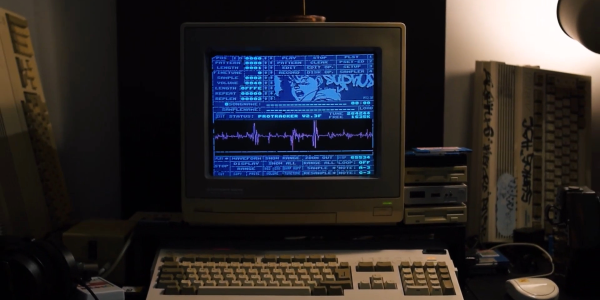
If you wanted me to demo CP/M running on an emulated Altair 8800, I’d pull out a tiny board from my pocket. You might wonder how I wound up with an Altair 8800 that runs CP/M (even WordStar), that fits in your pocket and cost less than $10. Turns out it’s a story that goes back to 1975.

When the Altair 8800 arrived back in 1975, I wanted one. Badly. I’d been reading about computers but had no hands-on experience. But back then, as far as I was concerned, the $400 price tag might as well have been a million bucks. I was working for no real pay in my family’s store, though in all fairness, adjusted into today’s money that was about $2,000.

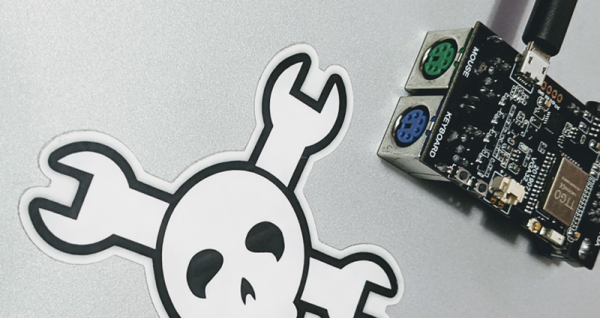
I’d love to buy one now, but a real Altair costs even more today than it did back then. They also take up a lot of desk space. Sure, there are replicas and I’ve had a few. I even helped work the kinks out of Vince Briel’s clone which I’ve enjoyed. However, the Briel computer has two problems. First, it takes a little work to drive a serial port (it uses a VGA and a PS/2 keyboard). Second, while it’s smaller than a real Altair, it is still pretty large — a byproduct of its beautiful front panel.

So to quickly show off CP/M to someone, you need to haul out a big box and find a VGA monitor and PS/2 keyboard — both of which are becoming vanishing commodities. I made some modifications to get the serial port working, but it is still a lot to cart around. You could go the software route with a simulator like SIMH or Z80pack, but now instead of finding a VGA monitor and a PS/2 keyboard, you need to find a computer where you can install the software. What I really wanted was a simple and portable device that could boot CP/M.

Continue reading “ESP32 Altair Emulator Gets Split Personality”

Restoring Commodore’s Unloved Plus/4

The Commodore Plus/4 was not loved by the marketplace after its launch in 1984. Despite its namesake feature of having productivity programs built in, its lack of compatibility with Commodore 64 software and oddball status meant that it struggled to find acceptance. However, like so many retro computers, it maintains a following to this day. [Drygol] had collected a total of eight neglected units, and set to giving them a full workover.

First on the docket is cleaning, and [Drygol] makes short work of disassembling the computers and removing decades of dirt and dust. Keycaps are treated with Retrobright to restore their original color. The black styling of the case means it gets a simple wash down instead, and then a rub with thin oil to restore the plastic’s original sheen.

[Drygol] steps through various popular hacks for the platform too, from 6510 CPU replacements for the often-failing 7501 and 8501, to SD2IEC card interfaces to replace the much-maligned storage original storage options. Damaged keyboard studs are replaced with hacked-up Amiga parts, while LEDs that are long out of production are swapped out for cut-down modern parts.

The impressive thing is just how much community support there is for an also-ran Commodore that never truly caught the public’s eye. Efforts are ongoing, too, with projects like THED aiming to reproduce some of the custom chips used on the platform.

We’ve featured posts on the engineering that goes into Commodore’s 8-bit computers as well, like this excellent piece from [Bil Herd] on the story of the Commodore 128. Of course, if you’re working your own wonders with retro hardware, you know who to call.

45 Minute Podcast Served Up On A Floppy Disk

Near the turn of the millenium, portable media players like the iPod led to the development of the podcast. The format generally consists of content similar to talk-based radio, and is typically served up in modern codecs like AAC, M4A and MP3. However, [Sean Haas] decided these were all too chunky, and wanted to see if it was possible to deliver similar content on a floppy disk. The results are predictable, but impressive.

[Sean]’s aim was to try and fit roughly 45 minutes of audio on to a 1.44 MB floppy disk. To pull this off, he looked far and wide for a codec fitting for the task. The choice landed on was Adaptive Multi-Rate, or AMR. Typically used to encode audio for GSM phone calls, it can also be used to create compressed audio files.

Initial attempts weren’t quite good enough to do the job, so [Sean] introduced a pre-processing step with FFMPEG, to speed the audio up 1.2 times. It was then passed through SoX and encoded in AMR at approximately 5 kbit/s. This allowed a 45-minute long MP3 file of 72MB to be compressed down into just 1.2 MB, and thus able to fit onto a floppy disk. Audio quality is predictably poor, as you can hear in the embedded clip below, but definitely intelligible. You’d probably want to skip any musical passages if you were doing this seriously.

Continue reading “45 Minute Podcast Served Up On A Floppy Disk”

Recreating Early Apple Mice For The Modern Era

At a time when practical graphical user interfaces were only just becoming a reality on desktop computers, Apple took a leap of faith and released one of the first commercially available mice back in 1983. It was criticized as being little more than a toy back then, but we all know how that particular story ends.

While the Apple G5431 isn’t that first mouse, it’s not too far removed. So much so that [Stephen Arsenault] believed it was worthy of historic preservation. Whether you want to print out a new case to replace a damaged original or try your hand at updating the classic design with modern electronics, his CAD model of this early computer peripheral is available under the Creative Commons license for anyone who wants it.

The model is exceptionally well detailed.

[Stephen] tells us that he was inspired to take on this project after he saw new manufactured cases for the G5431 popping up online, including a variant made out of translucent plastic. Realizing that a product from 1986 is old enough that Apple (probably) isn’t worried about people cloning it, he set out to produce this definitive digital version of the original case components for community use.

With these 3D models available, [Stephen] hopes that others will be inspired to try and modify the iconic design of the G5431. Perhaps by creating a Bluetooth version, or adding the ability to right-click. Considering we’ve already seen custom PCBs for mice, it’s hardly a stretch. We’d love to see somebody take him up on the offer, but even if not, the digital preservation of computer history is always welcome.

An Amiga Sampler 30 Years Later

There was a magic moment for a few years around the end of the 1980s, when home computers were better than professional ones. That’s a mighty grand pronouncement, but it refers to the crop of 16-bit home computers that genuinely were far better than nearly all PCs at the time for multimedia tasks. You could plug a sampler cartridge into your Amiga and be in the dance charts in no time, something which sparked a boom in electronic music creativity. As retrocomputing interest has soared so have the prices of old hardware, and for those still making Amiga music that cart can now be outrageously expensive. it’s something [echolevel] has addressed, with an open-source recreation of an Amiga sampler.

As anyone who peered inside one back int he day will tell you, an Amiga sampler was a very simple device consisting of a commonly-available 8-bit A to D converter, a CMOS switch for right and left samples, and maybe an op-amp preamplifier. This is exactly what he’s produced, save fpr the CMOS switch as he points out that Amiga musicians use mono samples anyway. At its heart is an ADC0820 half-flash ADC chip, and the whole thing is realised on a very retro-looking through-hole PCB.

For a Hackaday scribe with a Technosound Turbo still sitting in a box somewhere it’s a real trip down memory lane. It was a moment of magic to for the first time be able to edit and manipulate audio on a computer, and we’re glad to see that something of those days still lives on. See it in action in the video below the break.

Continue reading “An Amiga Sampler 30 Years Later”

This Mini Soviet Micro Will Have Astounding Attention To Detail

As the retro craze has gone mainstream, we’ve grown used to seeing “mini” versions of classic hardware, preloaded with a selection of games and ready for a wallow in nostalgia. Unfortunately for fans of the less well known platforms, the only devices to get the mini treatment so far are popular ones such as the Nintendo consoles, or the Commodore 64. This is something [Svofski] is aiming to change for one classic micro, by producing a mini version of the Soviet Vector-06c. And unlike the Commodore with its fake keyboard, this one will work in its entirety and have a fully-functional keyboard.

It’s a build that’s not finished yet. But in this case that’s no bad thing, because such is the extreme attention to detail that you’ll want to stick around and watch it unfold. The electronics will come courtesy of an FPGA recreation of the hardware, while the Vector’s unique keyboard is being recreated in miniature, with keycaps designed to fit a particular Alps switch. These are 3D-printed, painted, and then marked with their decals using stencils carefully etched from copper sheet. Even if you have no interest in the Vector-06c, these techniques could find a place in so many other projects.

The wonderfully ingenious and diverse world of Soviet technology has found its way onto these pages many times over the years, including at least one other microcomputer, and even a supercomputer. If your interests extend behind the Iron Curtain though, you might wish to read our colleague [Voja Antonic]’s account of hacking in Communist Yugoslavia.

Reverse Engineering The Charge Pump Of An 8086 Microprocessor

You’d think that the 8086 microprocessor, a 40-year-old chip with a mere 29,000 transistors on board that kicked off the 16-bit PC revolution, would have no more tales left to tell. But as [Ken Shirriff] discovered, reverse engineering the chip from die photos reveals some hidden depths.

The focus of [Ken]’s exploration of the venerable chip is the charge pump, a circuit that he explains was used to provide a bias voltage across the substrate of the chip. Early chips generally took this -5 volt bias voltage from a pin, which meant designers had to provide a bipolar power supply. To reduce the engineering effort needed to incorporate the 8086 into designs, Intel opted for an on-board charge pump to generate the bias voltage. The circuit consists of a ring oscillator made from a trio of inverters, a pair of transistors, and some diodes to act as check valves. By alternately charging a capacitor and switching its polarity relative to the substrate, the needed -5 volt bias is created.

Given the circuit required, it was pretty easy for [Ken] to locate it on the die. The charge pump takes up a relatively huge amount of die space, which speaks to the engineering decisions Intel made when deciding to include it. [Ken] drills down to a very low level on the circuit, with fascinating details on how the MOSFETs were constructed, and why eight transistors were used instead of two diodes. As usual, his die photos are top quality, as are his explanations of what’s going on down inside the silicon.

If you’re somehow just stumbling upon [Ken]’s body of work, you’re in for a real treat. To get you started, you’ll want to check out how he found pi baked into the silicon of the 8087 coprocessor, or perhaps his die-level exploration of different Game Boy audio chips.