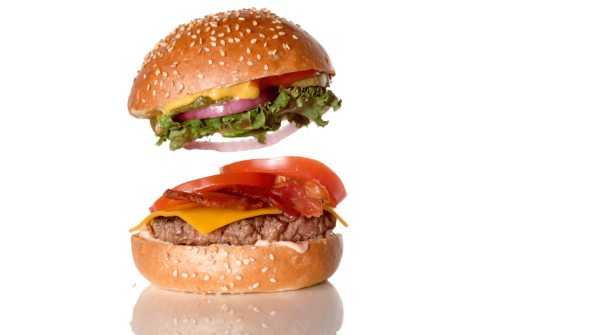
Not Even Hamsters Are Safe From The Internet Of Things

The internet of things is this strange marketing buzzword that seems to escape from the aether and infect our toasters and refrigerators. Now even a hamster is not safe.

[Mifulapirus]’s hamster, Ham, was living a pleasant hamster life. Then his owner heard about another hamster named Sushi, whose running wheel stats were broadcasted to the internet. Not to be left behind, Ham’s wheel was soon upgraded. Now Ham is burdened by the same social pressures our exercise apps try to encourage us to use. No, we are most certainly not going to tell our friends about two fourteen minute miles with a twenty minute coffee break in the middle, MapMyRun, we are not.

The feat of techno enslavement for the little hamster was accomplished with a custom board, an esp8266, and an arduino as described in the instructable. The arduino can be left out of the project now that the libraries have been ported to the esp8266. A hall effect sensor detects when the 3D printed hamster wheel is spinning.

If you’d like to check in on Ham, the little guy is alive and well, and the twitter is here. It looks like it’s been upgraded since the original article was posted. Now it shows when Ham is awake and running around the cage doing hamster errands.

Soda Fridge Hack To Fix A Lazy People Problem

[Paul] participated in a hackathon at work and created a hack to help solve what was ultimately a people problem. A soda fridge at work wasn’t getting refilled when empty. Instead of trying to make people less lazy, [Paul] went with making the fridge more needy.

The first thing [Paul] did was make a soda fridge refill sensor from a scale. As the fridge got emptier, it got lighter. The scale senses that and can decide it’s time for a refill. The only part missing was how to read the output from the scale. To do that, he took an unusual approach.
Continue reading “Soda Fridge Hack To Fix A Lazy People Problem”

ESP8266 Or MKR1000?

If you are a regular Hackaday reader, you’ve probably seen plenty of ESP8266 projects. After all, the inexpensive device is a workhorse for putting a project on WiFi, and it works well. There is a processor onboard, but, most often, the onboard CPU runs a stock firmware that exposes an AT command set or Lua or even BASIC. That means most projects have a separate CPU and that CPU is often–surprise–an Arduino.

It isn’t a big leap of logic to imagine an Arduino with an integrated WiFi subsystem. That’s the idea behind the MKR1000. But the real question you have to ask is: is it better to use an integrated component or just put an Arduino and ESP8266 together?

[Andreas Spiess] not only asked the question, but he answered it in a YouTube video (see below). He examines several factors on the MKR1000, the Arduino Due and Uno, and several other common boards. The examination covers performance, features, and power consumption.

Continue reading “ESP8266 Or MKR1000?”

DIY Vacuum Chamber Proves Thermodynamics Professor Isn’t Making It All Up

[Mr_GreenCoat] is studying engineering. His thermodynamics teacher agreed with the stance that engineering is best learned through experimentation, and tasked [Mr_GreenCoat]’s group with the construction of a vacuum chamber to prove that the boiling point of a liquid goes down with the pressure it is exposed to.

His group used black PVC pipe to construct their chamber. They used an air compressor to generate the vacuum. The lid is a sheet of lexan with a silicone disk. We’ve covered these sorts of designs before. Since a vacuum chamber is at max going to suffer 14.9 ish psi distributed load on the outside there’s no real worry of their design going too horribly wrong.

The interesting part of the build is the hardware and software built to boil the water and log the temperatures and pressures. Science isn’t done until something is written down after all. They have a power resistor and a temperature probe inside of the chamber. The temperature over time is logged using an Arduino and a bit of processing code.

In the end their experiment matched what they had been learning in class. The current laws of thermodynamics are still in effect — all is right in the universe — and these poor students can probably save some money and get along with an old edition of the textbook. Video after the break.

Continue reading “DIY Vacuum Chamber Proves Thermodynamics Professor Isn’t Making It All Up”

Fail Of The Week: Don’t Tie Those Serial Lines High

Fail Of The Week is a long-running series here at Hackaday. Over the years we’ve been treated to a succession of entertaining, edifying, and sometimes downright sad cock-ups from many corners of the technological and maker world.

You might think that we Hackaday writers merely document the Fails of others, laughing at others’ misfortunes like that annoying kid at school. But no, we’re just as prone to failure as anyone else, and it is only fair that we eat our own dog food and tell the world about our ignominious disasters when they happen.

And so we come to my week. I had a test process to automate for my contract customer. A few outputs to drive some relays, a few inputs from buttons and microswitches. Reach for an Arduino Uno and a prototyping shield, divide the 14 digital I/O lines on the right into 7 outputs and 7 inputs. Route 7 to 13 into a ULN2003 to drive my relays, tie 0 to 6 high with a SIL resistor pack so I can trigger them with switches to ground. Job done, and indeed this is substantially the hardware the test rig ended up using.

So off to the Arduino IDE to write my sketch. No rocket science involved, a fairly simple set of inputs, outputs, and timers. Upload it to the Arduino, and the LED on pin 13 flashes as expected. Go for a well-deserved lunch as a successful and competent engineer who can whip up a test rig in no time.

Back at the bench refreshed by the finest British pub grub, I started up the PC, plugged the shield into the Arduino, and applied the power. My sketch worked. But wait! There’s a slight bug! Back to the IDE, change a line or two and upload the sketch.

And here comes my fail. The sketch wouldn’t upload, the IDE reported a COM port error. “Damn’ Windows 10 handling of USB serial ports”, I thought, as I’m not a habitual Windows user on my own machines. Then followed something I’ve not done for quite a while; diving into the Windows control panel to chase the problem. Because it had to be a Windows problem, right?

arduino-serial-pinsThe seasoned Arduinisti among you probably spotted my fail four paragraphs ago. We all know that pins 0 and 1 on an Arduino are shared with the serial port, but who gives it a second thought? I guess I’d always had the good fortune to drive those pins from lines which didn’t enforce a logic state, and had never ended up tying them high. Hold them to a logic 1, and the Arduino can’t do its serial thing so sketches stay firmly in the IDE.

I could have popped the shield off every time I wanted to upload a new sketch, but since in the event I didn’t need all those inputs I just lifted the links tying those pins high and shifted the other inputs up the line. And went home that evening a slightly less competent engineer whose ability to whip up a test rig in no time was a bit tarnished. Ho hum, at least the revised sketch worked and the test rig did its job exactly as it should.

So that’s my Fail Of The Week. What’s yours?

Header image: pighixxx.com, CC-BY-ND via MarkusJenkins


2013-09-05-Hackaday-Fail-tips-tileFail of the Week is a Hackaday column which celebrates failure as a learning tool. Help keep the fun rolling by writing about your own failures and sending us a link to the story — or sending in links to fail write ups you find in your Internet travels.

Gear Clock Uses Stepper Motor

[Rjeuch] liked a wooden clock he saw on the Internet, but the gears were produced with a proprietary software tool. So he built his own version. Unlike the original, however, he chose to use a stepper motor to drive the hands.

The clock’s gears aren’t just for show, and the post does a good job explaining how the gears work, how you might customize them, and how they fit together. The clock’s electronics rely on an Arduino.

Continue reading “Gear Clock Uses Stepper Motor”

Home Made Pen Plotter

As someone who started using computers in the last century, I find the current resurgence of pen plotters somewhat nostalgic. The difference, of course, is that this century it is easier to make your own, which is what [Miguel Sanchez] is doing.

Inspired by the Axidraw, he is making his own pen plotter. He’s made great progress so far, creating a design that looks quite simple to build. His design is driven by an Arduino Uno with a stepper shield, a couple of NEMA 17 stepper motors and a servo to raise and lower the pen. Throw in a few rods, a belt or two and a number of 3D printed parts, and you’ve got a decent looking pen plotter.

He originally started with laser cut components, but shifted over to 3D printing as the design evolved. It’s not as fancy as the HP pen plotter I used to print out rude words in giant letters with in my youth (a HP7475, I think), but it is a neat build. Check it in action in the video below.

Continue reading “Home Made Pen Plotter”