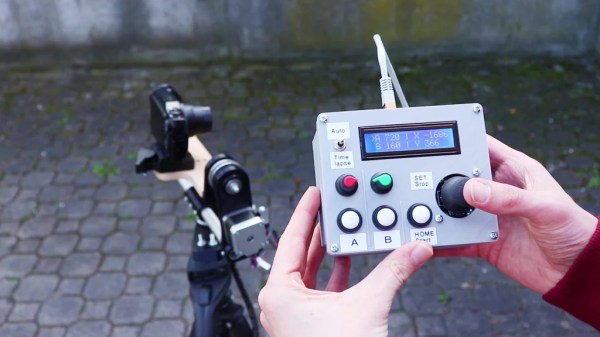
Arduino Nano Powers Reverse Polish Notation Calculator

There’s something about Reverse Polish Notation (RPN) and the calculators that use it. It calls to mind a time when a calculator was a serious tool, and not just a throwaway toy. Created in the legacy of such calculators by HP and Texas Instruments, [Simon Boak] shows off his SB116, sporting an Arduino Nano under the hood. It’s a fully custom design, with a hand-built metal case, a custom PCB for the keyboard, and a tiny OLED display for maximum retro green goodness.

The impetus for this build was to replace a particular calculator, a well-used TI Programmer, that’s useful for working with 6502 assembly. The SB116 supports binary, octal, decimal, and hex; and boasts some downright useful functions — AND, NOT, OR, XOR, and bitshifts. The source code is available, but you’re on your own for the case and keyboard. And for maximized retro faux-nostalgia, [Simon] designed a box that would have looked right at home on an 80s store shelf.

Stick around for more retro-modern takes on calculators, or tales of repairing a genuine vintage model.

Ethersweep: An Easy-To-Deploy Ethernet Connected Stepper Controller

[Neumi] over on Hackaday.IO wanted a simple-to-use way to drive stepper motors, which could be quickly deployed in a wide variety of applications yet to be determined. The solution is named Ethersweep, and is a small PCB stack that sits on the rear of the common NEMA17-format stepper motor. The only physical connectivity, beside the motor, are ethernet and a power supply via the user friendly XT30 connector. The system can be closed loop, with both an end-stop input as well as an on-board AMS AS5600 magnetic rotary encoder (which senses the rotating magnetic field on the rear side of the motor assembly – clever!) giving the necessary feedback. Leveraging the Trinamic TMC2208 stepper motor driver gives Ethersweep silky smooth and quiet motor control, which could be very important for some applications. A rear-facing OLED display shows some useful debug information as well as the all important IP address that was assigned to the unit.

Control is performed with the ubiquitous ATMega328 microcontroller, with the Arduino software stack deployed, making uploading firmware a breeze. To that end, a USB port is also provided, hooked up to the uC with the cheap CP2102 USB bridge chip as per most Arduino-like designs. The thing that makes this build a little unusual is the ethernet port. The hardware side of things is taken care of with the Wiznet W5500 ethernet chip, which implements the MAC and PHY in a single device, needing only a few passives and a magjack to operate. The chip also handles the whole TCP/IP stack internally, so only needs an external SPI interface to talk to the host device.

Continue reading “Ethersweep: An Easy-To-Deploy Ethernet Connected Stepper Controller”

Touch Tone MIDI Phone And Vocoder Covers Daft Punk

[poprhythm]’s Touch Tone MIDI Phone is a fantastic conversion of an old touch tone phone into a MIDI instrument complete with intact microphone, but this project isn’t just about showing off the result. [poprhythm] details everything about how he interfaced to the keypad, how he used that with an Arduino to create a working MIDI interface, and exactly how he decided — musically speaking — what each button should do. The LEDs on the phone are even repurposed to blink happily depending on what is going on, which is a nice touch.

Of course, it doesn’t end there. [poprhythm] also makes use of the microphone in the phone’s handset. Since the phone is now a MIDI instrument with both a microphone and note inputs, it’s possible to use them together as the inputs to vocoder software, which he demonstrates by covering Around the World by Daft Punk (video).

We love how [poprhythm] explains how he interfaced to everything because hardware work is all about such details, and finding the right resources. Here’s the GitHub repository for the Arduino code and a few links to other resources.

We have seen MIDI phone projects before, and each one is always unique in its own way: here’s a different approach to converting a keypad phone to MIDI, and this rotary pulse-dial phone went in a completely different direction with the phone itself completely unmodified, using only external interfacing.

You can admire [poprhythm]’s Touch Tone MIDI Phone in action in the short videos embedded below, with each one showing off a different aspect of the build. It’s great work!

Continue reading “Touch Tone MIDI Phone And Vocoder Covers Daft Punk”

The Ease Of Wireless Charging, Without The Wait

Historically, there have been a few cases of useful wireless power transmission over great distances, like a team at MIT that was able to light up a 60 W bulb at several meters, and of course Nikola Tesla had grand dreams of drawing energy from the atmosphere. But for most of us wireless power is limited to small, short-range devices like cellphone chargers. While it’s not a lot of work to plug in a phone when it needs a charge, even this small task can be automated.

This build begins with a 3D printed cradle for the smartphone to sit in. When the device detects that the phone has been placed in the cradle, it uses a linear actuator to drive a custom-built charging cable into the phone’s USB port. Similarly, when the phone is lifted from the cradle the cable is automatically removed. It appears that there is some play in the phone’s position that lets the charger be plugged in smoothly, and the project’s creator [Larpushka] points out that the linear actuator is not particularly strong so we don’t imagine the risk of damage is very high.

While wireless charging still may have the edge when it comes to keeping debris out of the port, we still really enjoy a project like this that seems to be done for its own sake. There are some improvements that [Larpushka] plans to make, but for now we’re delighted by this build. For anyone looking to add true wireless charging to any phone that doesn’t have it, though, it’s not too difficult to accomplish either.

PET Bottles Diligently Turned Into Filament

While the price of 3D printers has come down quite a lot in the past few years, filament continues to be rather pricey especially for those doing a lot of printing. This has led to some people looking to alternatives for standard filament, including recycling various forms of plastic. We’ve seen plenty of builds using various materials, but none so far have had this level of quality control in the final project.

What sets this machine apart from others is that it’s built around an Arduino Nano and includes controls that allow the user to fine-tune a PID controller during the conversion of the recycled plastic into filament. Different plastic bottles have different material qualities, so once the machine is started it can be adjusted to ensure that the filament produced has the exact specifications for the printer. The PCB is available for download, and the only thing that needs to be done by hand besides feeding the machine to start it is to cut the plastic into strips for the starter spool. There is also a separate 3D printed tool available to make this task easy, though.

Not only could this project save printing costs, but it also keeps harmful plastics out of landfills and other environments. Recycling plastic tends to be quite difficult since producing new plastic is incredibly cheap, and the recycled material can’t be used as often as other materials such as aluminum. But there are still plenty of people out there trying to reuse as much of it as they can.

Continue reading “PET Bottles Diligently Turned Into Filament”

Back To The Future Prop Can Tell When It Hits 88 MPH

Obviously, the most iconic piece of fictional hardware from the Back to the Future films is Doc Brown’s DeLorean DMC-12 time machine. But we’d have to agree with [Jason Altice] of CodeMakesItGo that the second-most memorable gadget is the modified Futaba remote control used to control the DeLorean from a distance. Now, thanks to his detailed build guide, you can build your own version of the time machine’s controller — complete with working speed readout.

Now to be clear, [Jason] isn’t claiming that his build is particularly screen accurate. It turns out that the actual transmitter used for the prop in the film, the Futaba PCM FP-T8SGA-P, has become difficult to find and expensive. But he argues that to the casual observer, most vintage Futaba transmitters are a close enough match visually. The more important part is recreating the extra gear Doc Brown bolted onto his version. Continue reading “Back To The Future Prop Can Tell When It Hits 88 MPH”

Want To Use A Classic Mac Mouse On A Modern Computer? No? Here’s How To Do It Anyway

Need to hook a classic Mac mouse up to your modern machine with the help of a DIY USB adapter? [John Floren] has you covered. [John]’s solution uses a board with an ATmega32U4 microcontroller on it to connect to the Mac mouse on one end, and emulate a USB HID (Human Interface Device) on the other. A modern machine therefore recognizes it like it would any other USB input device.

Why is this necessary? The connector on the classic Mac mouse may look like a familiar DE-9 connector, but it is not an RS-232 device and wouldn’t work if it were plugged into a 9-pin serial port. The classic Mac mouse uses a different pinout, and doesn’t have much for brains on the inside. It relies on the host computer to read its encoders and button states directly.

This project is actually a bit of an update to a piece of earlier work [John] did in making a vintage Depraz mouse work with modern systems. He suspected that it wouldn’t take much to have it also work with a classic Mac mouse, and he was right — all it took was updating the pin connections and adding some pull-up resistors. The source code and design files are on GitHub.

Even if one does not particularly want to use a classic Mac mouse for daily work, there’s definitely value in this kind of thing for those who deal in vintage hardware: it allows one to function-check old peripherals without having to fire up a vintage machine.

Continue reading “Want To Use A Classic Mac Mouse On A Modern Computer? No? Here’s How To Do It Anyway”