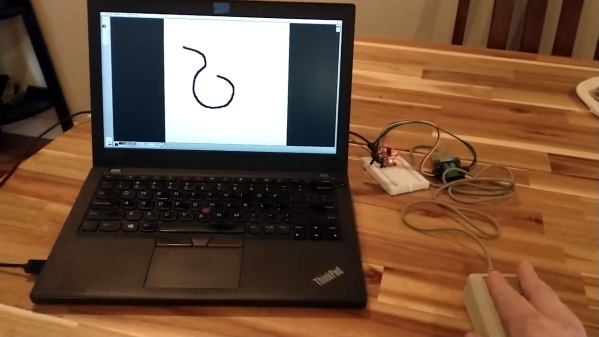
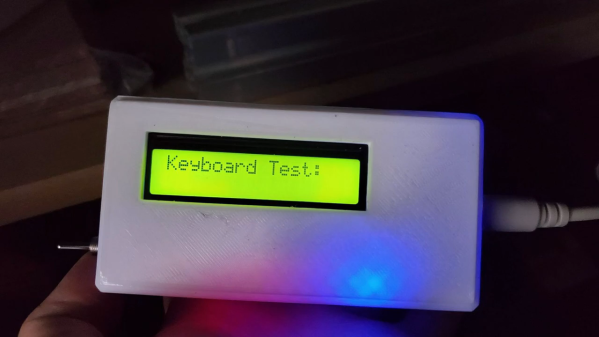
A USB interface connected to a Psion Organiser II

Arduino Nano Adds USB Interface To The Psion Organiser II

Introduced in 1984, the Psion Organiser series defined the first generation of electronic organizers or PDAs (personal digital assistants). Even though these devices are now over 30 years old, the Psion Organiser scene is alive and well: with new hardware and software is still being developed by enthusiasts the world over.

A USB interface connected to a Psion Organiser II
The Organiser II, with its brand-new USB interface

One of those enthusiasts is [James Stanley], who designed and built a USB interface for the Psion Organiser II. Although a “CommsLink” module providing an RS-232 port was available back in the day, it’s become hard to find, inspiring [James] to design a completely new module based on an Arduino Nano. Hooking it up to the Psion’s data bus was a simple matter of wiring up the eight data lines to the Nano’s GPIO ports. A set of series resistors served to prevent bus contention without having to add glue logic.

Getting the software working was a bit more difficult: the Organiser’s native OPL programming language doesn’t allow the user to directly access the expansion port’s memory address, so [James] had to write a routine in HD6303 machine code to perform the read, then call that routine from OPL to display the result on the screen. Currently, the routine only supports reading data from the Arduino, but extending it to a bidirectional interface should be possible too.

Finally, [James] designed and 3D printed a neat enclosure for the Arduino-USB interface, which makes it look almost as sleek as the original CommsLink module. Perhaps with a bit of further development, this could turn into another way to connect old Psions to the internet. We’ve also featured a new type of Datapak to enhance the Organiser’s memory. Continue reading “Arduino Nano Adds USB Interface To The Psion Organiser II”

Arduino Activated Automotive Aerodynamic Apparatus Is… (Spoiler Alert!)

Sometimes a great hack is great for no other reason than that it’s fun, and [Michael Rechtin]’s DIY Active Aero Spoiler and Air Brake certainly qualifies as a fun hack. This is a mod designed to live in a world where looks are everything, stickers add horsepower, and a good sound system is more important than good wheel alignment. Why is that? Because like the switch that exists only to activate the mechanism that turns it off, the DIY Active Aero Spoiler and Air Brake seen below is almost completely useless. So to understand its allure, we must understand its inspiration.

For a few decades now, luxury sports car manufacturers have been adding active aerodynamic components to their vehicles. For example, several Porsche models feature adaptive spoilers that adjust to driving conditions. Super cars such as the Bugatti Veyron have spoilers that flip up at high angles during braking to increase drag and reduce braking distance. All of these features are sadly missing from the average two or four door family-car-turned-wannabe-track-fiend. Until now!

[Michael] has created a new active spoiler for every mall-bound muffler-challenged hand me down. The build starts with a CNC cut foam wing which is covered with fiberglass, Bondo (an automotive necessity) and some faux carbon fiber for that go-fast feel. An Arduino, IMU, two servos, and a battery pack detect deceleration and automatically increase the spoiler angle just like the big boys, but without needing any integration into the vehicles systems. Or bolts, for that matter.

It’s unlikely that the braking force is enough to slow down the vehicle though, given that it’s not enough to pop the suction cups holding it to the trunk lid. But does it have the “wow” factor that it was designed to induce? Spoiler Alert: It does!

As it turns out, this isn’t the first adjustable spoiler featured here at Hackaday, and this adjustable spoiler on a car that’s made for actual racing is quite interesting.

Continue reading “Arduino Activated Automotive Aerodynamic Apparatus Is… (Spoiler Alert!)”

Meowing Box Will Befuddle Your Friends

If you don’t own a cat, hearing the sound of one meowing from somewhere in the house probably comes as quite a shock. The Cat Prank box built by [Reuben] promises to deliver such hilarity with aplomb. 

The idea is simple: hide the Cat Prank box in a cupboard or other space in a friend’s house, and it will meow from its secret location. When found, either the light sensor or motion sensor will trigger the yowling of an angry feline, with hopefully startling effects.

An Arduino Mini is the brains of the operation, paired with an XY-V17B sound module which plays the required animal wailings. There’s also a 433 MHz radio module that lets the prankster trigger meowing via remote control.

Code is available for those wishing to build their own. We’d love to see a mod with a time delay built in, so the device could be hidden and left to start meowing at some later date when the prankster is far away.

Similar work has graced these pages before, like the devilishly fiendish OpenKobold design. Just make sure your friends are receptive to such jokes before you go ahead and invest time and hardware in the prank!

Arduino Meets Quantum Computer

Quantum computers aren’t quite ready for the home lab, but since there are ways to connect to some over the Internet, you can experiment with them more easily than you might think. [Norbert] decided to interface a giant quantum computer to an ordinary Arduino. Why? Well, that isn’t necessarily clear, but then again, why not? He explains basic quantum computing and shows his setup in the video below.

Using the IBM quantum computer and the open source Qiskit makes it relatively easy, with the Python code he’s using on the PC acting as a link between the Arduino and the IBM computer. Of course, you can also use simulation instead of using the real hardware, and for such a simple project it probably doesn’t matter.

Granted, the demo is pretty trivial, lighting an LED with the state of qubit. But the technique might be useful if you wanted to, say, gather information from the real world into a quantum computer. You have to start somewhere.

We’ve looked at quantum computers before. They tell us it is the next big thing, so we want to be prepared. Qiskit is one of several options available today to make it easier.

Continue reading “Arduino Meets Quantum Computer”

Servo Plotter Needs Nothing Exotic

Although the widespread use of 3D printers has made things like linear bearings and leadscrews more common, you still can’t run down to your local big-box hardware store and get them. However, you can get drawer slides and any hobby shop can sell you some RC servos. That and an Arduino can make a simple and easy plotter. Just ask [JimRD]. You can also watch it do its thing in the video below.

Of course, servos aren’t usually what you use in a plotter. But the slides convert the rotation of the servo into linear motion. One servo for X and one for Y is all you need. Another microservo lifts the pen up and down using a hinge you could also get from a hardware store.

Continue reading “Servo Plotter Needs Nothing Exotic”

This film projecter is hiding an Arduino Uno that controls a water-based cooling system.

Cool The Shop With A Thermal Battery-Based System

Having any kind of shop is pretty great, no matter how large it may be or where it’s located. If the shop is in an outbuilding, you get to make more noise. On the other hand, it will probably get pretty darn hot in the summer without some kind of cooling system, especially if you don’t have a window for a breeze (or a window A/C unit).

Five 55-gallon tanks of tap water are buried just outside the shop.[Curtis in Seattle] built an awesome thermal battery-based cooling system for his shop. The battery part consists of five 55-gallon drums full of tap water that are connected in series and buried a foot underground, about two feet out from the wall. There are two radiators filled with water and strapped to 20″ box fans  — one inside the shop, which sends heat from the shop into the water, and another outside that transfers heat out of the water and into the cool night air. Most summer days, the 800-square-foot shop stays at a cool 71°F (21.7°C).

We love that the controls are housed in an old film projector. Inside there’s an Arduino Uno running the show and taking input from four DS18B20 one-wire temperature sensors for measuring indoor, outdoor, battery, and ground temperatures. There are four modes accessible through the LCD menu — idle, cool the shop, recharge mode, and a freeze mode in case the outside temperature plummets. Why didn’t [Curtis in Seattle] use anti-freeze? It’s too expensive, plus it doesn’t usually get that cold. (Although we hear that Seattle got several inches of snow for Christmas.) Check it out after the break.

If you can’t just go burying a bunch of 55-gallon drums in the ground where you live, consider building a swamp cooler out of LEGO.

Continue reading “Cool The Shop With A Thermal Battery-Based System”

A 3D-printed macropad that needs no solder or screws.

Snap-Together Macropad Does It Without Solder

Maybe we’re biased, but we think everyone has a use for a macropad. It’s just a matter of time before a highly personalized set of speed controls starts to sound like a great time-saving device to have around.

The column wire is red, and the row wire is blue. A printed clip snaps on to separate the two.Trouble is, macropads are usually kind of expensive to buy outright, and not everyone feels comfortable building keyboards. Okay, so what if you didn’t even have to solder anything? That’s the idea behind [Jan Lunge]’s hand-wired macropad.

You will still want to open a window for ventilation if you build this one, because this macropad requires a lot of 3D printing. What it doesn’t require is glue or screws, because everything snaps together.

Of course, the star of this build is [Jan]’s hot swap socket design. We especially love the little clip that holds the column wires in place while also providing a spacer between those and the row wires. Everything is connected up to a Pro Micro with non-insulated wire and held in place with bends at the ends and the magic of tension. Be sure to check out the build video after the break.

Thirsty for more than a six pack of switches? This design is easy to scale up until you run out of microcontroller inputs. At that point, you might want to add screens to keep track of all your macros.

Continue reading “Snap-Together Macropad Does It Without Solder”