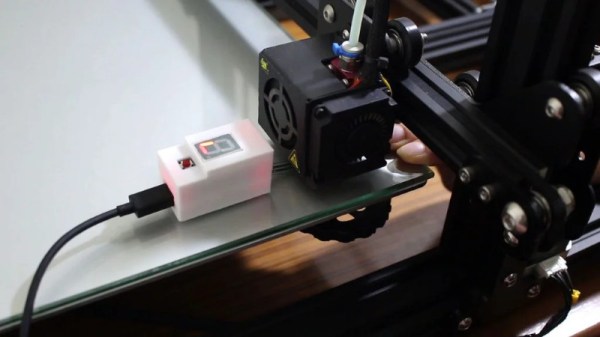
The Augmented Reality Breadboard Of The Future

You’d be hard pressed to find a carpenter who didn’t own a hammer, or a painter that didn’t have a couple of brushes kicking around. Some tools are simply so fundamental to their respective craft that their ownership is essentially a given. The same could be said of the breadboard: if you’re working with electronics on the hobby or even professional level, you’ve certainly spent a decent amount of time poking components and wires into one of these quintessential prototyping tools.

There’s little danger that the breadboard will loose its relevance going forward, but if [Andrea Bianchi] and her team have anything to say about it, it might learn some impressive new tricks. Developed at the Korean Advanced Institute of Science and Technology, VirtualComponent uses augmented reality and some very clever electronics to transform the classic breadboard into a powerful mixed-reality tool for testing and simulating circuits. It’s not going to replace the $3 breadboard you’ve got hiding at the bottom of your tool bag, but one day it might be standard equipment in electronics classrooms.

The short version is that VirtualComponent is essentially a dynamic breadboard. Holes in the same row are still electrically linked like in the classic breadboard, but with two AD75019 cross-point switch arrays and an Arduino in the base, it has the ability to virtually “plug in” components at arbitrary locations as selected by the user. So rather than having to physically insert a resistor, the user can simply tell the software to connect a resistor between two selected holes and the cross-point array will do the rest.

What’s more, many of those components can be either simulated or at least augmented in software. For example, by using AD5241 digital potentiometers, VirtualComponent can adjust the value of the virtual resistor. To provide variable capacitance, a similar trick can be pulled off using an array of real capacitors and a ADG715 digital switch to connect them together; essentially automating what the classic “Decade Box” does. In the demonstration video after the break, this capability is extended all the way out to connecting a virtual function generator to the circuit.

The whole system is controlled by way of an Android tablet suspended over the breadboard. Using the tablet’s camera, the software provides an augmented reality view of both the physical and virtual components of the circuit. With a few taps the user can add or edit their virtual hardware and immediately see how it changes the behavior of the physical circuit on the bench.

People have been trying to improve the breadboard for years, but so far it seems like nothing has really stuck around. Given how complex VirtualComponent is, they’ll likely have an even harder time gaining traction. That said, we can’t help but be excited about the potential augmented reality has for hardware development.

Continue reading “The Augmented Reality Breadboard Of The Future”

Make Physics Fun With A Trebuchet

What goes up must come down. And what goes way, way up can come down way, way too fast to survive the sudden stop. That’s why [Tom Stanton] built an altitude recording projectile into an oversized golf ball with parachute-controlled descent. Oh, and there’s a trebuchet too.

That’s a lot to unpack, but suffice it to say, all this stems from [Tom]’s obvious appreciation for physics. Where most of us would be satisfied with tossing a ball into the air and estimating the height to solve the classic kinematic equations from Physics 101, [Tom] decided that more extreme means were needed.

Having a compound trebuchet close at hand, a few simple mods were all it took to launch projectiles more or less straight up. The first payload was to be rocket-shaped, but that proved difficult to launch. So [Tom] 3D-printed an upsized golf ball and packed it with electronics to record the details of its brief ballistic flight. Aside from an altimeter, there’s a small servo controlled by an Arduino and an accelerometer. The servo retracts a pin holding the two halves of the ball together, allowing a parachute to deploy and return the package safely to Earth. The video below shows some pretty exciting launches, the best of which reached over 60 meters high.

The skies in the field behind [Tom]’s house are an exciting place. Between flying supercapacitors, reaction wheel drones, and low-altitude ISS flybys, there’s always something going on up there.

Continue reading “Make Physics Fun With A Trebuchet”

New Arduino Nano Line Rolls Out In Four Flavors At Maker Faire Bay Area

Arduino has announced a new line of Nano boards that will begin shipping next month. From the design, to the chips and features on the board, to the price, there’s a lot that is new here. I stopped by their booth at Maker Faire Bay Area for a look at the hardware.

Immediately noticeable is the new design for the pins on either side of the board, which has transitioned from through-hole to a castellated through-hole hybrid. The boards can be ordered with or without pin headers soldered in place. If you get them without, you can reflow these nano boards as modules on a larger PCB design. Recommended footprints are not yet available but I’m told they will be published soon.

The most basic model in this lineup is the “Nano Every”, a 5V board with the ATmega4809 at its center. This brings 48 KB of flash and 6 KB of RAM to the party, running at 20 Mhz. A really nice touch is the inclusion of power regulation that turns up to 21 V of input into the regulated 5 V for the chip, with the added bonus of sourcing up to 1 A for external components through the 5 V pin on one of the headers. For the hackers out there, you can choose to inject your unregulated power through the VIN line, or the USB header.

All of this is a really nice upgrade to the previously available Nano design, with the $9.90 price tag making it a really desirable board for your 8-bit microcontroller needs. The one critique that comes to my mind is that the pins are labeled nicely on the bottom silk screen, but I would also have liked to see these labels on the top layer. When used in a breadboard, or soldered to another PCB, pin labels will be hidden.

The rest of the Nano family center around more powerful chips. As mentioned above, the “Nano Every” board runs an 8-bit chip at 5 V, but the three different “Nano 33” boards have 32-bit chips running at 3.3 V. There’s an “IoT” version with an Arm Cortex-M0+ SAMD21 processor, 6-axis IMU, plus a uBlox NINA-W10 modules which is an ESP32-based board for WiFi, Bluetooth, and cryptography features. MSRP on this board is $18.

The “Nano 33 BLE” and “Nano 33 BLE Sense” boards both do away with the SAMD21 chip and utilize the Nordic nRF52480 which is part of the uBlox NINA-B306 modules and provide Bluetooth connectivity. At $19, the BLE flavor gets you a 9-axis accelerometer. For an additional ten bucks, the “BLE Sense” adds a slew of sensors: pressure, humidity, digital proximity, ambient light, gesture sensor, and a microphone. Pre-orders for these two are slated to begin shipping this July.

The new Arduino Nano designs bring a lot of power to a small footprint. I have to wonder if Arduino is looking to compete with ESP32 modules. The castellated edges on ESP32 modules have allowed them to pop up in all kinds of development boards and other products. The new Nano design continues the legacy of Arduino boards being prototype friendly, but adds the ability to include the boards in a product design based on surface mount assembly.

Desktop Weather Monitor Leaves Nothing To Chance

[Mirko Pavleski] has put together a little weather station for himself that combines Internet-sourced forecasts with physical sensor data to give him a complete view of his local conditions. There’s no shortage of weather applications for our smartphones and computers that will show us the current local conditions and the forecast for the next couple of days. It’s so easy to pull weather data from the various APIs out there that you even see the functionality “baked in” to different gadgets these days. Of course, you can dig through every weather API in the world and not find the temperature and humidity inside your office; for that, you need your own sensors.

[Mirko] took a somewhat unconventional approach by essentially building two totally separate weather devices and packing them into one enclosure, which gives the final device a rather unique look thanks to the contrasting display technologies used.

Local conditions are detected by an Arduino Nano connected to a BMP180 sensor and displayed on a Nokia 5110 LCD. The screen shows not only real-time temperature and barometric pressure, but the change in pressure over the last several hours. The three-day forecast, on the other hand, is provided by a NodeMCU ESP8266 development board connected to the increasingly ubiquitous 0.96 inch OLED.

If you’re not into the whole duality thing and would rather do it all on the same device, you might be interested in one of the ESP8266 weather monitors we’ve seen in the past.

Braille Keyboard Finds Its Voice

If you have a serious visual impairment, using a computer isn’t easy. [Dhiraj] has a project that allows people fluent in Braille to use that language for input. In addition to having a set position for fingers, the device also reads the key pressed as you type. With some third party software it is possible to even create Word documents, according to [Dhiraj].

You can see the finished product in the video below. This is one of those projects where the idea is the hardest part. Reading six buttons and converting them into characters is fairly simple. Each Braille character uses a cell of six bumps and the buttons mimic those bumps (although laid out for your fingers).

Continue reading “Braille Keyboard Finds Its Voice”

Build A Sprint Race Timer To Help Your Training

Any exercise is a positive thing, but if you’re looking to improve over time, you’ve got to measure your performance. [Nikodem Bartnik] is a runner and is looking to improve his sprinting abilities. Naturally, an Arduino is the perfect companion to help in this quest (YouTube link, embedded below).

The Arduino is built into a 3D printed enclosure, with several buttons for input. Rather unconventionally, a small e-paper display was chosen for the interface. This has the benefits of being easily readable outdoors during the day, as well as using very little power.

The device is simple to use, and makes training alone a breeze. The distance to be run can be selected, and the unit emits a series of beeps to indicate to the runner when to begin. The timer is placed at the finish line, and detects the runner passing by with an ultrasonic sensor.

It’s a useful build for sprint timing, and could be made even more versatile with a remote start function. If you need to time Hot Wheels instead of sprinters, don’t worry – there’s a build for you too. Video after the break.

Continue reading “Build A Sprint Race Timer To Help Your Training”

Stator Library Makes Your Arduino Code Easier To Read

The readability of your code can make the difference between your project being a joy to work on, or an absolute headache. This goes double when collaborating with others. Having easily parsed code reduces your cognitive load and makes solving problems easier. To try and help with this, [PTS93] developed the Stator library to make certain common tasks simpler to read.

The aim of the library is to get rid of piles of state tracking variables and endless if/else statements – hence the name. It’s designed primarily for the Arduino IDE but doesn’t have any dependencies on the API, so can be used in other C++ environments. It comes with a variety of neat tools for common jobs, such as reading an analog sensor with hysteresis around a trigger point, as well as easy ways to track state changes across multiple variables. By using basic English terms instead of condition checks and mathematical operators, it can make things more readable and easier to follow.

The power of the Arduino platform has always been in its easy to use libraries that make everything easier, from interfacing LCDs to working with Amazon Dash buttons.