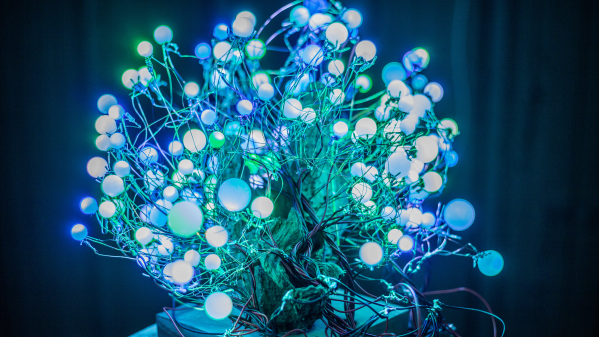
kumiko from nails

Nail This Tricky Kumiko Pattern

[Pask Makes] has previously made Kumiko patterns in wood and was happy with the results, but he wondered if he could make something visually similar from metal instead of wood.

For that, he reached for nails as it is a cheap source of uniform small rods of metal. Kumiko is, funny enough, a technique known for joining small pieces of wood without nails. There are many different patterns that use the technique and most are inspired by nature. It is the pressure of the wood in the pattern itself that holds it together and requires dedicated planning and thousands of minute adjustments. Since [Pask] was using a MIG welder to hold the nails together, it isn’t technically Kumiko but rather a Kumiko pattern.

The first step was to take the coating off the nails, which is something a little acid does a wonderful job with. After dropping a little acid, his nails were prepped and he was ready to tack them together. He printed a template on a sheet of paper and used a straight edge and a palm router with a groove bit to cut little channels for each of the nails to sit in. The nails were trimmed to the correct width with the help of a small jig. After he had tacked the nails together, he came back and filled in the centers.

It’s a straightforward little project that creates a beautiful pattern and it’s a good reminder that simple materials can make complex things. If you prefer the wood look, this Kumiko guitar might be more to your taste. Video after the break.

Continue reading “Nail This Tricky Kumiko Pattern”

Pop Goes The Mechanical Ping Pong Sculpture

In the waiting rooms of some dentists or doctors, you might have seen a giant metal ball rolling around in a large glass case. While it sure beats looking through those magazines, the sculpture can’t have come cheap. But not all of us want to pay high-end prices for fun toys. As a more cost-effective alternative, [JBV Creative] built an awesome 3D-printed ping pong sculpture.

The basic concept is the same as those fancy sculptures: a ball goes up, moves through some sort of impressive range of motion as it makes its way back down, and some sort of drive mechanism pushes it back to repeat the cycle anew. The design of this particular art piece is no different. A ping-pong ball falls down a funnel into a queue where balls are slowly loaded via a 12-way Geneva mechanism. An Archimedes spiral cam charges an elastic band that yeets the ball up and out of the track and sends it sailing through the air and down inside the funnel mentioned earlier. Everything on this sculpture is 3D-printed aside from the rubber bands and the ping pong balls.

What’s tricky about these sorts of things is the precision required both in printing and in design. It needs to run for hundreds if not thousands of hours and make no mistake. Making something work correctly 99% of the time is hard, but that last 1% can be almost as much work as that first 99%. [JBV Creative]’s first attempt had a catapult mechanism and he printed and tried out several scoops, but none gave the trajectory that he was looking for.

[JBV Creative] tried a plunger mechanism, but without a counterbalance weight providing the power, it just didn’t have enough oomph to launch the ball. Luckily, holes were included in the design, so it was relatively easy to adapt what had already been printed to use rubber bands instead. An additional goal was to have no visible fasteners, so everything needed to be mounted from the back. Check it out in action after the break.

It’s an incredible project that took serious thought, dedication, and in [JBV Creative]’s words, plenty of CAD twirling. It’s a great lesson in iterating and experimentation. If your talents are more soldering-based rather than CAD-based, perhaps a circuit sculpture is more up your alley?

Continue reading “Pop Goes The Mechanical Ping Pong Sculpture”

3D Printed Suncatcher Shines In The Light

Diffraction gratings create beautiful rainbow patterns when interacting with natural white light, and [audreyobscura] was familiar with their properties.  Thus, she set about producing an attractive 3D-printed suncatcher ornament that positively shines in the sun.

The design is straightforward, consisting of a 3D printed frame made of pieces glued together using QuickGrab glue. The pieces come together into a 7-segment star design, with a subtle 3D structure to it which helps add strength in addition to looking good.

Once assembled, sections of plastic diffraction grating are cut to size using a Curio desktop cutter. These are then glued into each segment of the star. While it’s possible to 3D print pieces with diffraction-grating like effects, using the film in this way allows light to pass through the suncatcher to create a more impressive effect.

On a cloudy day, the suncatcher looks almost entirely unassuming. However, when Earth’s nearest star shines, it projects glorious rainbows throughout the room, and letting it sway in the breeze lets the light play across the walls.

It’s a nice build, and a relatively easy ornament to make even if you’re new to 3D printing. We do like a good bit of decoration around here, especially if it’s a tiny version of a real TV. Video after the break.

Continue reading “3D Printed Suncatcher Shines In The Light”

Sound And Light Play Off Acrylic And Wire In This Engaging Circuit Sculpture

It’s no secret that we really like circuit sculptures around here, and we never tire of seeing what creative ways people come up with to celebrate the components used to make a project, rather than locking them away in an enclosure. And a circuit sculpture that incorporates sound and light in its design is always a real treat to discover.

Called “cwymriad” by its designer, [Eirik Brandal], this sound sculpture incorporates all kinds of beautiful elements. The framework is made from thick pieces of acrylic, set at interesting angles to each other and in contrasting colors. The sound-generating circuit, which uses square wave outputs from an ESP32 to provide carrier and modulation signals for a dual ring modulator, is built on a framework of tinned wires. The sounds the sculpture makes have a lovely resonance to them, like random bells and chimes that fade and mix together. There’s also a matrix of white LEDs that form a sort of digital oscilloscope that displays shifting waveforms in time with the music.

While we like the way this looks and sounds, the real bonus here is the details of construction in the video below. [Eirik]’s careful craftsmanship working with multiple materials is evident throughout; we were especially impressed by the work needed to drill holes for the LED matrix, any one of which slightly out of place would have been painfully obvious in the finished product.

This is far from [Eirik]’s first appearance on these pages. His vacuum tube and silicon “ioalieia” was featured just a few weeks back, and “ddrysfeöd” used the acrylic parts as light pipes in a lovely way.

Continue reading “Sound And Light Play Off Acrylic And Wire In This Engaging Circuit Sculpture”

Put A Little Piece Of The James Webb On Your Wall

The James Webb Space Telescope (JWST) has become something of a celebrity here on Earth, and rightfully so. After decades of development, the $10 billion deep space observatory promises to peel back the mysteries of the universe in a way that simply hasn’t been possible until now. Plus, let’s be honest, the thing just looks ridiculously cool.

So is it really such a surprise that folks would want a piece of this marvel hanging up in their wall? No, it’s not the real thing, but this rendition of the JWST’s primary mirror created by [James Kiefer] and [Ryan Kramer] certainly gets the point across.

A CNC router was used to cut the outside shape from a piece of 1/2 inch MDF, as well as put 1 mm deep pockets in the face to accept the hexagonal golden acrylic mirrors. We originally thought the mirrors were also custom made, but somewhat surprisingly, gold-tinted hex mirrors are apparently popular enough in the home decor scene that they’re readily available online for cheap. A quick check with everyone’s favorite a large online bookseller turned global superpower shows them selling for as little as $0.50 a piece.

With a coat of black paint on the MDF, the finished piece really does look the part. We imagine it’s fairly heavy though, and wonder how it would have worked out if the back panel was cut from a piece of thick foam board instead.

Of course this isn’t a terribly difficult design to recreate if you had to, but we still appreciate that the duo has decided to release both the Fusion 360 project file and the exported STL to the public. It seems only right that this symbol for science and discovery should be made available to as many people as possible.

After a dramatic launch on Christmas Day and a perilous flight through deep space, the JWST has performed impeccably. Even though we’re still a several months away from finally seeing what this high-tech telescope is capable of, it’s already managed to ignite the imaginations of people all over the globe.

Pyrotechnic Posters Are Fireworks Drawn On Paper

There’s a deep love many humans feel for fire; it’s often cited as one of the most important discoveries that led to the founding of civilization. The work of French artistic duo [Pinaffo-Pluvinage] definitely hits upon that, combining pyrotechnics with paper to make what are probably the most exciting posters you’ve ever seen, as reported by Heise Online.

The artworks are made with a variety of powders, including those for blue and red flames and one with a special “scintillating” effect.

The posters aren’t huge, measuring 50 cm x 70 cm. However, what they lack in size, they make up for with literal flames. Yes, the posters are laced with a variety of pyrotechnic powders that combust in a variety of designs and patterns to create a dynamic burning artwork once ignited.

Each poster is thus a work of art in both the visual and combustible realms. Different parts of the artwork burn at differnt rates and with different colored flames, adding to the performance when the poster is burned. Impressively, the artworks are not destroyed in the process; the pyrotechnic material burns off with much flame and smoke without destroying the poster itself.

Putting together the posters wasn’t as simple as simply doodling some designs. The duo had to develop their own methods to apply the pyrotechnic material to the paper. Reportedly, the effort took hundreds of experiments to get right.

It’s unclear exactly how the effect is achieved without burning the whole poster down; one suspects some kind of protective layer may be used. It’s quite the opposite of flash paper, which consumes the paper itself in the combustion.

In any case, fireworks experts will likely have some good ideas of the chemicals used to achieve the flaming effects; sound off in the comments if you know what’s what!

The pieces could be interpreted as a commentary on the transience of all things, or the artist’s intention could have been something different entirely. Who can say? Video after the break.

Continue reading “Pyrotechnic Posters Are Fireworks Drawn On Paper”

BenAkrin-PlottyBot-TypeWriterMode

PlottyBot: A DrawBot That Plots A Lot

Fire up those 3D printers because if you’re like us, you’ll want your own PlottyBot. Still, have a pile of “thank you notes” to write from recent winter holiday gift exchanges? Hoping to hand letter invitations to a wedding or other significant event? Need some new art to adorn your lock-down shelter or shop? It sounds like [Ben] could help you with that.

Besides being a handsomely designed desktop DrawBot, this project from [Ben] looks to have some solid software to run it, a community of makers who have tested the waters, and very detailed build instructions. Those include everything from a BOM with links for ordering parts to animated GIF assembly for the trickier steps.

If you’d like to graduate from “handwritten” cards and letters to something poster-sized are customization tips for expanded X and Y dimensions. As we’ve included in other recent articles, one caveat to mention is the current scarcity of the Raspberry Pi Zeros that PlottyBots require. But if you have one on hand or think you’ll be able to source one by the time you’ve 3D printed all the parts, it might just be the perfect time to add another bot to your family. As a heads up, this project is self-hosted on a solar-powered server, so maybe take turns reading the complete build log.

A nice bonus if you need help drawing something suitably complex to require a robot’s help, [Ben] also created MandalGaba which looks like an awesome online tool for drawings like the ones shown above.