80’s Smartwatch Finally Plays Tetris

While the current generation of smartwatches have only been on the market for a few years, companies have been trying to put a computer on your wrist since as far back as the 80s with varying degrees of success. One such company was Seiko, who in 1984 unveiled the UC-2000: a delightfully antiquated attempt at bridging the gap between wristwatch and personal computer. Featuring a 4-bit CPU, 2 KB of RAM, and 6 KB of ROM, the UC-2000 was closer to a Tamagotchi than its modern day counterparts, but at least it could run BASIC.

Dumping registers

Ever since he saw the UC-2000 mentioned online, [Alexander] wanted to get one and try his hand at developing his own software for it. After securing one on eBay, the first challenge was getting it connected up to a modern computer. (Translated from Russian here.) [Alexander] managed to modernize the UC-2000’s novel induction based data transfer mechanism with help from a ATtiny85, which allowed him to get his own code on the watch, all that was left was figuring out how to write it.

With extremely limited published information, and no toolchain, [Alexander] did an incredible job of figuring out the assembly required to interact with the hardware. Along the way he made a number of discoveries which set his plans back, such as the fact that there is no way to directly control individual pixels on the screen; all graphics would have to be done with the built-in symbols.

The culmination of all this hard work? Playing Tetris, naturally. Though [Alexander] admits that limitations of the device’s hardware meant the game had to be simplified a bit, he’s almost certainly having more fun than any of the UC-2000’s original owners did with this device. He’s setup a GitHub repository for anyone who wishes to join him in this brave new world of vintage wrist computing.

[Alexander] isn’t the only one experimenting with fringe wearable computers. We’ve seen our fair share of interesting smartwatches, featuring everything from novel input methods to complete scratch-builds.

Continue reading “80’s Smartwatch Finally Plays Tetris”

Modern Technology For An Ancient Contest

Certamen is a special class of  high school quiz bowl tournament that’s focused solely on the classics. No, not Austen and Dickens, the actual classics. All the questions are about stuff like ancient Greek and Roman civilization and culture, classical mythology, and the finer points of Latin grammar. Like any other quiz bowl, the contestants use buttons to buzz in and answer the questions.

To win at Certamen, a team needs more than just a vast working knowledge of classical antiquity. They also have to be fast on the buzzer. The best way to do that is to practice with official equipment. But this is Hackaday, so you know what comes next: all the ones you can buy cost five times more than they should, so [arpruss] made an awesome open-source version for a fraction of the cost.

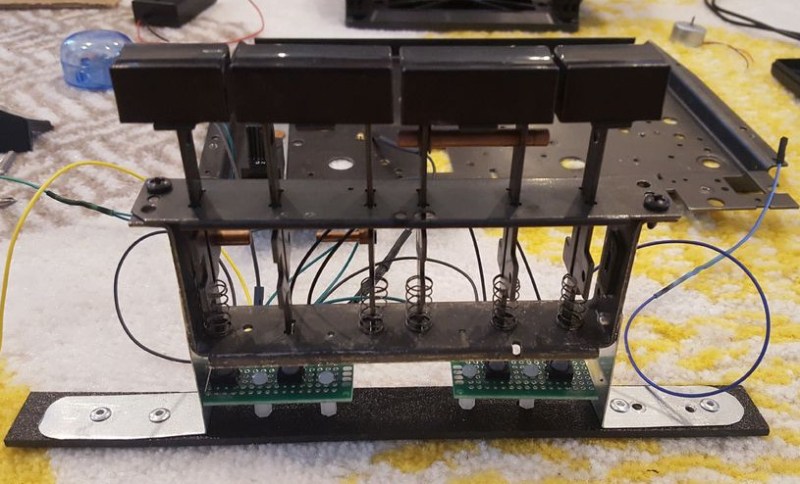
The practice machine consists of 12 arcade-style buttons connected to a control box. An Arduino Mega in the control box records the order of button presses as they arrive and displays a corresponding code on an LCD. A toggle switch selects between Certamen mode, where one button press locks out the rest of the team, and a Quiz mode with no lockout.

Our favorite thing about this build is the way [arpruss] took care of managing long cables, which was one of his main must-haves. The buttons are wired to the control box with Cat6 in three groups of four—one cable per table, one pair per chair. Our other favorite thing is the Easter eggs. Hold down the clear button on the control box when the system is booting and one of two things happens: either the buttons band together and turn into piano keys, or some Latin poetry appears on the screen.

[arpruss]’s 3D-printed buzzer bases look pretty slick. If Certamen practice ever starts to get out of hand, he might consider more robust packaging, like these Devo hat buttons.

Take Robby Home

Ok, we’ll stipulate it right up front: this isn’t a hack. But you have to admit, it would make a fine starting point for a truly epic one. Robby the Robot — the robot from the 1956 movie Forbidden Planet is up for sale. Well, technically he isn’t so much a robot as he is a suit with some animatronics. The auction lot includes Robby, his (non-functioning) vehicle, a control panel, and some other accouterments. If you have deep pockets, you’ll need to bid before November 21.

MGM reportedly spent $125,000 on Robby which was a crazy amount of money in the 1950s. In today’s currency, that would be well over a million bucks. They got their money’s worth, though, as Robby appeared in movies and TV shows including Lost in Space and several episodes of the Twilight Zone. He even made a motionless cameo on The Big Bang Theory.

Continue reading “Take Robby Home”

Build A Calculator, 1974 Style

Last month we touched upon the world of 1970s calculators with a teardown of a vintage Sinclair, and in the follow-up were sent an interesting link: a review of a classic Sinclair calculator kit from [John Boxall]. It’s a few years old now, from 2013, but since it passed us by at the time and there was clearly some interest in our recent teardown, it’s presented here for your interest.

It seems odd in 2017 that a calculator might be sold as a kit, but when you consider that in the early 1970s it would have represented an extremely expensive luxury purchase it makes some sense that electronics enthusiasts who were handy with a soldering iron might consider the cost saving of self-assembly to be worthwhile. The £24.95 price tag sounds pretty reasonable but translates to nearly £245 ($320) in today’s terms so was hardly cheap. The calculator in question is a Sinclair Cambridge, the arithmetic-only predecessor to the Sinclair Scientific we tore down, and judging by the date code on its display driver chip it dates from September 1974.

As a rare eBay find that had sat in storage for so long it was clear that some of the parts had suffered a little during the intervening years. The discrete components were replaced with modern equivalents, including a missing 1N914 diode, and the display was secured in its flush-fitting well in the board with wire links. The General Instrument calculator chip differs from the Texas Instruments part used in the Scientific, but otherwise the two calculators share many similarities. A full set of the notoriously fragile Sinclair battery clips are in place, with luck they’ll resist the urge to snap. A particularly neat touch is the inclusion of a length of solder and some solder wick, what seems straightforward to eyes used to surface-mount must have been impossibly fiddly to those brought up soldering tube bases.

The build raises an interesting question: is it sacrilege to take a rare survivor like this kit, and assemble it? Would you do it? We’d hesitate, maybe. But having done so it makes for a fascinating extra look at a Sinclair Cambridge, so is definitely worth a read. If you want to see the calculator in action he’s posted a video which we’ve put below the break, and if you need more detail including full-resolution pictures of the kit manual, he’s put up a Flickr gallery.

Continue reading “Build A Calculator, 1974 Style”

Programming An Oscilloscope Breakout Game In Pure Data

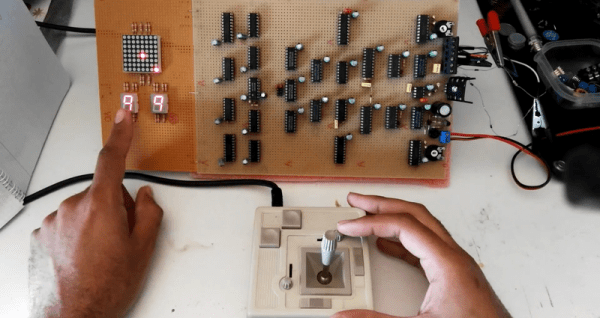
[S-ol] wrote in to share his sweet breakout game played on an oscilloscope. Built in a weekend as part of a game development jam, Plonat Atek is a polar breakout game where the player attacks the center and the ball bounces around the perimeter. You can play it either on an oscilloscope or using an online emulator. [S-ol] wrote the game in Pure Data, a visual programming language for audio. The software controls the audio out channels and uses sound to control the game graphics. He also made use of the Zexy extension for Pure Data.

One of the cool things about this setup is that since the game is programmed with sound, all the sound effects also double as visual effects

We love oscilloscopes, and not just because they’re useful as hell. They also make sweet vector displays, like this analog pong game that uses a scope for a display. Even when they’re not being used for retrogaming they can be capable of some pretty amazing graphics.

Homemade LED Clock Stands Test Of Time

In an era when you might get chastised if your mobile phone is more than two years old, it’s easy to forget that hardware was not always meant to be a temporary commodity. We acknowledge a few standout examples of classic hardware still surviving into the modern era, such as vintage computers, but they’re usually considered to be more of a novelty than an engineering goal. In a disposable society, many have forgotten that quality components and a well thought out design should give you a service life measured in decades, not months.

A perfect example of this principle is the beautiful LED clock built 40 years ago by [Davide Andrea]. A teenager at the time, [Davide] built this clock to be used by the local radio station, as clocks that showed seconds were important for timing radio shows. Finding it in storage recently, [Davide] took to the /r/electronics subreddit to report that it still works fine after all these years.

Cracking open the case shows a unique and highly functional construction style. Notches cut into the side panels of the case accept individual protoboards in a “blade” type configuration, with the blades connected by a handful of individual wires. No digging through the parts bin for a “worthless” old IDE cable to tear up back in the 1970’s.

Continue reading “Homemade LED Clock Stands Test Of Time”

3D Printing Belts For Vintage Hardware

It may be hard for some of the younger readers to believe, but there was a time when hardware was full of little rubber belts. Tape decks, VCRs, even some computers: they all had rotating parts that needed to transfer power to other components, and belts were a cheap and quiet way to do it. Unfortunately, now decades later we realize that these little belts are often the Achilles heel of classic hardware, getting brittle and breaking long before the rest of the components are ready to give up the fight.

Which is exactly what [FozzTexx] found when trying to revive his newly purchased Commodore PET 2001. The belt inside of the cassette drive had become hard and fallen to pieces, and rather than hunt around for a replacement, [FozzTexx] reasoned he might be able to print one out of a flexible 3D printer filament like NinjaFlex. Besides, this wasn’t the only piece of vintage tech in his house that needed a belt replacement, so he figured it would be a worthwhile experiment.

As the original belt was little more than dust, [FozzTexx] had to design his replacement from scratch. He started by cleverly replicating the path the belt would need to take with string, and then measuring the inside diameter of the string circle with his calipers. [FozzTexx] then reduced the diameter by 5% to take into account the stretching of the new belt.

The profile of the belt was square, which made modeling and 3D printing much easier. [FozzTexx] just subtracted a smaller circle from a larger one in 2D, and then extruded that circle into the third dimension by 1.18 mm to match the height of the original part. Careful measurement paid off, and the newly printed NinjaFlex belt had his Commodore loading and saving programs on the first try.

We’ve covered the difficulty in sourcing replacement belts for old hardware previously, so it will be interesting to see if others are able to make use of the research [FozzTexx] has done here. Of course, longevity concerns are always brought up when NinjaFlex is used, so hopefully [FozzTexx] keeps us updated.