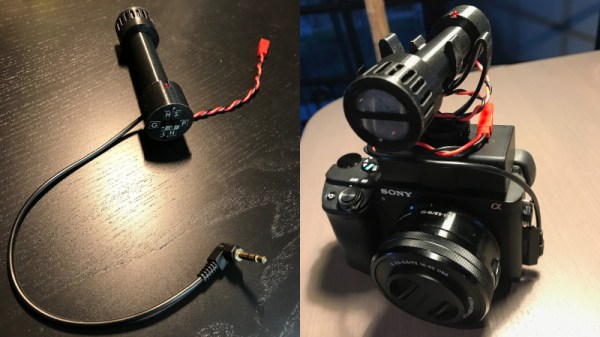
These Lessons Were Learned In Enclosure Design, But Go Far Beyond

[Foaly] has been hard at work making an open-source long range camera remote, and recently shared a deeply thoughtful post about how it is never too early to consider all aspects of design, lest it cost you in the end. It all started with designing an enclosure for a working prototype, and it led to redesigning the PCB from scratch. That took a lot of guts, and we recommend you make some time to click that link and read up on what he shared. You’ll either learn some valuable tips, or just enjoy nodding sagely as he confirms things you already know. It’s win-win.

Note the awkward buttons right next to the antenna connector, for example.

The project in question is Silver, and calling it a camera remote is selling it a bit short. In any case, [Foaly] had a perfectly serviceable set of prototypes and needed a small batch of enclosures. So far so normal, but in the process of designing possible solutions, [Foaly] ran into a sure-fire sign that a project is in trouble: problems cropping up everywhere, and in general everything just seeming harder than it should be. Holding the mounting-hole-free PCB securely never seemed quite right. Buttons were awkward to reach, ill-proportioned, and didn’t feel good to use. The OLED screen’s component was physically centered, but the display was off-center which looked wrong no matter how the lines of the bezel were sculpted. The PCB was a tidy rectangle, but the display ended up a bit small and enclosures always looked bulky by the time everything was accounted for. The best effort is shown here, and it just didn’t satisfy.

[Foaly] says the real problem was that he designed the electronics and did the layout while giving some thought (but not much thought) to their eventual integration into a case. This isn’t necessarily a problem for a one-off, but from a product design perspective it led to so many problems that it was better to start over, this time being mindful of how everything integrates right from the start: the layout, the components, the mechanical bits, the assembly, and the ultimate user experience. The end result is wonderful, and we’re delighted [Foaly] took the time to document his findings.

Enclosure design is a big deal and there are many different ways to go about it. For a more unique spin, be sure to check out our how-to make enclosures from the PCBs themselves. For a primer on more traditional enclosure manufacture and design, take a few minutes to familiarize yourself with injection molding.

Robotic Skin Sees When (and How) You’re Touching It

Cameras are getting less and less conspicuous. Now they’re hiding under the skin of robots.

A team of researchers from ETH Zurich in Switzerland have recently created a multi-camera optical tactile sensor that is able to monitor the space around it based on contact force distribution. The sensor uses a stack up involving a camera, LEDs, and three layers of silicone to optically detect any disturbance of the skin.

The scheme is modular and in this example uses four cameras but can be scaled up from there. During manufacture, the camera and LED circuit boards are placed and a layer of firm silicone is poured to about 5 mm in thickness. Next a 2 mm layer doped with spherical particles is poured before the final 1.5 mm layer of black silicone is poured. The cameras track the particles as they move and use the information to infer the deformation of the material and the force applied to it. The sensor is also able to reconstruct the forces causing the deformation and create a contact force distribution. The demo uses fairly inexpensive cameras — Raspberry Pi cameras monitored by an NVIDIA Jetson Nano Developer Kit — that in total provide about 65,000 pixels of resolution.

Apart from just providing more information about the forces applied to a surface, the sensor also has a larger contact surface and is thinner than other camera-based systems since it doesn’t require the use of reflective components. It regularly recalibrates itself based on a convolutional neural network pre-trained with data from three cameras and updated with data from all four cameras. Possible future applications include soft robotics, improving touch-based sensing with the aid of computer vision algorithms.

While self-aware robotic skins may not be on the market quite so soon, this certainly opens the possibility for robots that can detect when too much force is being applied to their structures — the machine equivalent sensation to pain.

Continue reading “Robotic Skin Sees When (and How) You’re Touching It”

IREnE Goes Around

Timelapse rigs are awesome because you can spice up your videos with more interesting panning and tilting timelapse shots. So, why not build yourself one? That’s what [td0g] decided to do, and the result is IREnE, a rather nice homemade 3DOF rig that fits onto a standard tripod. 3DOF means that it has three degrees of freedom: the camera can be rotated on the tripod, moved linearly on an extending arm away from the tripod head and rotated around its own axis. In other words: it can pan past an object while rotating the camera to keep the object centered in the frame.

IREnE stands for Inverted Radial Extension Eggtimer, a play on the dual radial nature of the device and how photographers use egg timers for this sort of thing. It’s also a sneaky tribute to a foe of Sherlock Holmes. The rig is driven by three NEMA 17 motors and an ATMega328p, all powered by a Dewalt powertool battery and his own DeWatt power adapter. the rig also has a secondary function with minor modifications as a pancake printer.

Breakfast aside, there are a few caveats to this project. While a tripod is fine for stabilizing a camera on the top of it, offsetting the weight like this makes the tripod unstable. [td0g] did add a few welded stabilizer bars that brace it to more stable, but the whole thing should be used with some caution. The camera sits on a 1-inch square aluminium extruder that [td0g] claims is robust enough to hold his Canon D7, but I am not sure I would trust it with my expensive equipment.

This is the fifth high-quality build we have seen from [td0g]: we previously covered the excellent high-speed LED flash, great telescope mount, high-speed chronograph, and wood-burning ATX power supply hack.

Continue reading “IREnE Goes Around”

A Mechanical Shutter Release For A Digital Camera

Most digital cameras these days come with some kind of electronic remote shutter release. Various solutions exist, using USB cables, smartphone apps, or dedicated remotes. [Steloherd] wasn’t happy with the options available for his Ricoh GRII, though, so built a rig to do things the old fashioned way.

The spring plate helps protect the shutter button from damage.

[Steloherd] wanted to use an old-school mechanical release cable, so devised a way to use it to trigger the Ricoh’s standard shutter button. A small aluminium bracket was created, attached to the hot shoe on top of the camera via a mounting foot from a standard flash accessory. A spring plate was then created to help spread the load from the mechanical release pin, ensuring it triggers the camera effectively without damaging anything.

Installing the mechanical release proved difficult, as the DIN standard calls for an obscure M3.4 conical tapped thread. Rather than muck about finding rare tooling, [Steloherd] simply recut the thread on the release cable to a straight M3x0.5, and did the same for the bracket.

Overall, it’s a tidy hack, and one that could be adapted to other cameras fairly easily. Other methods we’ve seen involve such odd choices as linear actuators harvested from air fresheners, if you’d believe it. As always, if it works, it works!

Quick And Dirty Digital Conversion For Analog SLR

The unarguable benefits of digital photography has rendered the analog SLR obsolete for most purposes. This means that a wide selection of cameras and lenses are available on the second hand market for pennies on the dollar, making them ripe targets for hacking. [drtonis] decided to experiment with a quick and easy digital conversion to an old Canon A-1, and it’s got us excited about the possibilities.

Who needs Instagram filters? Just distort in-camera!

It’s a simple hack, but a fun one. The SLR is opened up, and the spring plate for holding the film is removed. A Raspberry Pi camera then has its original lens removed, and is placed inside the film compartment. It’s held in with electrical tape, upon a 3mm shim to space it correctly to work with the original optics.

[drtonis] notes that the build isn’t perfect, with some aberration likely caused by the reflective electrical tape in the film cavity. However, we think it’s a nice proof of concept that could go so much further. A Raspberry Pi Zero could be easily squeezed inside along with the camera, and everything glued in place to make things more robust. A specialist paint such as Stuart Semple’s Black 2.0 could also help cut down on light leaks inside. Plus, there’s plenty of small screens that can be used with the Raspberry Pi that would provide a useful preview function.

We’d love to see more conversions like this one. While it’s unlikely they’ll compete with commercial DSLRs on outright performance, everyone loves a little bit of charming distortion here and there, and all manner of fancy lenses can be had for cheap for analog platforms. We’ll be keeping a close eye on the tipline for further This fundevelopments – you know what to do!

Continue reading “Quick And Dirty Digital Conversion For Analog SLR”

Printed Arduino Turntable Takes Objects For A Spin

Have you built a 3D scanner yet? There’s more than one way to model those curves and planes, but the easiest may be photogrammetry — that’s the one where you take a bunch of pictures and stitch them into a 3D model. If you build a scanner like [Brian Brocken]’s that does almost everything automatically, you might consider starting a scan-and-print side hustle.

This little machine spins objects 360° and triggers a Bluetooth remote tethered to an iPhone. In automatic mode, it capture anywhere from 2-200 pictures. There’s a mode for cinematic shots that shoots video of the object slowly spinning around, which makes anything look at least 35% more awesome. A third mode offers manual control of the turntable’s position and speed.

An Arduino UNO controls a stepper that moves the turntable via 3D printed-in-place bearing assembly. This project is a (vast) improvement over [Brian]’s hand-cranked version that we looked at over the summer, though both are works of art in their own right.

Our favorite part aside from the bearing is the picture-taking process itself. [Brian] couldn’t get the iPhone to play nice with HC-05 or -06 modules, so he’s got the horn of 9g servo tapping the shutter button on a Bluetooth remote. This beautiful beast is wide open, so fire up that printer. You can watch the design and build process of the turntable after the break.

Want to scan some really tiny things? Make a motorized microscope from movie machines.

Continue reading “Printed Arduino Turntable Takes Objects For A Spin”

Review: Ear Wax Cleaning Cameras As Cheap Microscopes, We Take A Closer Look

Those of us who trawl the world of cheap imported goods will most often stay in our own comfortable zones as we search for new items to amaze and entertain us. We’ll have listings of electronic goods or tools, and so perhaps miss out on the scores of other wonders that can be ours for only a few dollars and a week or two’s wait for postage.

Who knew sticky ears were such big business!

Just occasionally though something will burst out of another of those zones and unexpectedly catch our eye, and we are sent down an entirely new avenue in the global online supermarket.

Thus it was that when a few weeks ago I was looking for an inspection camera I had a listing appear from the world of personal grooming products. It seems that aural hygiene is a big market, and among the many other products devoted to it is an entire category of ear wax removal tools equipped with cameras. These can get you up close and personal with your ear canal, presumably so you can have a satisfying scoop at any accumulated bodily goop. I have a ton of electronics-related uses for a cheap USB close-up camera so I bought one of these so I could — if you’ll excuse the expression — get a closer look.

Continue reading “Review: Ear Wax Cleaning Cameras As Cheap Microscopes, We Take A Closer Look”