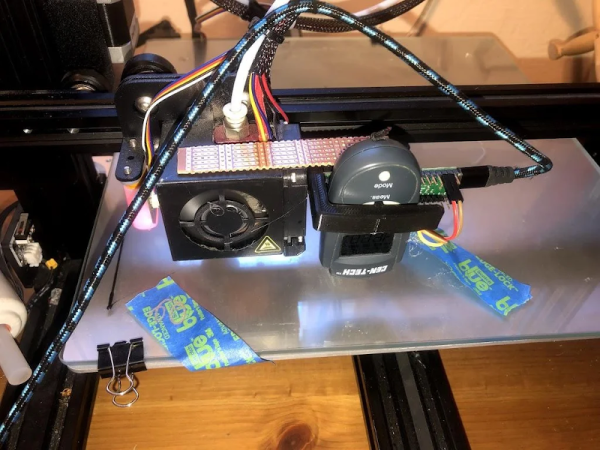
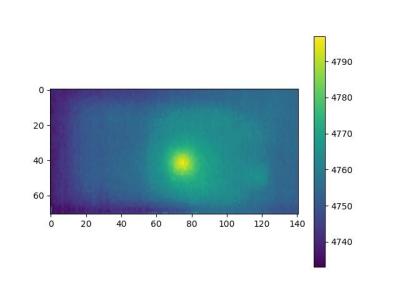
Don’t blame us for the title. [CCrome] admits it may well be the cheapest and worst IR camera available. The concept is surprisingly simple. Mount a cheap Harbor Freight non-contact thermometer on a 3D printer carriage and use it to scan the target. The design files are available on GitHub.
There is, of course, an Arduino to grab the data and send it to the PC. Some Python code takes care of converting it into an image.
Perhaps you don’t need a camera, but having a way to communicate with an $11 IR temperature sensor might come in handy someday. You do have to mash the measurement button down, so [CCrome] used the 3D printer to make a clamp for the button that also holds the POGO pins to the PCB. We would have been tempted to solder across the switch and also solder the wires to the pad. But, then again, you need a 3D printer for the project anyway.
Don’t expect the results you would get from a real thermal sensor. If you want that, you may have to build it yourself or open your wallet wide. If you need some inspiration for a use case, look at the thermal camera contest from a few years back.
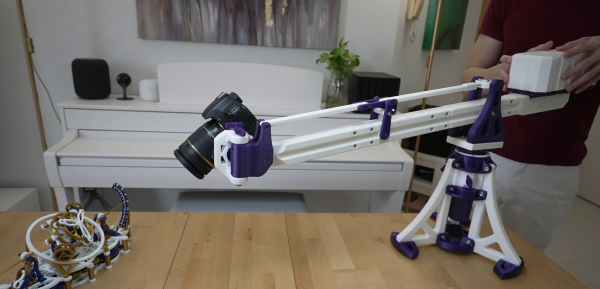
If you’ve ever tried to document a project on your workbench with photos or videos, you know the challenge of constantly moving tripods to get the right shot. [Mechanistic] is familiar with this frustration, so he built a small desktop camera crane.
Heavily inspired by [Ivan Miranda]’s large camera crane, this build scales it down and mainly uses 3D printed parts. The arm of the crane can pivot along two axes around the base, uses a parallel bar mechanism to keep the camera orientation constant through its vertical range of motion. The camera mount itself allows an additional 3 degrees of freedom to capture any angle and can mount a DSLR or smartphone. To offset the weight of the camera, an adjustable counterweight is added to the rear of the arm. Every axis of rotation can be locked using thumbscrews.
We can certainly see a crane like this being useful on our workbench for more than just camera work. You could create attachments for holding lights, displays, multimeters, or some helping hands. For some tips on creating an engaging project video check out [Lewin Day]’s excellent video on the subject.
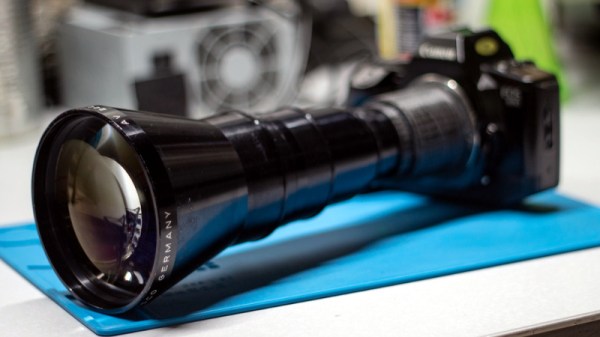
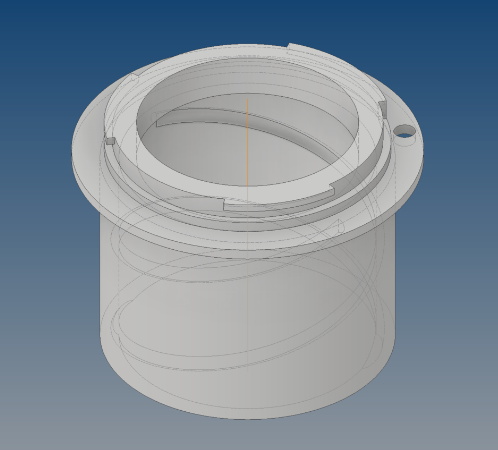
While browsing through an antiques shop, [Nick Morganti] came across a Kodak slide projector with an absolutely massive lens hanging off the front. Nearly a foot long and with a front diameter of approximately four inches, the German-made ISCO optic was a steal for just $10. The only tricky part was figuring out how to use it on a modern DSLR camera.
After liberating the lens from the projector, [Nick] noted the rear seemed to be nearly the same diameter as the threaded M42 mount that was popular with older film cameras. As luck would have it, he already had an adapter that let him use an old Soviet M42 lens on his camera. The thread pitch didn’t match at all, but by holding the lens up to the adapter he was able to experiment a bit with the focus and take some test shots.
Encouraged by these early tests, [Nick] went about designing a 3D printed adapter. His first attempt was little more than a pair of concentric cylinders, and was focused like an old handheld spyglass. This worked, but it was quite finicky to use with the already ungainly lens. His second attempt added internal threads to the mix, which allowed him to more easily control focus. After he was satisfied with the design, he glued a small ring over the adapter so the lens could no longer be unscrewed all the way and accidentally fall out.
To us, this project is a perfect application of desktop 3D printing.[Nick] was able to conceptualize a one-of-a-kind design, test it, iterate on it, and arrive on a finished product, all without having to leave the comfort of his own home. To say nothing of the complex design of the adapter, which would be exceedingly difficult to produce via traditional means. Perhaps some people’s idea of a good time is trying to whittle a lens bayonet out of wood, but it certainly isn’t ours.
Stop motion animation is notoriously difficult to pull off well, in large part because it’s a mind-numbingly slow process. Each frame in the final video is a separate photograph, and for each one of those, the characters and props need to be moved the appropriate amount so that the final result looks smooth. You don’t even want to know how long Ben Wyatt spent working on Requiem for a Tuesday, though to be fair, it might still get done before the next Avatar.
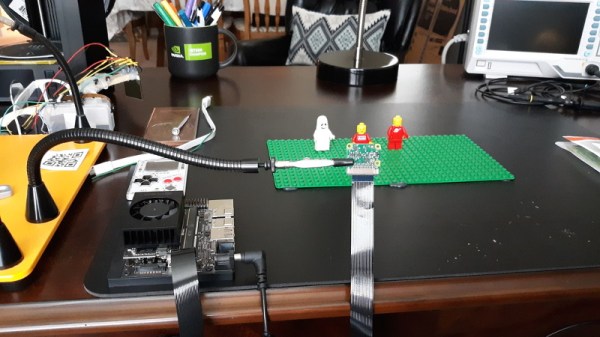
But [Nick Bild] thinks his latest project might be able to improve on the classic technique with a dash of artificial intelligence provided by a Jetson Xavier NX. Basically, the Jetson watches the live feed from the camera, and using a hand pose detection model, waits until there’s no human hand in the frame. Once the coast is clear, it takes a shot and then goes back to waiting for the next hands-free opportunity. With the photographs being taken automatically, you’re free to focus on getting your characters moving around in a convincing way.
If it’s still not clicking for you, check out the video below. [Nick] first shows the raw unedited video, which primarily consists of him moving three LEGO figures around, and then the final product produced by his system. All the images of him fiddling with the scene have been automatically trimmed, leaving behind a short animated clip of the characters moving on their own.
Now don’t be fooled, it’s still going to take awhile. By our count, it took two solid minutes of moving around Minifigs to produce just a few seconds of animation. So while we can say its a quicker pace than with traditional stop motion production, it certainly isn’t fast.
While the concept might seem quaint to us today, microfiche was once a very compelling way to store and distribute documents. By optically shrinking them down to just a few percent of their original size, hundreds of pages could be stored on a piece of high-resolution film. A box of said films could store the equivalent of several gigabytes of text and images, and reading them back only required a relatively simple projection machine.
As [Joerg Hoppe] explains in the write-up for his automatic microfiche scanner, companies such as Digital Equipment Corporation (DEC) made extensive use of this technology to distribute manuals, schematics, and even source code to their service departments in the 70s and 80s. Luckily, that means hard copies of all this valuable information still exist in excellent condition decades after DEC published it. The downside, of course, is that microfiche viewers aren’t exactly something you can pick up at the local Big Box electronics store these days. To make this information accessible to current and future generations, it needs to be digitized.
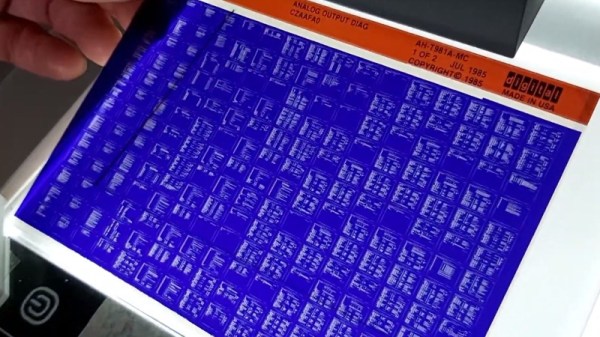
The camera panning over a full DEC microfiche sheet.
[Joerg] notes there are commercial services that would do this for you, but the prices are just too high to be practical for the hobbyist. The same for turn-key microfiche scanners. Which is why he’s developed this hardware and software system specifically to digitize DEC documents. The user enters in the information written on the top of the microfiche into the software, and then places it onto the machine itself which is based on a cheap 3D printer.
The device moves a Canon DSLR camera and appropriate magnifying optics in two dimensions over the film, using the Z axis to fine-tune the focus, and then commands the camera to take an image of each page. These are then passed through various filters to clean up the image, and compiled into PDFs that can be easily viewed on modern hardware. The digital documents can be further run though optical character recognition (OCR) so the text can be easily searched and manipulated. In the video after the break you can see that the whole process is rather involved, but once the settled into the workflow, [Joerg] says his scanner can digitize 100 pages in around 10 minutes.
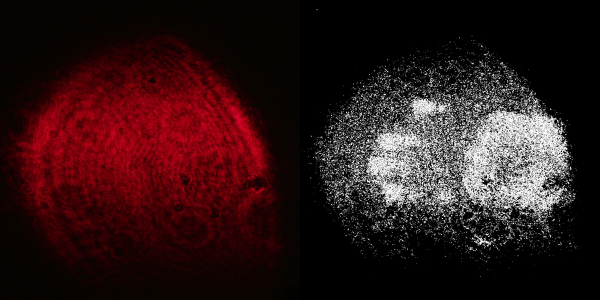
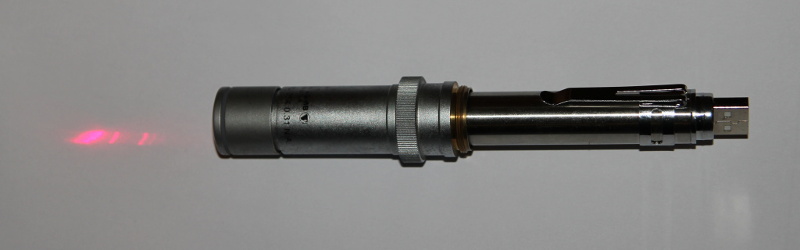
It sure sounds like “laser speckle imaging” is the sort of thing you’d need grant money to experiment with, but as [anfractuosity] recently demonstrated, you can get some very impressive results with a relatively simple hardware setup and some common open source software packages. In fact, you might already have all the components required to pull this off in your own workshop right now and just not know it.
Anyone who’s ever played with a laser pointer is familiar with the sparkle effect observed when the beam shines on certain objects. That’s laser speckle, and it’s created by the beam reflecting off of microscopic variations in the surface texture and producing optical interference. While this phenomenon largely prevents laser beams from being effective direct lighting sources, it can be used as a way to measure extremely minute perturbations in what would appear to be an otherwise flat surface.
In this demonstration, [anfractuosity] has combined a simple red laser pointer with a microscope’s 25X objective lens to produce a wider and less intense beam. When this diffused beam is cast onto a wall, the speckle pattern generated by the surface texture can plainly be seen. What’s not obvious to the naked eye is that touching the wall with your hand actually produces a change in the speckle pattern. But if you take high-resolution before and after shots, the images can be run through OpenCV to highlight the differences and reveal a ghostly hand-print.
Lens caps are important for protecting expensive camera lenses from damage. Dust, grit, and other nasty things will all quickly spoil the quality of a shot, and can even permanently damage a lens if you’re unlucky. However, lens caps are also lost quite easily. Thus, it’s useful to be able to make your own, and [DSLR CNC DIY] has the low down on how to do it.
The benefit of printing your own lens caps is customization. No matter the oddball size and shape of your lens, when you’re 3D printing your own cap, you can design it to fit. The video also shows off the benefits of being able to embed text right into the body of the cap, so you’re never confused as to which cap goes with which lens. The caps use the metal lever from a binder clip in order to provide the clamping force necessary to hang on to the lens. It’s an improvement over some living-hinge designs that grow weaker over time.
Overall, if you’ve got a bunch of lenses that need a new cap, this could be the project for you. It’s also likely much cheaper and easier than hunting down replacement caps for obscure lenses online. Alternatively, contemplate what you could do with fancy lens adapters. Video after the break. Continue reading “3D Printing Your Own Sturdy Lens Caps”→