Generate Power As You Ride With A Bicycle Planar Alternator

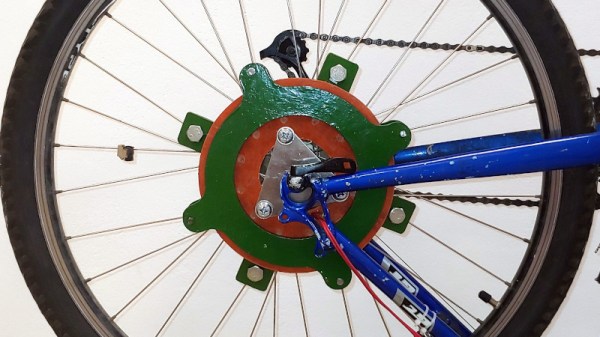
For most riders, bicycle lighting consists of an array of LED lamps and flashing gizmos, usually powered by lithium-ion batteries, or coin cells for the smaller ones. Some people though prefer to dispense with batteries and generate their own power, and that’s what [Thomas D] has done by fitting his bike with an alternator. But this is no off the shelf unit that rubs the tire or sits in a wheel hub. Instead, he’s built his own planar alternator that attaches to the spokes.

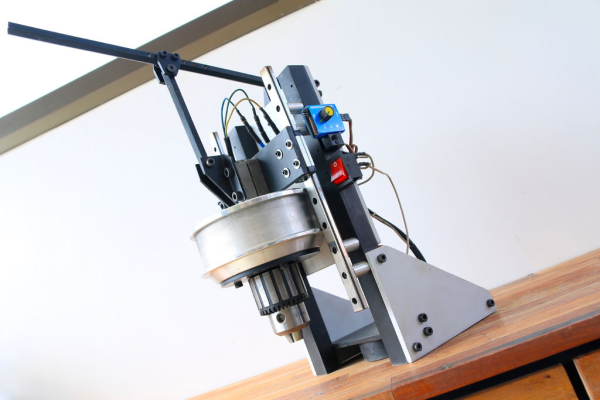
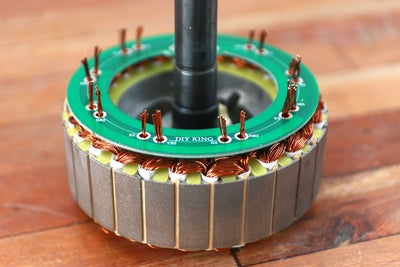
The design is inspired by those used in some wind generators, a central disk holding a set of planar coils sits between two rotating disks holding magnets. The stator holding the coils is made from laser-cut acrylic, and the rotors holding the magnets are sheet steel. One rotor is attached to the rear wheel spokes of the bicycle in close proximity to the stator which is attached to the rear frame. The second rotor sits on the other side of the stator while attached to the first rotor by its edge.

The coils are wired as two parallel groups in series in a ring with a single-phase output that feeds a rectifier and DC to DC converter. It would be interesting to see the effect of the same alternator with different winding arrangements or multiple phases.

This is the first time we’ve seen one of these on a bicycle, but this type of alternator has appeared here in more than one wind generator.

Continue reading “Generate Power As You Ride With A Bicycle Planar Alternator”

Make A Vintage-Looking Clock In A Flash

Now that everyone has a phone with a camera, we would bet that fewer people than ever are in the market for a nice vintage flash unit such as the one [lonesoulsurfer] chose for this cool clock build. But here’s something that never goes out of style — a clock that doubles as a conversation piece.

At the heart of this build is a dirt cheap clock unit meant for cars. It also displays the ambient temperature and has a voltage testing mode(!), which could come in handy someday. Although [lonesoulsurfer] didn’t connect a pair of probes, he did cut a wee hole for the temperature sensor to stick out of. He also cut off the SMD buttons and wired new momentaries to the outside of the case.

Although we really like the look of the textured plastic lens over the 7-segments, our favorite part might be the stand and the way [lonesoulsurfer] implemented it. He made a threaded rod by pounding a hex nut into the end of a piece of aluminium tubing, and then dropped a bolt through the bottom of the flash body before closing it up, so it screws on like a camera to a tripod. Take a second and check out the build video after the break.

We love a good clock so much that we just had a contest to find the coolest ways to tell time. In case you missed it, here are the best of the best.

Continue reading “Make A Vintage-Looking Clock In A Flash”

Airport Split-Flap Letters Carry On As Spotify Display

Today’s tale of being in the right place at the right time comes from [fabe1999], who was doing an intern gig at the airport when the controller on their split-flap display bought a one-way ticket going south. They were just going to throw away thousands of these letters and replace them with monitors, but the intern intervened.

[fabe1999] grabbed an armload, took them home, and set about making them flap again, one letter at a time. An ATtiny worked okay, but it wasn’t really fast enough to flip them at their full clacking potential, so [fabe1999] switched to an ESP8266. So now there is one ESP for each of the 20 characters, and another that runs a web server where text can be directly entered for immediate display.

Each letter uses two sensors to flap to the right letter. The first one acts as a start sensor, detecting the blackness of a blank character. Another sensor counts the letters and makes the ESP stop the motor on the right one. So far, [fabe1999] hasn’t figured out how to recognize when a blank character can stay blank, so they flap all the way around back to blank for now. It certainly adds to the rich, flappy sound, but that can’t be good for the long-term life of the letters. Your flight is now departing for Post Break Island, where the letters are spending part of their retirement showing song titles from Spotify.

No chance of split flaps falling into your lap? Here’s a tip: you can fab your own flip.

Continue reading “Airport Split-Flap Letters Carry On As Spotify Display”

Hoverboard Grows Up, Becomes Magnetic Drill Press

If you need to drill metal in tight places, the magnetic drill press, or mag drill is your BFF. The idea here is that a drill press with an electromagnetic base can go anywhere, and even drill horizontally if need be. If you don’t need to use one often, but want one anyway, why not build one out of e-waste?

[DIY KING 00] built this mag drill starting with the motor from a hoverboard. While these three-phase brushless motors have a lot of torque to offer reuse projects like this, they’re not designed to be particularly fast.

He was able to make it about three times faster by cutting the windings apart and reconnecting them in parallel instead of series. He designed a simple PCB to neatly tie all the connections back together and added an electronic speed control (ESC) from an R/C car.

Reluctant to give up the crown, he made his own three-coil electromagnetic base, using a drill to wind magnet wire around temporary chuck-able cores. The coils are then potted in epoxy to keep out dust and drilling debris. Everything runs from two large LiPo batteries, and he can get about 15 minutes of high-torque drilling done before they’re dead. Can you feel the electromagnet pulling you past the break to check out the build and demo video?

Depending on what you’re doing, you might get away with a magnetic vise instead.

Continue reading “Hoverboard Grows Up, Becomes Magnetic Drill Press”

Teardown And Analysis Of A Cheap Solar Lamp

If you walk the aisles of a dollar store one constant that you will see worldwide is the Chinese solar lamp. Your dollar gets you a white LED behind plastic, mounted on a spike to stick into the ground, and with a solar cell on top. It charges in the sunlight during the day and then lights the LED for a few hours at nightfall. They are in gardens everywhere, and no doubt landfill sites are full of them because they do not last very long. [Giovanni Bernardo] had one that stopped working, so he subjected it to a teardown to find out what was up, and what made it tick (Italian, Google Translate link).

As expected, the culprit proved to be a leaking and corroded 1.2 volt NiMh cell, and its replacement with an AA cell brought the lamp back to life. But the interesting part of this tale comes from his teardown and analysis of the lamp’s components. It’s centered around a YX8016 battery charger and power management chip. The device has an amazing economy of design with only four components including the solar cell and the LED. The final component is a small inductor that forms part of the boost converter to keep the LED lit as the battery voltage falls. The chip switches at 580kHz, and produces a 3.2 volt supply.

If this is a subject that interests you, don’t forget to take a look at the power harvesting challenge we ran a while back.

Feel The Force With A Pocket Magnetometer

With the rise of affordable 3D printers, we just don’t see the projects in Tic Tac boxes that we used to. That’s kind of a shame. Not only are you upcycling existing plastic when you use one, they’re decently sized component vessels for pocket builds such as [rgco]’s portable magnetometer, especially if you can get the 100-count box. Best of all, they’re see-through!

Sure, you could get a magnetometer app for your phone to test out the strength of your Buckyballs, but this is more fun, and you can use it in more places. This build doesn’t take much — an Arduino Nano reads from a Hall effect sensor and outputs the magnetic flux density in militeslas (mT) on an OLED. Fortifying the sensor by mounting it inside the body of an old (also see-through!) ballpoint pen body is a nice touch.

In order to calibrate it, [rgco] made a solenoid by wrapping a length of PVC with magnet wire. The code for this very portable and low-cost magnetometer measures the magnetic field 2000 times in under three-tenths of a second, and outputs both the mean and the standard deviation of these measurements.

Magnetometers can ID all kinds of things from submarines to Suburbans. Here’s an ESP8266 magnetometer that opens a driveway gate when it detects the car.

Pi 4 Emulator In A Durable, Dumpstered Cabinet

We must be looking in the wrong Dumpsters, because we never find anything as cool as [Queen_Combat] did. It’s one of those Kidzspace kid-proof waiting room game systems, complete with the original TV and an XBOX 360 that hasn’t been updated since 2009. When life hands you a sturdy game console box, it’s almost your duty to turn it into an all-in-one Raspberry Pi 4 emulation station.

[Queen_Combat] relocated the speakers from the top to the inside, just behind the vent holes on the sides, and printed a couple of mountable custom enclosures to hold them there. These are driven with a little 5W amplifier board, and everything is run from the XBOX’s power supply.

We particularly like the use of extenders in cigarette-lighter form factor, because we hadn’t seen those before. [Queen_Combat] printed a couple of adapters to make them fit nicely into the large holes on the front where the XBOX controllers were once attached — one has a volume knob, and the other has a USB3 port and a 3.5mm audio jack. [Queen_Combat] wanted to have HDMI audio out as well, so there’s an HDMI audio extractor in the mix, too, and another extender around back. Only thing missing is a paint job and some sweet vinyl graphics.

Yes, vinyl graphics would be sweet, but how? Not on the laser cutter, if that’s what you’re thinking. Don’t dismiss vinyl cutters out of hand, because they can do a whole lot more than that.

Via r/raspberry_pi