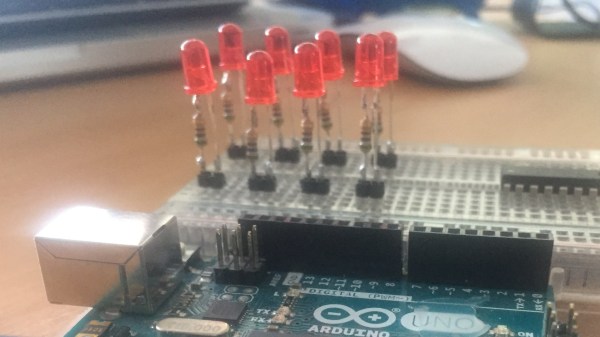
Beautiful Moving Origami Light Made From Scrap

Whenever [MakerMan] hits our tip line with one of his creations, we know it’s going to be something special. His projects are almost exclusively built using scrap and salvaged components, and really serve as a reminder of what’s possible if you’re willing to open your mind a bit. Whether done out of thrift or necessity, he proves the old adage that one man’s trash is often another’s treasure.

We’ve come to expect mainly practical builds from [MakerMan], so the beautiful ceiling light which he refers to as a “Kinetic Chandelier”, is something of a change of pace. The computer controlled light is able to fold itself up like an umbrella while delivering a pleasing diffuse LED glow. He tells us it’s a prototype he’s building on commission for a client, and we’re going to go out on a limb and say he’s going to have a very satisfied customer with this one.

Like all of his builds, the Kinetic Chandelier is almost entirely built out of repurposed components. The support rods are rusty and bent when he found them, but after cutting them down to size and hitting them with a coat of spray paint you’d never suspect they weren’t purpose-made. The light’s “hub” is cut out of a chunk of steel with an angle grinder, and uses bits of bike chain for a flexible linkage.

Perhaps most impressive is his DIY capstan which is used to raise and lower the center of the light. [MakerMan] turns down an aluminum pulley on a lathe to fit the beefy gear motor, and then pairs that with a few idler pulleys held in place with bits of rebar welded together. It looks like something out of Mad Max, but it gets the job done.

Finally, he salvages the LED panels out of a couple of cheap work lights and welds up some more rebar to mount them to the capstan at the appropriate angle. This gives the light an impressive internal glow without a clear source when viewed from below, and really gives it an otherworldly appearance.

This isn’t the first time we’ve seen a hacker put together their own chandelier, or even the first time we’ve seen it done with scrap parts. But what [MakerMan] has put together here may well be the most objectively attractive one we’ve seen so far.

Continue reading “Beautiful Moving Origami Light Made From Scrap”

Pringles Can Turned Vaporwave Lamp

We play host to a lot of incredibly complex projects here at Hackaday; take a look at some of the entries in the Hackaday Prize for some real world-class engineering. But the hacks you can knock out in an afternoon are often just as compelling as the flagship projects. After all, not everyone is looking to devote years of their lives into building some complex machine.

Case in point, this very slick lamp built by [mytzusky]. Made of nothing more exotic than an old Pringles can and an RGB LED strip, this is something that can potentially be built with what you have laying around right now. All you need to provide is a bit of geometry, a steady hand, and a love for anything that looks like it could pass as a prop in a TRON fan film.

The first step is getting the Pringles can: either find one in the trash or treat yourself to a stack of weird hard potato chip sorta things. Once you’ve got the can, you need to cut out your design. You could print out the template provided by [mytzusky] if you want, but you could put your own spin on it instead. Just remember that the design needs to make sense when you wrap it around the can.

With the lines cut out of the can, the whole thing gets wrapped with a few sheets of standard white paper. This will not only cover the original label but diffuse the light coming from the cuts you’ve just made. [Mytzusky] doesn’t mention it, but some kind of sealer applied to the paper might be a good idea if you’re looking to keep this thing around for the long haul.

Finally, an RGB LED strip goes inside the can. Make sure to flip the can upside down for this part, with the solid end on the top and the clear lid on the bottom. Not only does this let you run the wire out of the bottom, but provides a very cool ring of diffuse light at the bottom of the lamp.

This is another excellent example of an “upcycled” project which uses literal trash as a building material. It might take a little outside the box thinking, but the results can be very impressive.

Lightsaber Uses Pogo Pins To Make Assembly A Breeze

There was an endless supply of fantastic projects at Supercon this year, but one whose fit and finish really stood out was [Scott]’s lightsaber. If you were walking around and saw someone with a very bright RGB device with a chromed-out handle hanging off their belt it was probably this, though it may have been hard to look at directly. On the outside, the saber looks like a well-polished cosplay prop, and it is! But when Scott quickly broke down the device into component pieces it was apparent that extra care had been put into the assembly of the electronics.

Like any good lightsaber replica the blade is lit, and wow is it bright. The construction is fairly simple, it’s a triplet of WS2812B LED strips back to back on a triangular core, mounted inside a translucent polycarbonate tube with a diffuser. Not especially unusual. But the blade can be popped off the hilt at a moments notice for easy transport and storage, so the strips can’t be soldered in. Connectors would have worked, but who wants flying wires when they’re disconnecting their lightsaber blade. The answer? Pogo pins! Scott runs the power, ground, and data lines out of the strips and into a small board with slip ring-style plated rings. On the hilt, there is a matching array of pogo pins to pass along power and data. The data lines from all the strips are tied together minimizing the number of connections to make, and the outer two power rings have more than one pin for better current-carrying capacity. A handy side effect is that there is nowhere on the blade where there aren’t LEDs; the strips go down to the very end of the blade where it meets the main board inside the hilt.

The hilt is filled with an assembly of 18650’s and a Teensy mounted with a custom shield, all fit inside a printed midframe. The whole build is all about robust design that’s easy to assemble. The main board is book-ended by perpendicular PCBs mounted to the ends, one at the top to connect to the blade and one at the bottom to connect to a speaker. Towards the bottom there is space for an optional Bluetooth radio to allow remote RGB control.

Scott is selling this as a product but also provides detailed instructions and parts lists for each component. Assembly instructions for the blade are here. The hilt is here. And pogo adapters are on OSH Park here. An overview of the firmware with links to GitHub is here. Check out a walkthrough of the handle assembly and blade attachment after the break!

Continue reading “Lightsaber Uses Pogo Pins To Make Assembly A Breeze”

Gyro Controlled RGB Blinky Ball Will Light Up Your Life

[James Bruton], from the XRobots YouTube channel is known for his multipart robot and cosplay builds. Occasionally, though, he creates a one-off build. Recently, he created a video showing how to build a LED ball that changes color depending on its movement.

The project is built around a series of 3D printed “arms” around a hollow core, each loaded with a strip of APA102 RGB LEDs. An Arduino Mega reads orientation data from an MPU6050 and changes the color of the LEDs based on that input. Two buttons attached to the Mega modify the way that the LEDs change color. The Mega, MPU6050, battery and power circuitry are mounted in the middle of the ball. The DotStar strips are stuck to the outside of the curved arms and the wiring goes from one end of the DotStar strip, up through the middle column of the ball to the top of the next arm. This means more complicated wiring but allows for easier programming of the LEDs.

Unlike [James’] other projects, this one is a quickie, but it works as a great introduction to programming DotStar LEDs with an Arduino, as well as using an accelerometer and gyro chip. The code and the CAD is up on Github if you want to create your own. [James] has had a few of his projects on the site before; check out his Open Dog project, but there’s also another blinky ball project as well.

Continue reading “Gyro Controlled RGB Blinky Ball Will Light Up Your Life”

Code Review Lamp Subtly Reminds You To Help Your Fellow Developer

[Dimitris Platis] works in an environment with a peer review process for accepting code changes. Code reviews generally are a good thing. One downside though, is that a lack of responsiveness from other developers can result in a big hit to team’s development speed. It isn’t that other developers are unwilling to do the reviews, it’s more that individuals are often absorbed in their own work and notification emails are easily missed. There is also a bit of a “tragedy of the commons” vibe to the situation, where it’s easy to feel that someone else will surely attend to the situation, but often no one does. To combat this, [Dimitris] built this Code Review Lamp, a subtle notification that aims to prod reviewers into action.

The lamp is based on a ring of RGB LEDs and a Wemos D1 Mini board. The Wemos utilizes the popular ESP8266, so it’s easy to develop for. The LED ring and Wemos are tied together with a slick custom PCB. Mounting the LED ring on the top of the PCB and the Wemos on the bottom allows for easy powering via a USB cable while directing light upward.  The assembly is placed in a translucent 3D printed enclosure creating a pleasant diffuse light source.

Every developer gets a Code Review Lamp. The lamps automatically log in to the change management system to check whether anything is awaiting review. If a review is ready, the Lamp glows in a color specific to the individual developer. All this serves as a gentle but persistent reminder that someone’s work is being held up until a review is completed.

We love the way that the device has a clear purpose: it does its job without any unnecessary features or parts. It’s similar to this ESP8266 IoT Motion Sensor in that it has a single job to do, and focuses on it well.

Continue reading “Code Review Lamp Subtly Reminds You To Help Your Fellow Developer”

This Cup Holder Crystal Ball Tells Your MPG Future

Hybrid vehicles, which combine an eco-friendly electric motor with a gasoline engine for extended range, are becoming more and more common. They’re a transitional technology that delivers most of the advantages of pure electric vehicles, but without the “scary” elements of electric vehicle ownership which are still foreign to consumers such as installing a charger in their home. But one element which hybrids are still lacking is a good method for informing the driver whether they’re running on petroleum or lithium; a way to check at a glance how “green” their driving really is.

[Ben Kolin] and his daughter [Alyssa] have come up with a clever hack that allows retrofitting existing hybrid vehicles with an extremely easy to understand indicator of real-time vehicle efficiency. No confusing graphics or arcade-style bleeps and bloops, just a color-changing orb which lives in the cup holder. An evolved version which takes the form of a smaller “dome light” that sits on the top of the dashboard could be a compelling aftermarket accessory for the hybrid market.

The device, which they are calling the ecOrb, relies on an interesting quirk of hybrid vehicles. The OBD II interface, which is used for diagnostics on modern vehicles, apparently only shows the RPM for the gasoline engine in a hybrid. So if the car is in motion but the OBD port is reporting 0 RPM, the vehicle must be running under electric power.

With a Bluetooth OBD adapter plugged into the car, all [Ben] and [Alyssa] needed was an Arduino Nano clone with a HC-05 module to read the current propulsion mode in real-time. With some fairly simple conditional logic they’re able to control the color of an RGB LED based on what the vehicle is doing: green for driving on electric power, purple for gas power, and red for when the gas engine is at idle (the worst case scenario for a hybrid).

Check out our previous coverage of OBD hacking on the Cadillac ELR hybrid if you’re looking to learn more about what’s possible with this rapidly developing class of vehicle

Continue reading “This Cup Holder Crystal Ball Tells Your MPG Future”

LED Stick Person Costume Lights Up The Night

Sometimes a simple idea can yield fantastic results. A few runs of LED strips fastened to a black hoody and sweatpants and just like that…a LED stick person costume for Halloween. The creator of the “Glowy Zoey” [Royce] originally put together some glow in the dark stick person suits to stand out when hitting the slopes at night. Now he’s taken that simple idea for a costume and made a small business out of it.


“I had a lot of extra parts laying around. I gathered everything up and got to work soldering.”  – Royce Hutain

The suits themselves consist of button snaps and ribbon loops sewn into a pattern that routes the LED strips around the jacket’s hood and down each arm. To make the lighting effect pop, an all black plastic mask is used to cover the wearer’s face. It wouldn’t be that much a stretch to substitute EL wire in place of the LED strips if one were so inclined. We’d wager a number of you could pull this off straight out of the junkbox.

The Glowy Zoey stick figure suits even received some mainstream television press a few years ago when they were featured on Jimmy Fallon’s Late Night show. Note that visiting the Glowy Zoey website may take you back a bit since it features one of those autoplay jingles that were so prevalent in the Web 1.0 days. In fact the same jingle is used in the video below from their YouTube channel:

Continue reading “LED Stick Person Costume Lights Up The Night”