Get Twelve Charlieplexed PWM Outputs From An ATtiny85

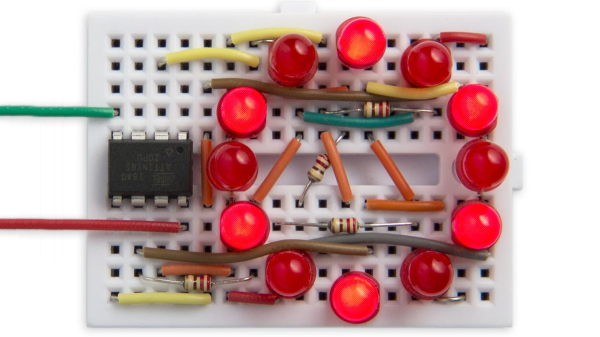
Most of us are aware that charlieplexing can drive a large number of LEDs from a relatively small number of I/O pins, but [David Johnson-Davies] demonstrates adding another dimension to that method to create individually controlled PWM outputs as well. His ATtiny85 has twelve LEDs, each with individually-set brightness levels, and uses only four of the five I/O pins on the device.

Each LED can be assigned a brightness between 0 (fully off) and 63 (fully on). The PWM is done by using one of the timers in the ATtiny85 to generate a periodic interrupt, and the ISR for the interrupt takes care of setting the necessary ratios of on and off times for each charlieplexed output. The result? Twelve flicker-free LEDs with individually addressable brightness levels, using an 8-pin microcontroller and just a few passive components on a tiny breadboard. There’s even one I/O pin left on the ATtiny85, for accepting commands or reading a sensor.

[David] really wrings a lot out of the ATtiny series of microcontrollers with his compact projects, like his Tiny Function Generator (which recently got an update.) He also demonstrated that while charlieplexing is usually used with LEDs, charlieplexing can be used with switches just as easily.

A Coin Cell Powers This Tiny ESP32 Dev Board

Just for the challenge, just for fun, just for bragging rights, and just to do a little showing off – all perfectly valid reasons to take on a project. It seems like one or more of those are behind this tiny ESP32 board that’s barely larger than the coin cell that powers it.

From the video below, [Mike Rankin] has been working down the scale in terms of powering and sizing his ESP32 builds. He recently completed a project with an ESP32 Pico D4 and an OLED display that fits exactly on an AA battery holder, which he populated with a rechargeable 14550. Not satisfied with that form factor, he designed another board, this time barely larger than the LIR2450 rechargeable coin cell in its battery holder. In addition to the Pico D4, the board sports a USB charging and programming socket, a low drop-out (LDO) voltage regulator, an accelerometer, a tiny RGB LED, and a 96×16 OLED display. Rather than claim real estate for switches, [Mike] chose to add a pair of pads to the back of the board and use them as capacitive touch sensors. We found that bit very clever.

Sadly, the board doesn’t do much – yet – but that doesn’t mean we’re not impressed. And [Mike]’s no stranger to miniaturization projects, of course; last year’s Open Hardware Summit badge was his brainchild.

Continue reading “A Coin Cell Powers This Tiny ESP32 Dev Board”

Talking Telegram With The ESP8266

At this point it’s something of a given that a member of the ESP8266 family is likely your best bet if you want to cobble together a small Internet-connected gadget. Costing as little as $3 USD, this well documented all-in-one solution really can’t be beat. But of course, the hardware is only one half of the equation. Deciding how to handle the software side of your homebrew Internet of Things device is another story entirely.

A simple Telegram ESP8266 switch

It would be fair to say that there’s no clear-cut “right” way to approach the software, and it really depends on the needs or limitations of your particular project. For example [Brian Lough] finds that building Telegram support into his ESP8266 allows him to accomplish his goals with the minimum amount of fuss while at the same time using an environment he’s already comfortable with. He recently wrote in to share one of his Telegram projects with us, and in the video after the break, takes the time to explain some of the things he likes best about controlling his hardware through the encrypted chat platform.

But you don’t have to take his word for it, you can try it yourself. Thanks to the software library that [Brian] has developed to connect his projects to Telegram, the aptly named “Universal Telegram Bot Library”, anyone can easily follow in his footsteps. Adding his Telegram library to your next ESP8266 project is as easy as selecting it in the Arduino IDE. From there the video explains the process for getting a bot ID from Telegram, and ultimately how you use it to receive messages from the service. What you do with those messages is entirely up to you.

According to [Brian], the main downside is that you are beholden to a web service to control your local devices; not ideal if the Internet goes down or you would rather your little hacker projects not talk to the big scary Internet in the first place. If you’d rather keep all your smart things talking within the confines of your own network, perhaps your next project could be setting up a private MQTT server.

Continue reading “Talking Telegram With The ESP8266”

Badge.Team: Badges Get A Platform

Electronic conference badges are now an accepted part of the lifeblood of our community, with even the simplest of events now sporting a fully functional computer as an eye-catching PCB on a lanyard. Event schedules and applications are shipped on them, and the more sophisticated ones have app libraries and support development communities of their own.

The trouble is that so often those badges fail to live up to their promise, and one reason behind that stems from the enormity of the task facing a badge team when it comes to firmware for a modern badge. There is some fascinating news from the Netherlands  that might reduce some of those firmware woes though, badge.team is a freshly-launched project that provides a ready-made badge firmware with the promise of both stability and long-term support. If you’re making a badge, or even a one-off device using the ESP32, this is a project worth checking out.

Continue reading “Badge.Team: Badges Get A Platform”

How To Program A Really Cheap Microcontroller

There are rumors of a cheap chip that does USB natively, has an Open Source toolchain, and costs a quarter. These aren’t rumors: you can buy the CH552 microcontroller right now. Surprisingly, there aren’t many people picking up this cheap chip for their next project. If there’s no original projects using this chip, no one is going to use this chip. Catch 22, and all that.

Like a generous god, [Aaron Christophel] has got your back with a working example of programming this cheap chip, and doing something useful with it. It blinks LEDs, it writes to an I2C display, and it does everything you would want from a microcontroller that costs a few dimes.

The CH552, and its friends the small CH551 all the way up to the CH559, contain an 8051 core, somewhere around 16 kB of flash, the high-end chips have a USB controller, there’s SPI, PWM, I2C, and it costs pennies. Unlike so many other chips out there, you can find SDKs and toolchains. You can program the chip over USB. Clearly, we’re looking at something really cool if someone writes an Arduino wrapper for it. We’re not there yet, but we’re close.

To program these chips, [Aaron] first had to wire up the microcontroller into a circuit. This was just a bit of perf board, a resistor, a few caps, and a USB A plug. That’s it, that’s all that’s needed. This is a fairly standard 8051 core, so writing the code is relatively easy. Uploading is done with the WCHISPTool software, with options available for your favorite flavor of *nix.

But it gets better. One of the big features of the CH552 is USB. That means no expensive or weird programmers, yes, but it also means the CH552 can emulate a USB HID device. The CH552 can become a USB keyboard. To demo this, [Aaron] programmed a CH552 board (DE, here’s the Google translatrix) loaded up with touch pads and LEDs to become a USB keyboard.

If you don’t feel like soldering up one of these yourself, there are some suppliers of CH554 dev boards, and the files for [Aaron]’s projects are available here. Check out the videos below, because this is the best tutorial yet on programming and using some very interesting chips that just appeared on the market.

Continue reading “How To Program A Really Cheap Microcontroller”

A Lightweight AVR IDE

It’s entirely possible to do your coding in vim or emacs, hammering out hotkeys to drive the interface and bring your code to life. While working in such a way has its charms, it can be confronting to new coders, and that’s before even considering trying to understand command line compiler settings. The greenhorn coder may find themselves more at home in the warm embrace of an IDE, and [morrows_end] has now built one for those working with AVR assembly code.

The IDE goes by the name of Simple AVR IDE, or savr_ide for short. Programmed in C++ with the FLTK widget library, [morrows_end] has tested it on Windows XP, but notes that it should successfully compile for Linux, Unix, and even MacOS too.

All the basic features are there – there’s syntax highlighting, as well as integration with the AVRA assembler and AVRDUDE for programming chips. It’s a tool that could make taking the leap into assembly code just that little bit easier.  For another taste of bare metal coding, check out [Ben Jojo]’s discussion of x86 bootloaders.

Is That A Word Clock In Your Pocket?

Word clocks are one of those projects that everyone seems to love. Even if you aren’t into the tech behind how they work, they have a certain appealing aesthetic. Plus you can read the time without worrying about those pesky numbers, to say nothing of those weird little hands that spin around in a circle. This is the 21st century, who has time for that?

Now, thanks to [Gordon Williams], these decidedly modern timepieces just got a lot more accessible. His word clock is not only small enough to fit in the palm of your hand, but it’s the easiest-to-build one we’ve ever seen. If you were ever curious about these gadgets but didn’t want to put in the the time and effort required to build a full scale version, this diminutive take on the idea might be just what Father Time ordered.

The trick is to attach the microcontroller directly to the backside of an 8 x 8 LED matrix. As demonstrated by [Gordon], the Bluetooth-enabled Espruino MDBT42Q fits neatly between the rows of pins, which need only a gentlest of persuasions to get lined up and soldered into place. Since the time can be set remotely over Bluetooth, there’s not even so much as an additional button required. While driving the LEDs directly off of the digital pins of a microcontroller is never recommended, the specifics of this application (only a few of the LEDs on at a time, and not for very long) means he can get away with it.

Of course, that just gets you an array of square LEDs you blink. It wouldn’t be much of a word clock without, you know, words. To that end, [Gordon] has provided an overlay which you can print on a standard inkjet printer. While it’s not a perfect effect as the light still comes through the ink, it works well enough to get the point across. One could even argue that the white letters on the gray background helps with visibility compared to just the letters alone lighting up.

If you’re not in the market for a dollhouse-sized word clock, fear not. We’ve got no shortage of adult sized versions of these popular timepieces for your viewing pleasure.

Continue reading “Is That A Word Clock In Your Pocket?”