ESP8266 Broadcasts Memorial WiFi Spam

John Perry Barlow, founding member of the Electronic Frontier Foundation and Freedom of the Press Foundation, died on February 7th, 2018. To say that he left his mark on the Internet, and by extension modern culture, is something of an understatement. He may not be a household name, but between this activism (online and off), lectures, written work, and various entrepreneurial projects, his 70 years of life were surely not wasted. Barlow was once quoted as saying “I want to be a good ancestor”, and by pretty much any metric it would seem he made good on that goal.

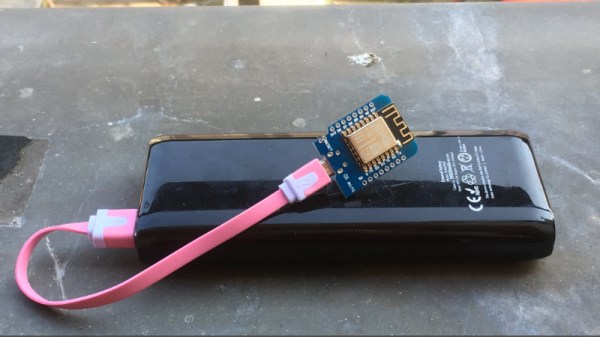
To mark his passing, [Moritz Metz] came up with a rather unusual memorial. Using a bit of code on an ESP8266 board, he created a device that would broadcast out Barlow’s “A Declaration of the Independence of Cyberspaceline-by-line in the form of 228 WiFi SSIDs. Perhaps not the most effective way to get Barlow’s words out to the people, but we’ll give him extra points for style.

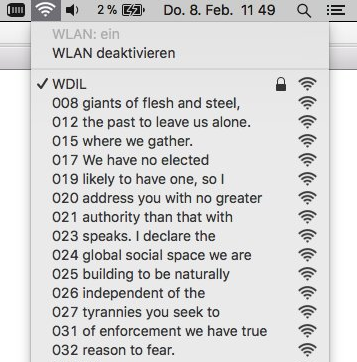
The code itself is based on FakeBeaconESP8266, which as the name implies, allows the user to create fake WiFi networks. to broadcast the manifesto of your choosing, you need only add in the appropriate sendBeacon() lines at the bottom of the code. It would appear that prefixing each line with a number is required to make devices scanning for networks show the lines of text in proper sequence. At least on the devices demoed, anyway.

Just to be clear: you should definitely not do this. Jamming up the local environment with a bunch of fake networks is a pretty terrible idea. But as a memorial for a man who occasionally claimed to be an anarchist, you could do worse. Plus we have to admit “Giants of Flesh and Steel” is an awesome name for a network.

Continue reading “ESP8266 Broadcasts Memorial WiFi Spam”

Count Your Fans With This Stylish ESP8266 Display

Continuous self-affirmation is a vital component to the modern lifestyle. Of course you know the world loves you, but exactly how much do they love you? Checking your phone every few minutes to see if you’ve gained any followers is gauche, and perhaps more to the point, doesn’t let you show off when you’ve got visitors over. In the modern era, the up-and-coming social media star needs a stylish way to display just how popular they are for the world to see.

That’s the idea behind this very slick social media counter created by [Becky Stern]. Built into a standard shadow box frame and using LED displays glowing through a printed piece of paper, the finished product looks more like modern art than the usual hacker fare.

The counter is powered by a NodeMCU, but you could drop in your favorite variant of the ESP8266 and things would work more or less the same. For the displays, [Becky] is using four Adafruit 7-Segment LED modules, which are easily controlled via I2C which keeps the wiring to a minimum.

It’s interesting to note that since her follower count on Twitter has already hit five digits, two of the display modules are used next to each other for that particular service. Her Instructables and Instagram counters only have one display each however, limiting her counts on those services to 9,999 each. There’s probably something to be learned here in terms of the relative follower counts you can expect on the different social networks if you’re targeting your content to the hacker and maker crowd, but we’ll leave the analysis to those with a better handle on such matters.

Hardware aside, [Becky] spends a lot of time in the video talking about the code she’s come up with to pull her stats from the various services and push them out to the LED displays at a regular interval. It’s nice to see so much attention and explanation given to the software side of a project like this, as more often than not you’re left to your own to figure out what the source code is doing.

This project is quite similar to the YouTube Play Button hack we covered a few months back, but the addition of multiple social networks in one device is a nice improvement over the basic concept.

Continue reading “Count Your Fans With This Stylish ESP8266 Display”

Hacking A Sonoff WiFi Switch

The ESP8266 platform has become so popular that it isn’t just being used in hobby and one-off projects anymore. Companies like Sonoff are basing entire home automation product lines around the inexpensive WiFi card. What this means for most of us is that there’s now an easily hackable and readily available product on the market that’s easily reprogrammed and used with tools that we’ve known about for years now, as [Dan] shows in his latest project.

[Dan] has an aquaponics setup in his home, and needs some automation to run the lights. Reaching for a Sonoff was an easy way to get this done, but the out-of-the-box device can only be programmed in the simplest of ways. To get more control over the unit, he wired a USB-to-Serial UART to the female headers on the board and got to programming it.

The upgraded devices are fully programmable and customizable now, and this would be a great hack for anyone looking to get more out of a Sonoff switch. A lot of the work is already done, like building a safe enclosure, wiring it, and getting it to look halfway decent. All that needs to be done is a little bit of programming. Of course, if you’d like to roll out your own home automation setup from scratch that can do everything from opening the garage door to alerting you when your dog barks, that’s doable too. You’ll just need a little more hardware.

ESP32, We Have Ways To Make You Talk

One of our favorite scenes from the [James Bond] franchise is the classic exchange between [Goldfinger] and [Bond]. [Connery] (the One True Bond) says, “You expect me to talk?” And the reply is, “No Mr. Bond, I expect you to die!” When it comes to the ESP32, though, apparently [XTronical] expects it to talk. He posted a library to simplify playing WAV files on the ESP32. There is also a video worth watching, below.

Actually, you might want to back up to his previous post where he connects a speaker via one of the digital to analog converters on the board. In that post, he just pushes out a few simple waveforms, but the hardware is the same setup he uses for playing the WAV files.

Continue reading “ESP32, We Have Ways To Make You Talk”

Intel C4004

Inventing The Microprocessor: The Intel 4004

We recently looked at the origins of the integrated circuit (IC) and the calculator, which was the IC’s first killer app, but a surprise twist is that the calculator played a big part in the invention of the next world-changing marvel, the microprocessor.

There is some dispute as to which company invented the microprocessor, and we’ll talk about that further down. But who invented the first commercially available microprocessor? That honor goes to Intel for the 4004.

Path To The 4004

Busicom calculator motherboard based on 4004 (center) and the calculator (right)

We pick up the tale with Robert Noyce, who had co-invented the IC while at Fairchild Semiconductor. In July 1968 he left Fairchild to co-found Intel for the purpose of manufacturing semiconductor memory chips.

While Intel was still a new startup living off of their initial $3 million in financing, and before they had a semiconductor memory product, as many start-ups do to survive they took on custom work. In April 1969, Japanese company Busicom hired them to do LSI (Large-Scale Integration) work for a family of calculators.

Busicom’s design, consisting of twelve interlinked chips, was considered a complicated one. For example, it included shift-register memory, a serial type of memory which complicates the control logic. It also used Binary Coded Decimal (BCD) arithmetic. Marcian Edward Hoff Jr — known as “Ted”, head of the Intel’s Application Research Department, felt that the design was even more complicated than a general purpose computer like the PDP-8, which had a fairly simple architecture. He felt they may not be able to meet the cost targets and so Noyce gave Hoff the go-ahead to look for ways to simplify it.

Continue reading “Inventing The Microprocessor: The Intel 4004”

ESP32 Makes For World’s Worst Radio Station

We can say one thing for [bitluni]: the BOMs for his projects, like this ESP32 AM radio transmitter, are always on the low side. That’s because he leverages software to do jobs traditionally accomplished with hardware, always with instructive results.

In this case, the job at hand is creating an RF oscillator in the broadcast AM band and modulating some audio onto it. From his previous experience using an ESP32 to watch video on an oscilloscope, [bitluni] knew that the microcontroller’s DACs were up to the task of producing an 800-kHz signal, and he managed to produce a more-or-less sine wave carrier with some clever code. His sketch takes data from a header file, modulates it onto the carrier, and sends it out over the ether using a short stub of wire for an antenna. The range is severely limited, but for what it is, it gets the job done and shows the basics. And as a bonus, [bitluni] included a bit of JavaScript that turns an audio file into a header file that’s ready to go out over the airwaves for all your trolling needs.

If you’re looking for a little more range for your low power transmitter and you’re a licensed amateur operator, you might want to explore the world of QRP radio.

Continue reading “ESP32 Makes For World’s Worst Radio Station”

Arcade Style Computer Hotkeys

Prolific maker [Sean Hodgins] has taken the wraps off of his latest one-day build, and as usual, it takes the kind of spare parts most people reading Hackaday will have in their parts bins and turns it into something fun and useful. This time around, he takes a bunch of spare arcade-style buttons he had from a previous project and combines them with an Adafruit Trinket (SAMD21 flavor) to make a USB input device for his computer.

[Sean] uses 1/4 inch acrylic to make the case, though he does mention that it could just as easily be 3D printed. But using the acrylic is easy and gives a nice glossy look to the final hardware. With a saw and a drill press you can make some very professional cases out of acrylic, which goes to show that you don’t necessarily need to have a high end 3D printer to create great looking enclosures.

As explained in the video, the Adafruit Trinket is not strictly necessary for this build, it’s just what [Sean] had lying around. Any microcontroller that can present itself to the operating system as a USB Human Interface Device (HID) will work fine for a project like this.

Software wise, a modified Arduino demo program is used to equate the states of the digital pins to pre-defined key combinations to be sent to the computer. In this simple example the key combinations are hard-coded into the Trinket’s source code, but a future enhancement could be adding a method of setting up new key combinations with a configuration tool.

We’ve covered our fair share of non-traditional USB input devices, all operating on largely the same principle. As it turns out, hackers have quite a pension for making oddball input devices.

Continue reading “Arcade Style Computer Hotkeys”