Hands-On With The BBC Micro:Bit

It’s been a long wait, but our latest single board computer for review is finally here! The BBC micro:bit, given free to every seventh-grade British child, has landed at Hackaday courtesy of a friend in the world of education. It’s been a year of false starts and delays for the project, but schools started receiving shipments just before the Easter holidays, pupils should begin lessons with them any time now, and you might even be able to buy one for yourself by the time this article goes to press.

The micro:bit top view

It’s a rather odd proposition, to give an ARM based single board computer to coder-newbie children in the hope that they might learn something about how computers work, after all if you are used to other similar boards you might expect the learning curve involved to be rather steep. But the aim has been to position it as more of a toy than the kind of development board we might be used to, so it bears some investigation to see how much of a success that has been.

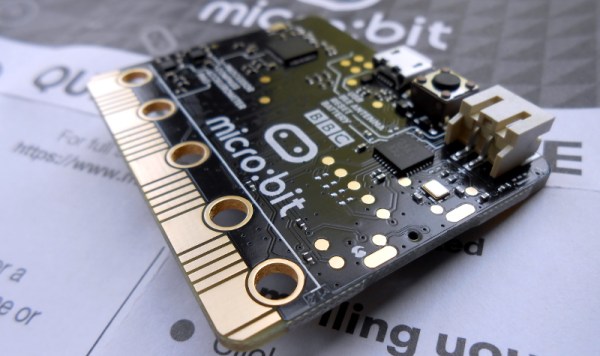
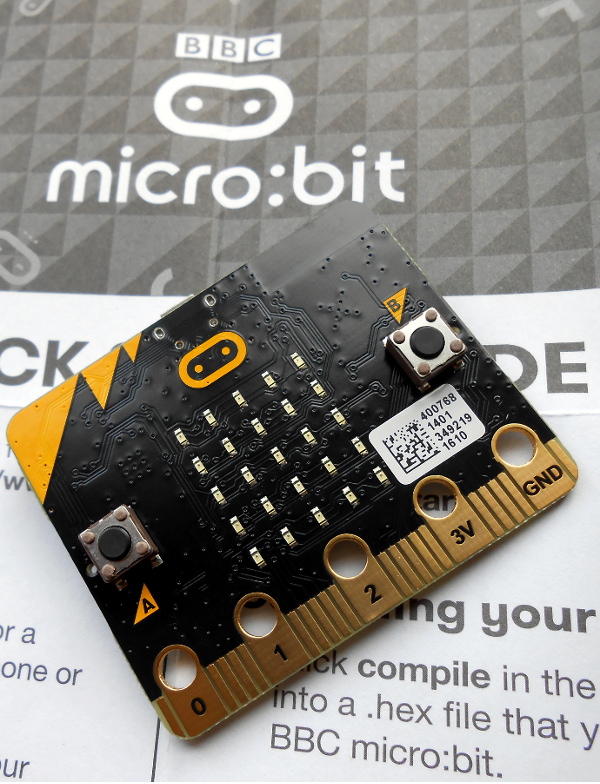
Opening the package, the micro:bit kit is rather minimalist. The board itself, a short USB lead, a battery box and a pair of AAA cells, an instruction leaflet, and the board itself.  Everything is child-sized, the micro:bit is a curved-corner PCB about 50mm by 40mm. The top of the board has a 5 by 5 square LED matrix and a pair of tactile switches, while the bottom has the surface-mount processor and other components, the micro-USB and power connectors, and a reset button. Along the bottom edge of the board is a multi-way card-edge connector for the I/O lines with an ENIG finish. On the card edge connector several contacts are brought out to wide pads for crocodile clips with through-plated holes to take 4mm banana plugs, these are the ground and 3V power lines, and 3 of the I/O lines.

Continue reading “Hands-On With The BBC Micro:Bit”

Cable Butchering For Logic-Level Serial

Early PCs and other computers had serial ports, sometimes as their main interfaces for peripherals. Serial ports still survive, but these days they are more likely to have a USB connection into the main computer. However, when you are working with a microcontroller, you probably don’t want a proper RS232 port with its plus and minus 12 volt signals.

You can get converters that specifically output logic-level signals but you probably can’t pick one up at the local office supply store. They might, though, have a normal USB to serial cable. [Aaron] had the same problem so he hacked into a cable to pull out the logic level signals.

On the one hand, hacks like this are a good inspiration for when you have a similar problem. On the other hand, you probably won’t wind up with the same cable as [Aaron]. He got lucky since the board inside his cable was clearly marked. Just to be sure, he shorted the transmit and receive lines to see that he did get an echo back from a terminal program.

Unsurprisingly, you can also repurpose an ESP8266 to perform this same task. Or, you can use a cable as an I/O device.

TV Stick Out-Raspberries Raspberry Pi

Android-based TV sticks should be in more projects. They are readily available and inexpensive. They have a lot of horsepower for the price, and they can even boot a mainline Linux kernel, unlike some single-board computers we know. They’re smaller than the Pi Zero, so they’ll fit almost anywhere.

The one thing they don’t have, though, is I/O. Sure, it’s got a USB port, but that’s just about it. [Necromant] considered these problems and created a carrier board that fixes all that.

  • On-board 3A DC-DC. You can power the whole thing with anything from 7 to 24 volts DC
  • A 4-Port USB hub
  • An ATtiny 2313, connected to the hub via the V-USB stack
  • 2 USB ports on the back, with power control via GPIO lines
  • One USB port on the front (with power always on)
  • 3 relays
  • Fits a common anodized aluminum enclosure

The ATtiny code is on GitHub and allows for full I/O control, saving the state of the pins in EEPROM, and providing up to eight channels of servo control. The device connects through the USB port (consuming one port on the hub).

Repurposing consumer gear for embedded service is nothing new. We’ve seen it with phones. We’ve even seen remotes used as a mouse. But this is such a nice template for adding cheap and easy computing power to your projects that we’re surprised we don’t see it more often. Why aren’t you hacking a TV stick into your projects?

Mike Szczys Ends 8-Bit Vs 32-Bit Holy War!

If you’ve read through the comments on Hackaday, you’ve doubtless felt the fires of one of our classic flame-wars. Any project done with a 32-bit chip could have been done on something smaller and cheaper, if only the developer weren’t so lazy. And any project that’s squeezes the last cycles of performance out of an 8-bit processor could have been done faster and more appropriately with a 32-bit chip.

bits_argument

Of course, the reality for any given project is between these two comic-book extremes. There’s a range of capabilities in both camps. (And of course, there are 16-bit chips…) The 32-bit chips tend to have richer peripherals and run at higher speeds — anything you can do with an 8-bitter can be done with its fancier cousin. Conversely, comparatively few microcontroller applications outgrow even the cheapest 8-bitters out there. So, which to choose, and when?

Eight Bits are Great Bits

The case that [Mike] makes for an 8-bit microcontroller is that it’s masterable because it’s a limited playground. It’s a lot easier to get through the whole toolchain because it’s a lot shorter. In terms of debugging, there’s (often) a lot less that can go wrong, letting you learn the easy debugging lessons first before moving on to the truly devilish. You can understand the hardware peripherals because they’re limited.

And then there’s the datasheets. The datasheet for a chip like the Atmel ATMega168 is not something you’d want to print out, at around 660 pages long. But it’s complete. [Mike] contrasts with the STM32F405 which has a datasheet that’s only 200 pages long, but that’s just going over the functions in principle. To actually get down to the registers, you need to look at the programming manual, which is 1,731 pages long. (And that doesn’t even cover the various support libraries that you might want to use, which add even more to the documentation burden.) The point is, simpler is simpler. And if you’re getting started, simpler is better.

Continue reading “Mike Szczys Ends 8-Bit Vs 32-Bit Holy War!”

Smallest MIDI Synth, Again!

Not content with fitting a tiny square-wave MIDI synthesizer into a MIDI plug, [Mitxela] went on to cram a similar noisemaker into a USB plug itself.

Besides being physically small, the code is small too, as well as the budget. It uses V-USB for the USB library running on an ATtiny85, and a couple of passive parts. His firmware (apparently) takes in MIDI notes and spits out square waves.
Continue reading “Smallest MIDI Synth, Again!”

Atmel Removes Full-Swing Crystal Oscillator

It is one of our favorite chips, and the brains behind the Arduino UNO and its clones, and it’s getting a tweak (PDF). The ATmega328 and other megaX8-series chips have undergone a subtle design change that probably won’t affect you, but will cause hours of debugging headaches if it does. So here’s your heads-up. The full-swing oscillator driver circuitry is being removed. As always, there’s good news and bad news.

The older ATmega chips had two different crystal drivers, a low-power one that worked for lower speeds, and higher-current version that would make even recalcitrant crystals with fat loading capacitors sing. This “full-swing” crystal driver was good for 16 MHz and up.

The good news about the change is that the low-power crystal driver has been improved to the point that it’ll drive 16 MHz crystals, so you probably don’t need the full-swing driver anymore unless you’re running the chip at 20 MHz (or higher, you naughty little overclocker).

This is tremendously important for Arduinos, for instance, which run a 16 MHz crystal. Can you imagine the public-relations disaster if future Arduinos just stopped working randomly? Unclear is if this is going to ruin building up a perfboard Arduino as shown in the banner image. The full-swing oscillator was so robust that people were getting away with a lot of hacky designs and sub-optimal loading capacitor choices. Will those continue to work? Time will tell.

The bad news is that if you were using the full-swing oscillator to overcome electrical noise in your environment, you’re going to need to resort to an external oscillator instead of a simple crystal. This will increase parts cost, but might be the right thing to do anyway.

Whenever anyone changes your favorite chip, there’s a predictable kerfuffle on the forums. An Atmel representative said they can get you chips with the full-swing driver with a special order code. We’re thinking that they’re not going to let us special order ten chips, though, so we’re going to have to learn to live with the change.

The ATmega328 has already gotten a makeover, and the new version has improved peripheral devices which are certainly welcome. They don’t have the full-swing oscillator onboard, so you can pick some up now and verify if this change is going to be a problem for you or not. We don’t have any of the new chips to test out just yet.

Thanks to [Ido Gendel] for tipping us off to the change in our comment section! If you have any first-hand experience with the new chips, let us know in the comments and send in a tip anytime you trip over something awesome during your Internet travels.

Megaprocessor Is A Macro Microprocessor

If we have to make a list of Projects that are insane and awesome at the same time, this would probably be among the top three right up there. For the past few years, [James Newman] has been busy building Megaprocessor – a huge micro-processor made out of transistors and LED’s, thousands of ’em. “I started by wanting to learn about transistors. Things got out of hand.” And quite appropriately, he’s based out of Cambridge – the “City of perspiring dreams“. The Why part is pretty simple – because he can. We posted about his build as recently as 10 months back, but he’s made a ton of progress since then and an update seemed in order.

megaprocessor_04How big is it ? For starters, the 8-bit adder module is about 300mm (a foot) long – and he’s using five of them. When fully complete, it will stretch 14m wide and stand 2m tall, filling a 30 sq.m room, consisting of seven individual frames that form the parts of the Megaprocessor.

The original plan was for nine frames but he’s managed to squeeze all parts in to seven, building three last year and adding the other four since then. Assembling the individual boards (gates), putting them together to form modules, then fitting it all on to the frames and putting in almost 10kms of cabling is a slow, painstaking job, but he’s been on fire last few months. He has managed to test and integrate the racks shown here and even run some code.

The Megaprocessor has a 16-bit architecture, seven registers, 256bytes of RAM and a questionable amount of PROM (depending on his soldering endurance, he says). It sips 500W, most of it going to light up all the LED’s. He guesses it weighs about half a ton. The processor uses up 15,300 transistors and 8,500 LED’s, while the RAM has 27,000 transistors and 2,048 LED’s. That puts it somewhere between the 8086 and the 68000 microprocessors in terms of number of transistors. He recently got around to calculating the money he’s spent on this to date, and it is notching up over 40,000 Quid (almost $60,000 USD)!  You can read a lot of other interesting statistics on the Cost and Materials page.

Continue reading “Megaprocessor Is A Macro Microprocessor”