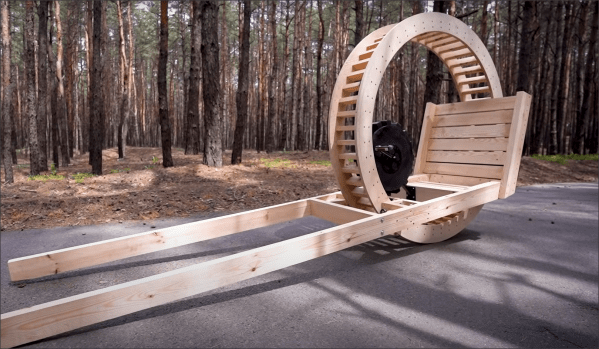
How To Make A Collapsible Container Without Breaking Down

How hard could it be to make a collapsible silicone container? Turns out, it’s really, really hard — collapsible containers have rigid guidelines. Just ask [Eric Strebel], who failed dozens of times before finally getting it right (video, embedded below).

[Eric] started with an SLA-printed two-part mold and a silicone formulation with a Shore durometer of A 40 — this is the measure of hardness for silicone, polymers, and elastomers in the sense that the piece will resist indentation. The first twenty-four attempts all came out looking great, but not a single one of them would collapse and stay collapsed.

Eventually, [Eric] went back to the drawing board and played with the angles of the flex points, the thickness of the living hinges, and the wall thicknesses, which have to be strong enough to stay collapsed.

For attempt #25, [Eric] took the part out of the mold about three hours in and tried curing it in the collapsed state. Persistence paid off, and the part finally collapses and stays that way. Get yourself some popcorn and check out the fail-fest after the break. You know what we always say — fail fast, fail often.

[Eric] has made many molds both from silicone and for silicone. Some of them are really big!

Continue reading “How To Make A Collapsible Container Without Breaking Down”

Extreme Canine Mask For Protection From Foxtails

Our canine partners are fortunately not affected by the current global pandemic, but it turns out there are other dangers that might necessitate them to wearing masks: Foxtail seeds. After getting a $400 vet bill for extracting a foxtail from his dog, [Hildeguard]’s ear, [Amos Dudley] decided to take the threat seriously and made her a form-fitting 3D printed mask.

The only commercial solution [Amos] could find was the “OutFox Field Guard”, which is a $50 vinyl-coated mesh bag that covers the dog’s entire head. It had the unfortunate side effects of causing some other dogs to try and rip it off and does not allow easy access to the mouth for treats or balls. [Hilde]’s custom mask was designed in CAD after creating a rough 3D scan of her head with an iPhone app. The bottom is open to allow [Hilde] to freely use her mouth, while the nose and ears holes are covered with mesh. Custom heat-formed polycarbonate lenses cover the eye holes. The mask itself was printed using Draft resin, and the inside was padded with a thin layer of foam. It might also be possible to create a silicone version using a 3D-printed mold. The top features an integrated GoPro mount, and we can’t help but wonder what other electronic upgrades could be fitted to this sci-fi-looking mask.

In the field, the mask worked well and did not seem to bother [Hilde]. Unfortunately, it did not solve the problem of other dogs trying to rip it off at the park, so for the moment [Amos] is only using it for more solitary activities like hiking.

It doesn’t look like [Amos] is struggling in that department, but if you need some help burning of your dog’s energy, you can always built them a 3D printed automatic ball launcher.


3D Zoetrope Uses Illusion To Double The Frames

Although film and animation have come quite a long way, there’s still something magical about that grandaddy of them all, the zoetrope. Thanks to persistence of vision, our eyes are fooled into seeing movement where there is none, only carefully laid-out still pictures strobing under the right lighting.

After four months of research, CAD, prototyping, and programming, [Harrison McIntyre] has built a 3D zoetrope that brings a gif to glorious physical life (video, embedded below). All the image pieces are printed and move under a fancy backlight that [Harrison] borrowed from work. It works essentially the same as a 2D zoetrope, as long as you get the spacing juuuuust right. 360° divided by 20 frames comes out to 18° per frame. So a motor spins the disk around, and every 18°, the light pulses for one millisecond and then turns off until the next frame is in position.

The really interesting thing is that there are actually more than 20 frames at play here. If you follow a single character through the loop, it takes 46 frames to complete the animation thanks to something 3D zoetrope pioneer [Kevin Holmes] dubbed ‘animation multiplexing‘, which in [Harrison]’s example, is easily explained as a relay race in which all runners run their section at the same time, creating the illusion of constant motion.

There’s more than one way to use a 3D printer to create a zoetrope, and we doubt we would have ever thought of this one that squashes four dimensions into three.

Continue reading “3D Zoetrope Uses Illusion To Double The Frames”

Machine-Vision Archer Makes You The Target, If You Dare

We’ll state right up front that it’s a really, really bad idea to let a robotic archer shoot an apple off of your head. You absolutely should not repeat what you’ll see in the video below, and if you do, the results are all on you.

That said, [Kamal Carter]’s build is pretty darn cool. He wisely chose to use just about the weakest bows you can get, the kind with strings that are basically big, floppy elastic bands that shoot arrows with suction-cup tips and are so harmless that they’re intended for children to play with and you just know they’re going to shoot each other the minute you turn your back no matter what you told them. Target acquisition is the job of an Intel RealSense depth camera, which was used to find targets and calculate the distance to them. An aluminum extrusion frame holds the bow and adjusts its elevation, while a long leadscrew and a servo draw and release the string.

With the running gear sorted, [Kamal] turned to high school physics for calculations such as the spring constant of the bow to determine the arrow’s initial velocity, and the ballistics formula to determine the angle needed to hit the target. And hit it he does — mostly. We’re actually surprised how many on-target shots he got. And yes, he did eventually get it to pull a [William Tell] apple trick — although we couldn’t help but notice from his, ahem, hand posture that he wasn’t exactly filled with self-confidence about where the arrow would end up.

[Kamal] says he drew inspiration both from [Mark Rober]’s dart-catching dartboard and [Shane Wighton]’s self-dunking basketball hoop for this build. We’d say his results put in him good standing with the skill-optional sports community.

Continue reading “Machine-Vision Archer Makes You The Target, If You Dare”

Garage Semiconductor Fab Gets Reactive-Ion Etching Upgrade

It’s a problem that few of us will likely ever face: once you’ve built your first homemade integrated circuit, what do you do next? If you’re [Sam Zeloof], the answer is clear: build better integrated circuits.

At least that’s [Sam]’s plan, which his new reactive-ion etching setup aims to make possible. While his Z1 dual differential amplifier chip was a huge success, the photolithography process he used to create the chip had its limitations. The chemical etching process he used is a bit fussy, and prone to undercutting of the mask if the etchant seeps underneath it. As its name implies, RIE uses a plasma of highly reactive ions to do the etching instead, resulting in finer details and opening the door to using more advanced materials.

[Sam]’s RIE rig looks like a plumber’s stainless steel nightmare, in the middle of which sits a vacuum chamber for the wafer to be etched. After evacuating the air, a small amount of fluorinated gas — either carbon tetrafluoride or the always entertaining sulfur hexafluoride — is added to the chamber. A high-voltage feedthrough provides the RF energy needed to create a plasma, which knocks fluorine ions out of the process gas. The negatively charged and extremely reactive fluorine ions are attracted to the wafer, where they attack and etch away the surfaces that aren’t protected by a photoresist layer.

It all sounds simple enough, but the video below reveals the complexity. There are a lot of details, like correctly measuring vacuum, avoiding electrocution, keeping the vacuum pump oil from exploding, and dealing with toxic waste products. Hats off to [Sam’s dad] for pitching in to safely pipe the exhaust gases through the garage door. This ties with [Huygens Optics]’s latest endeavor for the “coolest things to do with fluorine” award.

Continue reading “Garage Semiconductor Fab Gets Reactive-Ion Etching Upgrade”

Lego Microscope Aims To Discover Future Scientists

When it comes to inspiring a lifelong appreciation of science, few experiences are as powerful as that first glimpse of the world swimming in a drop of pond water as seen through a decent microscope. But sadly, access to a microscope is hardly universal, denying that life-changing view of the world to far too many people.

There have been plenty of attempts to fix this problem before, but we’re intrigued to see Legos used to build a usable microscope, primarily for STEM outreach. It’s the subject of a scholarly paper (preprint) by [Bart E. Vos], [Emil Betz Blesa], and [Timo Betz]. The build almost exclusively uses Lego parts — pretty common ones at that — and there’s a complete list of the parts needed, which can either be sourced from online suppliers, who will kit up the parts for you, or by digging through the old Lego bin. Even the illuminator is a stock part, although you’ll likely want to replace the orange LED buried within with a white one. The only major non-Lego parts are the lenses, which can either be sourced online or, for the high-power objective, pulled from an old iPhone camera. The really slick part is the build instructions (PDF), which are formatted exactly like the manual from any Lego kit, making the build process easily accessible to anyone who has built Lego before.

As for results, they’re really not bad. Images of typical samples, like salt crystal, red onion cells, and water fleas are remarkably clear and detailed. It might no be a lab-grade Lego microscope, but it looks like it’s more than up to its intended use.

Thanks for the heads up on this, [Jef].

Measuring Planck’s Constant With LEDs And A DMM

The remarkable thing about our universe is that it’s possible to explore at least some of its inner workings with very simple tools. Gravity is one example, to which [Galileo]’s inclined planes and balls bear witness. But that’s classical mechanics: surely the weirdness that is quantum mechanics requires far more sophisticated instrumentation to explore, right?

That’s true enough — if you consider a voltmeter and a Mark 1 eyeball to be sophisticated. That’s pretty much all you need for instruments to determine Planck’s constant to a decent degree of precision, the way that [poblocki1982]’s did. There’s a little more to it, of course; the method is based on measuring the voltage at which LEDs of various wavelengths start shining, so a simple circuit was built to select an LED from the somewhat grandly named “photon energy array” and provide a way to adjust and monitor the voltage and current.

By performing the experiment in a dark room with adapted eyes, or by using an opaque tube to block out stray light, it’s possible to slowly ramp the voltage up until the first glimmer of light is seen from each LED. Recording the voltage and the wavelength gives you the raw numbers to calculate the Planck constant h, as well as the Planck error Δh, with the help of a handy spreadsheet. [poblocki1982] managed to get within 11% of the published value — not too shabby at all.

Does this all still sound too complicated for you? Maybe a Watt balance made from Lego is more your speed.