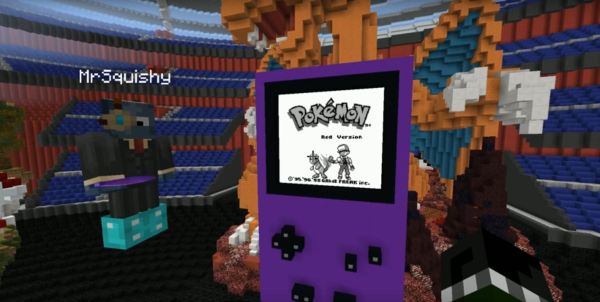
Printing Nintendo Portables With SLA

Downing] is no stranger to building portable consoles, employing all manner of techniques in the process. However, when it came time to start on this commission, [Downing] decided to take a different tack – employing a Form 2 SLA printer in this Nintendo 64 portable build.

Modifying home consoles to become portables often involves tricks like Frankencasing – hacking together original factory parts such as controllers, cases, and accessories, and using body filler and a lot of sanding to create a template for vacuum moulding, which then results in a seamless final product. It’s possible to get some really impressive results, but it does limit the builder to relying on existing parts.

By using the Form 2, [Downing] was able to take advantage of the SLA printer’s ability to create parts with good surface finish that would normally require a lot of post-print finishing when 3D printed with more common FDM technology. This was particularly useful as it allowed the creation of custom buttons and small parts that “just fit” – normally such parts are made from stock pieces that are then modified.

The build also features a few other cool features – there’s a breakout box which allows the connection of extra controllers, as well as hosting AV out for hooking up to a television. The breakout box connects to the portable over an HDMI cable. It’s a tidy choice – it’s a standard cable that has an abundance of conductors available so you don’t have to be particularly tricky to get 3 controllers and a few analog signals talking over it.

In the end, [Downing] wouldn’t use SLA printing again for the case itself – the process was too slow and expensive. In this respect, FDM may require more work after printing but it still comes out ahead in terms of time and money. But for small custom parts like buttons and structural brackets, the Form 2 is the machine for the job.

Video after the break.

Continue reading “Printing Nintendo Portables With SLA”

The Power Glove Ultra Is The Power Glove We Finally Deserve

How do you make the most awesome gaming peripheral ever made even more bad? Give it a 21st-century upgrade! [Alessio Cosenza] calls this mod the Power Glove Ultra, and it works exactly as we imagined it should have all those years ago.

The most noticeable change is the 3D-printed attachment that hosts the Bluetooth module, a combination USB charger and voltage booster, and a Metro Mini(ATmega328) board. On top of a 20-hour battery life, a 9-axis accelerometer, gyroscope, and compass gives the Power Glove Ultra full 360-degree motion tracking and upgrades the functionality of the finger sensors with a custom board and five flex sensor strips with 256 possible positions for far more nuanced input. [Cosenza] has deliberately left the boards and wires exposed for that cyberpunk, retro-future look that is so, so bad.

Continue reading “The Power Glove Ultra Is The Power Glove We Finally Deserve”

How To Add More Games To The NES Classic

The hype around the NES Classic in 2016 was huge, and as expected, units are already selling for excessively high prices on eBay. The console shipped with 30 games pre-installed, primarily first-party releases from Nintendo. But worry not — there’s now a way to add more games to your NES Classic!

Like many a good hack, this one spawned from a forum community. [madmonkey] posted on GBX.ru about their attempts to load extra games into the console. The first step is using the FEL subroutine of the Allwinner SOC’s boot ROM to dump the unit’s flash memory. From there, it’s a matter of using custom tools to inject extra game ROMs before reburning the modified image to the console. The original tool used, named hakchi, requires a Super Mario savegame placed into a particular slot to work properly, though new versions have already surfaced eliminating this requirement.

While this is only a software modification, it does come with several risks. In addition to bricking your console, virus scanners are reporting the tools as potentially dangerous. There is confusion in the community as to whether these are false positives or not. As with anything you find lurking on a forum, your mileage may vary. But if you just have to beat Battletoads for the umpteenth time, load up a VM for the install process and have at it. This Reddit thread (an expansion from the original pastebin instructions) acts as a good starting point for the brave.

Only months after release, the NES Classic is already a fertile breeding ground for hacks — last year we reported on this controller mod and how to install Linux. Video of this ROM injection hack after the break.

Continue reading “How To Add More Games To The NES Classic”

NES Classic Edition – Controller Mod

The Nintendo Classic Mini took the world by storm this year — finally, an NES in a cute, tiny package that isn’t 3D printed and running off a Raspberry Pi! It’s resoundingly popular and the nostalgic set are loving it. But what do you do when you’re two hours deep into a hardcore Metroid session and you realize you need to reboot and reload. Get off the couch? Never!

[gyromatical] had already bought an Emio Edge gamepad for his NES Mini. A little poking around inside revealed some unused pads on the PCB. Further investigation revealed that one pad can be used to wire up a reset button, and two others can be used to create a home switch. Combine this with the turbo features already present on the Emio Edge, and you’ve got a pretty solid upgrade over the stock NES Mini pad. Oftentimes, there’s extra functionality lurking inside products that manufacturers have left inactive for the sake of saving a few dollars on switches & connectors. It’s always worth taking a look inside.

Now, back in 2006, the coolest hack was running Linux on everything — and somebody’s already trying to get Linux on the NES Mini.

Continue reading “NES Classic Edition – Controller Mod”

Thwomp Drops Brick On Retro Gaming

[Geeksmithing] wanted to respond to a challenge to build a USB hub using cement. Being a fan of Mario Brothers, a fitting homage is to build a retro-gaming console from cement to look just like your favorite Mario-crushing foe. With a Raspberry Pi Zero and a USB hub embedded in it, [Geeksmithing] brought the Mario universe character that’s a large cement block — the Thwomp — to life.

[Geeksmithing] went through five iterations before he arrived at one that worked properly. Initially, he tried using a 3D printed mold; the cement stuck to the plastic ruining the cement on the face. He then switched to using a mold in liquid rubber (after printing out a positive model of the Thwomp to use when creating the mold). But the foam board frame for the mold didn’t hold, so [Geeksmithing] added some wood to stabilize things. Unfortunately, the rubber stuck to both the foam board and the 3D model making it extremely difficult to get the model out.

Like [Han] in carbonite, that's a Rapsberry Pi Zero being encased in cement
Like [Han] in carbonite, that’s a Raspberry Pi Zero being encased in cement
Next up was regular silicone mold material. He didn’t have enough silicone rubber to cover the model, so he added some wood as filler to raise the level of the liquid. He also flipped the model over so that he’d at least get the face detail. He found some other silicone and used it to fill in the rest of the mold. Despite the different silicone, this mold worked. The duct tape he used to waterproof the Raspberry Pi, however, didn’t. He tried again, this time he used hot glue – a lot of hot glue! – to waterproof the Pi. This cast was better, and he was able to fire up the Pi, but after a couple of games his controller stopped working. He cracked open the cement to look at the Pi and realized that a small hole in the hot glue caused a leak that shorted out the USB port on the Pi. One last time, he thought, this time he used liquid electrical tape to waterproof the Pi.

The final casting worked and after painting, [Geeksmithing] had a finished cement Thwomp console that would play retro games. He missed the deadline for the USB Hub Challenge, but it’s still a great looking console, and his video has a lot of detail about what went wrong (and right) during his builds. There’s a great playlist on YouTube of the other entries in the challenge, check them out along with [Geeksmithing]’s video below!

Continue reading “Thwomp Drops Brick On Retro Gaming”

Learn Some Plastic Techniques With This SNES WiiMote Mod

Not all hacks have to be deeply technical. Sometimes a good show of skill is just as impressive. [lyberty5] takes two completely different hunks of plastic and somehow epoxies them into a convincing and, most impressively, reliable chimera.

While the WiiMote’s motion controls certainly caused a lot of wordy debate on the Internet when it was debuted. While everyone and their grandmother who owned a game company rushed out to copy and out-innovate it once they saw Nintendo’s hoard of dragon gold. Most game designers had other thoughts about the concept, mostly that it wouldn’t do for a platformer. So the gamer caught in the middle of it all had to rotate their grip-optimized rectangle 90 degrees and blister their thumbs on tiny buttons to play. Continue reading “Learn Some Plastic Techniques With This SNES WiiMote Mod”

Linux On Your NES Classic Edition

Nintendo look as though they may have something of a hit on their hands with their latest console offering. It’s not the next in the line of high-end consoles with immersive VR or silicon that wouldn’t have looked out of place in last year’s supercomputer, instead it’s an homage to one of their past greats. The NES Classic Edition is a reboot of the 1980s console with the familiar styling albeit a bit smaller, and 30 of the best NES games included.

You do not, however, get an original NES with a 6502 derived processor, and a stack of game cartridges. In the Classic Edition is a modern emulator, running on very modern hardware. We’re told it contains an Allwinner R16 quad-core Cortex A7 SoC, 256Mb of RAM, and 512Mb of Flash. That’s a capable system, and unsurprisingly any hacking potential it may have has attracted some interest. Reddit user [freenesclassic] for example has been investigating its potential as a Linux machine, and has put up a post showing the progress so far. It is known that there is already some form of Linux underpinning the console because Nintendo have released a set of sources as part of their compliance with the terms of the relevant open-source licences. That and the availability of a serial port via pads on the PCB gives hope that a more open distro can be installed on it.

We’re taken through the process of starting the machine up with the serial port connected to a PC, and getting it into the Allwinner FEL mode for low-level flashing work. Then we’re shown the process of loading a custom U-Boot, from which in theory a kernel of your choice can be loaded.

Of course, it’s not quite that simple. There is still some way to go before the device’s Flash can be accessed so for now, all that is possible is to use the RAM, and the current state of play has a kernel panic as it is unable to mount a filesystem. However this is a new piece of hardware in its first few days after launch, so this is very much a work in progress. We are sure that this device will in time be opened up as a fully hackable piece of hardware, and we look forward to covering the interesting things people do with it when that has happened.

If you are interested in the NES Classic, take a look at it on Nintendo’s web site. Meanwhile, here at Hackaday as a quick look at our past stories tagged “nes” shows, we’ve covered a huge number of projects involving the platform in the past.

Thanks [Doc Oct] for the tip.

Original NES console header image: Evan-Amos [Public domain], via Wikimedia Commons.