How To Build Your Own Google AIY Without The Kit

Google’s voice assistant has been around for a while now and when Amazon released its Alexa API and ported the PaaS Cloud code to the Raspberry Pi 2 it was just a matter of time before everyone else jumped on the fast train to maker kingdom. Google just did it in style.

Few know that the Google Assistant API for the Raspberry Pi 3 has been out there for some time now but when they decided to give away a free kit with the May 2017 issues of MagPi magazine, they made an impression on everyone. Unfortunately the world has more makers and hackers and the number of copies of the magazine are limited.

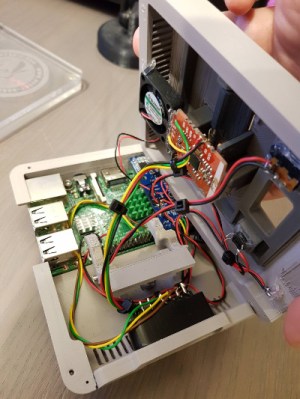
In this writeup, I layout the DIY version of the AIY kit for everyone else who wants to talk to a cardboard box. I take a closer look at the free kit, take it apart, put it together and replace it with DIY magic. To make things more convenient, I also designed an enclosure that you can 3D print to complete the kit. Lets get started.

Continue reading “How To Build Your Own Google AIY Without The Kit”

The Internet Of Cigars

We know, we know. They are bad for you. You shouldn’t start, but some people do love a cigar. And a fine cigar is pretty particular about drying out. That’s why tobacconists and cigar aficionados store their smokes in a humidor. This is anything from a small box to a large closet that maintains a constant humidity. Of course, who could want such a thing these days without having it connected to the Internet?

This fine-looking humidor uses a Raspberry Pi. When the humidity is low, an ultrasonic humidifier adds moisture to the air. If it gets too high, a fan circulates the air until it balances out. Who knew cigar smoking could be so high-tech? The humidity sensor is an AM2302. There’s also a smart USB hub that can accept commands to turn the fan and humidifier on and off.

The wooden cabinet was an existing humidor, apparently. [Atticakes] says he spent about $100 total but that a commercial equivalent would have been at least $250. You can find his source code on GitHub.

If you are vehemently anti-cigar, we should point out that there are other uses for such a device. Because of Denver’s low humidity, for example, the Colorado Rockies baseball team store game balls in a large humidor.

For the record, a zip lock bag can do in a pinch. Without something, the experts say the cigar starts to change negatively in two or three days.

First networkable humidor we’ve seen? Hardly. If you need something to light that stogie, we suggest a laser.

Sense Hat Comes Alive

Remember the Raspberry Pi Sense Hat? Originally designed for a mission to the International Space Station, the board has quite a few sensors onboard as well as an 8×8 RGB LED matrix. What can you do with an 8×8 screen? You might be surprised if you use [Ethan’s] Python Sense Hat animation library. You can get the full visual effect in the video below.

The code uses an array to represent the screen, which isn’t a big deal since there are only 64 elements. Turning on a particular element to animate, say, a pong puck, isn’t hard with or without the library. Here’s some code to do it with the library:

for x in range(0,7):
 ect.cell(image,[0,x],[randint(0,255), randint(0,255), randint(0,255)],0.1)
 ect.cell(image,[0,x],e,0.1)
for x in range(7,0, -1):
 ect.cell(image,[0,x],[randint(0,255), randint(0,255), randint(0,255)],0.1)
 ect.cell(image,[0,x],e,0.1)

Each loop draws a box with a random color and then erases it before going to the next position. The second for loop makes the puck move in the opposite direction. You can probably deduce that the first argument is the screen array, the second is the position. The third argument sets the color, and the final argument sets an animation timer. Looking at the code, though, it does look like the timer blocks which is probably not going to work for some applications.

If that’s all there was, this wouldn’t be worth too much, but you can also draw triangles, circles, and squares. For example:

ect.circle(image,(4,4), 3, [randint(0,255), randint(0,255), randint(0,255)], 0.1)

We covered the Sense Hat awhile back. Of course, it does a lot more than just light up LEDs as you can see from this weather dashboard.

Continue reading “Sense Hat Comes Alive”

Hackaday Prize Entry: LiFePO4wered/Pi+

For some of you the title might seem familiar, as [Patrick Van Oosterwijck] LiFePO4wered/Pi project is a quite successful Hackaday.io project. Now he’s designing from scratch the plus version to fill in some gaps and solve some of the challenges that affected the initial project. So what exactly is LiFePO4wered/Pi+ and what can it do?

In a nutshell, it’s a smart UPS for the Raspberry Pi. The standard version allows a Model A+ and Pi Zero to run on battery for over 2 hours, and the B+, B2 and B3 to run for at least an hour (it maybe less, depending on the system load, of course). It implements two-way communications between the power system and the Raspberry Pi (running the open-source daemon) over the I2C bus. This allows for continuous measurement of the battery voltage and load voltage, with user programmable thresholds for boot, clean shutdown and hard power down. There’s a touch pad that provides clean boot/shutdown capability even in a headless setup, a wake timer allowing the Raspberry Pi to be off for low duty cycle applications and an auto-boot feature to maximize uptime by making the Raspberry Pi run whenever there is sufficient battery power.

That’s the standard version, which we covered last year… what else could the plus version have?

Well, to start, it brings more current to run complete systems with LCD screen and hard drives, the previous version was limited when it came to current. It will provide the option for a wider range of input power sources, such as solar panels, which is pretty nice. The on/off button and the power led will no longer be soldered on the main board so they can ‘relocated’ elsewhere, for example, when making a custom enclosure. Detection of input power to trigger automatic boot and shutdown will be added and last, but not least, a real-time clock with absolute time wake up.

So there it is, the new LiFePO4wered/Pi+ version, with all bells and whistles for the Raspberry Pi enthusiast.

Hackaday Prize Entry: Rangefinder + Camera = SmartZoom

The interesting thing about submissions for The Hackaday Prize is seeing unusual projects and concepts that might not otherwise pop up. [ken conrad] has a curious but thoughtfully designed idea for Raspberry Pi-based SmartZoom Imaging that uses a Pi Zero and camera plus some laser emitters to create a device with a very specific capability: a camera that constantly and dynamically resizes the image make the subject appear consistently framed and sized, regardless of its distance from the lens. The idea brings together two separate functions: rangefinding and automated zooming and re-sampling of the camera image.

The Raspberry Pi uses the camera board plus some forward-pointing laser dots as a rangefinder; as long as at least two laser dots are visible on the subject, the distance between the device and the subject can be calculated. The Pi then uses the knowledge of how near or far the subject is to present a final image whose zoom level has been adjusted to match (and offset) the range of the subject from the camera, in effect canceling out the way an object appears larger or smaller based on distance.

We’ve seen visible laser dots as the basis of rangefinding before, but never tied into a zoom function. Doubtlessly, [ken conrad] will update his project with some example applications, but in the meantime we’re left wondering: is there a concrete, practical use case for this unusual device? We have no idea, but we’d certainly have fun trying to find one.

Sudo Google Assistant

A Raspberry Pi kicking around one’s workbench is a project waiting to happen — if they remain unused long enough to be considered a ‘spare.’ If you find you’ve been pining after an Alexa or your own personal J.A.R.V.I.S., [Novaspirit Tech] might be able to help you out — provided you have a USB mic and speaker handy — with an accessible tutorial for setting up Google Assistant on your Pi.

A quick run-through on enabling a fresh API client on Google’s cloud platform, [Novaspirit] jumps over to the Raspbian console to start updating Python and a few other dependencies. Note: this is being conducted in the latest version of Raspbian, so be sure to update before you get underway with all of your sudos.

Once [Novaspirit] gets that sorted, he sets up an environment to run Google Assistant on the Pi, authenticates the process, and gets it running after offering a couple troubleshooting tips. [Novaspirit] has plans to expand on this further in the near future with some home automation implementation, but this is a great jumping-off point if you’ve been looking for a way to break into some high-tech home deliciousness — or something more stripped-down — for yourself.  Check out the video version of the tutorial after the break if you like watching videos of guys typing away at the command line.

Continue reading “Sudo Google Assistant”

Liquid cooled Raspberry Pi with mineral oil

Liquid Cooling Overclocked Raspberry Pi With Style

[HydroGraphix HeadQuarters] has earned his name with this one. While he is using mineral oil instead of hydro, he’s certainly done a nice job with the graphics of it. The ‘it’ in questions is an overclocked Raspberry Pi 3 in a transparent container filled with mineral oil, and with a circulating fan.

He’s had no problem running the Pi at 1.45 GHz while running a Nintendo 64 emulator, getting between 40 °C and 50 °C. The circulating fan is a five volt computer USB fan. It’s hard to tell if the oil is actually moving, but we’re pretty sure we see some doing so near the end of the video below the break.

Mineral oil is not electrically conductive, and is often used to prevent arcing between components on high voltage multiplier boards, but those components are always soldered together. If you’ve ever worked with mineral oil, you know that it creeps into every nook and cranny, making us wonder if it might work its way between some of the (non-soldered) contacts in the various USB connectors on this Raspberry Pi. Probably not, but those of us with experience with it can attest to it’s insidiousness.

Continue reading “Liquid Cooling Overclocked Raspberry Pi With Style”