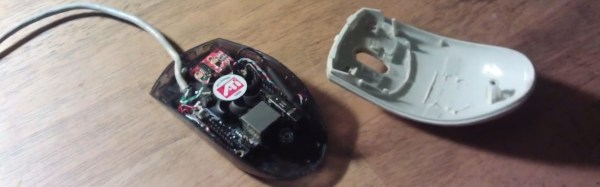
[Slider2732] got his Orange Pi Zero working with a 3 watt amplifier, wireless keyboard (with built-in mouse), and car reversing monitor. But he needed a case to house it in. He remembered that he used to make parameters for ghost hunting by filling PC mouse cases with all sorts of electronics. So why not put the Orange Pi Zero in a mouse too? Looking through his mouse collection, he picked out an old Logitech optical mouse and went to work.
We like that the Logitech has transparent bottom halves, perfect for proving to anyone who might be skeptical that the PC really is in the mouse. A great enhancement we think would be to make the mouse actually be the mouse too! But there doesn’t seem to be enough room left for that. What’s smaller than a Pi Zero that will also run the armbian Linux distribution, OpenELEC Mediacenter, Kodi and a bunch of games?
He even set up the wireless networking for watching YouTube videos. Check out the build and demo video after the break.
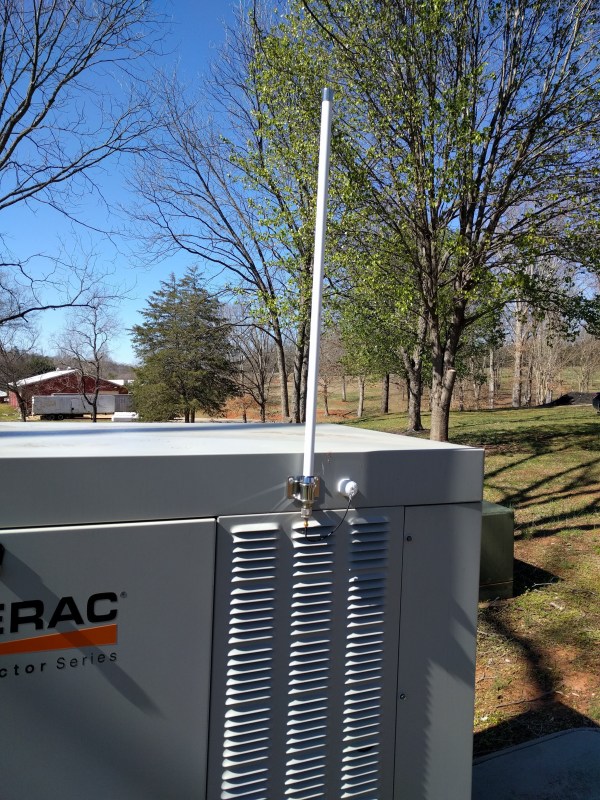
Part of the problem with having an alarm system is its reliance on land line telephone service. Some of them are getting away from this practice, but there are still many legacy systems out there that require a check to be sent in to Ma Bell every month in addition to the alarm system fees. Like these antiquated systems, [jgyates] was having a similar problem with the generator at his home which could only be monitored with a link to a cell network. Now that there’s a Raspberry Pi in every house, however, [jgyates] has a generator monitor that isn’t beholden to the phone company.
The hardware setup is little more than connecting the communications lines from the generator’s controller (in this case, a Generac Evolution controller) to the serial communications pins on a Raspberry Pi 3. [jgyates] did most of the work in Python, and his code is able to monitor almost every aspect of this generator and report it over WiFi or Ethernet, as well as control the generator settings from anywhere that has an Internet connection.
Even if you don’t have a generator with this particular controller, it will be a good guide for converting a monitor of any type into one that doesn’t require a land line or cell network connection. To that end, there have been lots of projects that convert even simple, old, analog household devices to report data over the LAN.
Looking for something a bit more from your Raspberry Pi? Tired of the usual console and arcade games? Eltech’s Exagear Desktop is a virtual machine that runs on your Raspberry Pi and allows you to run x86 games. [Dmitry]’s done a write-up about running more modern games on your Raspberry Pi.
Up until now, the Pi has been a great platform for retro gaming. By running MAME or EmulationStation, you can play classic arcade games as well as the great console games you played as a kid. Exagear Desktop goes one further, allowing you to use Wine to play more modern PC games on your Raspberry Pi 3.
The Pi 3 is still a bit underpowered for bleeding edge games, but is powerful enough that it can play some of the PC games from a few years ago. [Dmitry]’s example shows how to get Arcanum, Disciples II, and Fallout running on the Raspberry Pi. In the second part of the write-up, [Dmitry] shows you how to get Heroes of Might and Magic 3, Sid Meier’s Alpha Centauri, and Caesar 3 installed and running as well.
Obviously they will always lag behind today’s gaming machines, but the power now available in a computer the size of a credit card is pretty impressive. It’s nice to have a tool that allows one to play more than just the console games from years gone by — this opens up a whole range of great PC games to add to our library. Maybe it’s time to fabricate that new PC game controller. Or, if the Raspberry Pi seems like too much power, you could consider playing retro games on an Arduino.
Ever since the Raspberry Pi was released to an eager public just over five years ago there is one project that seems to have been tackled more frequently than any other using the small computer from Cambridge: that of making a laptop with Pi for brains. Perhaps you feel you have had your fill of Pi laptops both good and bad, but it’s still a project that can bring up some surprises.
Does [Eben] carry a silver marker with him at all times, laptops for the signing of?[Archie Roques] is a young maker from Norwich, UK, and at the Raspberry Pi birthday party in early March he had rather an unusual laptop. He’d done the usual thing of mating the official Pi screen, a bluetooth keyboard/touchpad, Pi, and battery, but as always it’s the detail that matters. His case is a carefully designed sandwich of laser-cut plastic that somehow manages the impossible task of containing all the laptop internals while not being too bulky.
For power he at first used a 4 AH LiPo cell from a dead tablet with a Pimoroni LiPo power board, but since he hit problems with the Pimoroni board supplying both screen and Pi he’s switched to an off-the-shelf power bank. Unusually this laptop also has built-in audio, using another Pimoroni product, their speaker pHAT.
Where this laptop has a flaw though is in the display hinges. He has plans for a beautifully made 3D printed hinge, but for now he’s using a piece of tape, which though functional does not add to the aesthetic. When we saw it in Cambridge the keyboard was fitting more snugly than it does in the photos on his write-up, so perhaps he’s fixed some of its issues. Despite the in-progress hinge it’s a very usable little Pi laptop, and though (Hint, [Archie]!) he hasn’t yet published the design files for it, we’re sure when he does we’ll see other people building the same machine. They won’t be quite as exclusive as [Archie]’s model though, while he was in Cambridge he managed to get it signed by [Eben Upton], founder of the Raspberry Pi Foundation and judge for the 2017 Hackaday Prize.
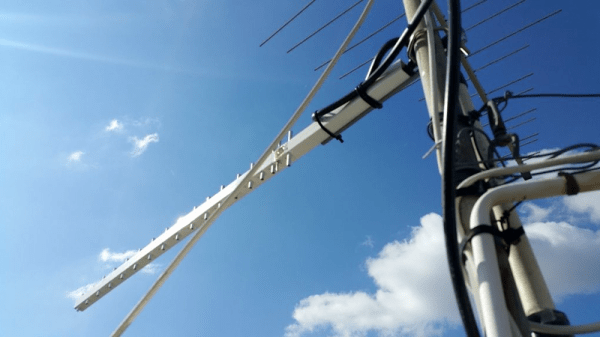
[Afonso]’s 77-year-old grandmother lives in a pretty remote location, with only AM/FM radio reception and an occasionally failing landline connecting her to the rest of the world. The nearest 3G cell tower is seven kilometers away and unreachable with a cell phone. But [Afonso] was determined to get her up and running with video chats to distant relatives. The solution to hook granny into the global hive mind? Build a custom antenna to reach the tower and bridge it over to local WiFi using a Raspberry Pi.
The first step in the plan was to make sure that the 3G long-shot worked, so [Afonso] prototyped a fancy antenna, linked above, and hacked on a connector to fit it to a Huawei CRC-9 radio modem. This got him a working data connection, and it sends a decent 4-6 Mbps, enough to warrant investing in some better gear later. Proof of concept, right?
On the bridging front, he literally burned through a WR703N router before slapping a Raspberry Pi into a waterproof box with all of the various radios. The rest was a matter of configuration files, getting iptables to forward the 3G radio’s PPP payloads over to the WiFi, and so on. Of course, he wants to remotely administer the box for her, so he left a permanent SSH backdoor open for administration. Others of you running remote Raspberry Pis should check this out.
We think it’s awesome when hackers take connectivity into their own hands. We’ve seen many similar feats with WiFi, and indeed [Afonso] had previously gone down that route with a phased array of 24 dBi dishes. In the end, the relatively simple 3G Pi-and-Yagi combo won out.
Part two of the project, teaching his grandmother to use an Android phone, is already underway. [Afonso] reports that after running for two weeks, she already has an Instagram account. We call that a success!
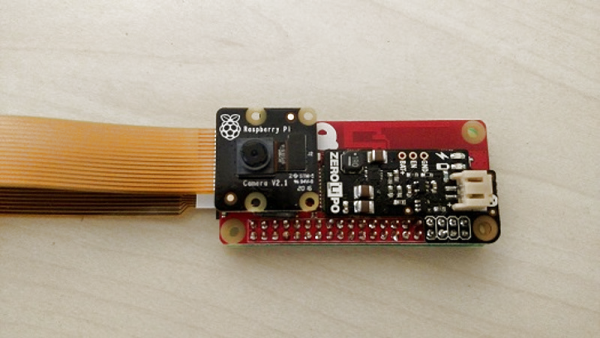
What makes [mwagner1]’s Raspberry Pi Zero-based WiFi camera project noteworthy isn’t so much the fact that he’s used the hardware to make a streaming camera, but that he’s taken care to document every step in the process from soldering to software installation. Having everything in one place makes it easier for curious hobbyists to get those Pi units out of a drawer and into a project. In fact, with the release of the Pi Zero W, [mwagner1]’s guide has become even simpler since the Pi Zero W now includes WiFi.
Using a Raspberry Pi as the basis for a WiFi camera isn’t new, but it is a project that combines many different areas of knowledge that can be easy for more experienced people to take for granted. That’s what makes it a good candidate for a step-by-step guide; a hobbyist looking to use their Pi Zero in a project may have incomplete knowledge of any number of the different elements involved in embedding a Pi such as basic soldering, how to provide appropriate battery power, or how to install and configure the required software. [mwagner1] plans to use the camera as part of a home security system, so stay tuned.
If Pi Zero camera projects catch your interest but you want something more involved, be sure to check out the PolaPi project for a fun, well-designed take on a Pi Zero based Polaroid-inspired camera.
If you’ve played Fallout 4, you’re familiar with the wall-mounted terminals in the game. They’ve got a post-apocalyptic aesthetic and the glowing green screen that calls out to anyone that grew up with computers and hacker movies from the 80s and 90s. Remember the first time you set your command line text to green? Don’t be embarrassed, we were all young once.
[PowerUpProps] liked the Fallout terminal so much they developed a replica. It’s a build that leans heavily on maker standards, a Raspberry Pi and 3D printing form the basis of the terminal. With ready access to such powerful tools, it makes starting such a project much more approachable. The key to the success of this build is the fine attention to detail in the finishing – the paint job looks incredible, and when photographed appropriately, it could be mistaken for the real thing an in-game screenshot.
An interesting touch is the use of a dark green acrylic window in front of the LCD, which gives the display a tinted hue. We’d like to see this compared with a clear glass window with a classic fishbowl curve to it, combined with greening up in software. The creator readily admits that this looks great at the command line, but is somewhat of a letdown when using the GUI.
Perhaps the only thing the prop build could use is some sort of user interface — the keyboard is only 3D printed and there’s no mouse or other pointing device included. There are some creative solutions to this problem, which we often see in other Fallout projects, like the ever popular Pip-Boy replica builds.


![Does [Eben] carry a silver marker with him, laptops for the signing of?](https://hackaday.com/wp-content/uploads/2017/03/archie-with-laptop.jpg)