Give Your Smart Home A Green Thumb With MQTT

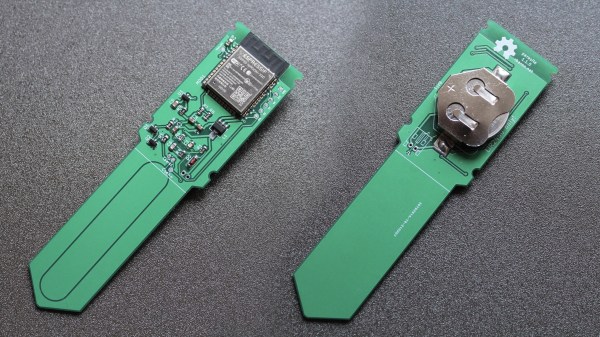
We have all been stuck inside for too long, and maybe that’s why we have recently seen a number of projects attempting to help humans take better care of their housemates from Kingdom Plantae. To survive, plants need nutrients, light, and water. That last one seems tricky to get right; not too dry and not drowning them either, so [rbaron’s] green solder-masked w-parasite wireless soil monitor turns this responsibility over to your existing home automation system.

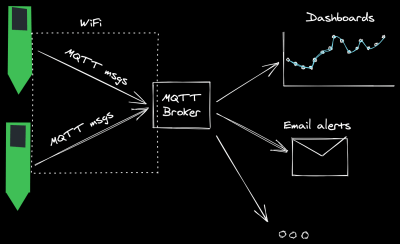
w-parasite MQTT diagram

Like this low-power soil sensor project and the custom controller for six soil sensors, [rbaron’s] w-parasite uses a “parasitic capacitive” moisture sensor to determine if it’s time to water plants. This means that unlike resistive soil moisture sensors, here the copper traces are protected from corrosion by the solder mask. For those wondering how they work, [rbaron]’s Twitter thread has a great explanation.

The “w” in the name is for WiFi as the built-in ESP-32 module then takes the moisture reading and sends an update wirelessly via MQTT. Depending on the IQ of your smart-home setup, you could log the data, route an alert to a cellphone, light up a smart-bulb, or even switch on an irrigation system.

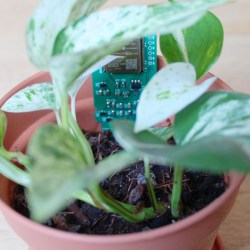
w-parasite circuit board in a potted plant[rbaron] has shared a string of wireless hacks, controlling the A/C over Slack and a BLE Fitness Tracker that inspired more soldering than jogging. We like how streamlined this solution is, with the sensor, ESP-32 module, and battery all in a compact single board design. Are you asking yourself, “but how is a power-hungry ESP-32 going to last longer than it takes for my geraniums to dry out?” [rbaron] is using deep sleep that only consumes 15uA between very quick 500ms check-ins. The rechargeable LIR2450 Li-Ion coin cell shown here can transmit a reading every half hour for 90 days. If you need something that lasts longer than that, use [rbaron]’s handy spreadsheet to choose larger batteries that last a whole year. Though, let’s hope we don’t have to spend another whole year inside with our plant friends.
We may never know why the weeds in the cracks of city streets do better than our houseplants, but hopefully, we can keep our green roommates alive (slightly longer) with a little digital nudge.


Minimal MQTT With Micropython

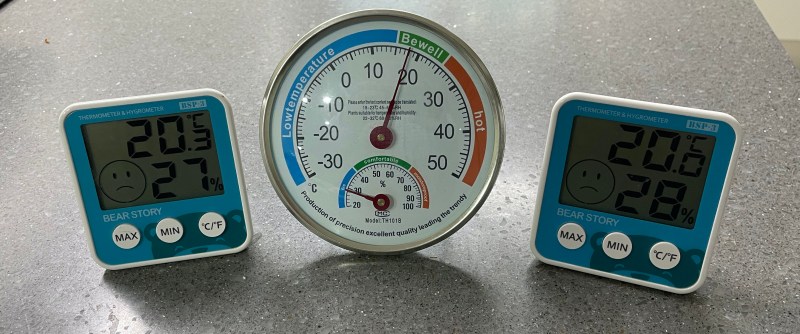
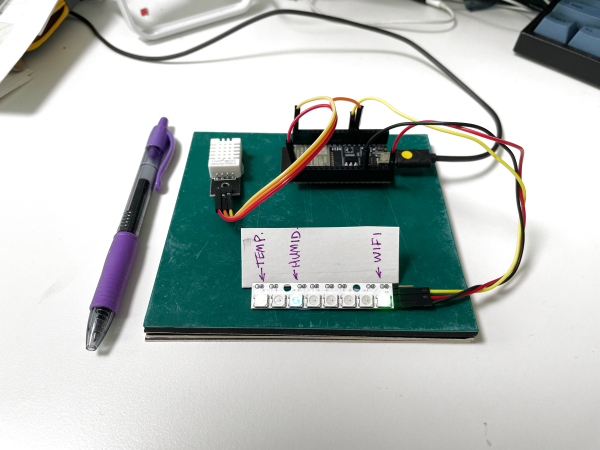
I have been meaning to play around with MQTT for some time now, and finally decided to take the plunge one evening last week. I had three cheap home temperature and humidity sensors, and was bothered that they often didn’t agree. Surprisingly, while the analog one had a calibration adjustment in the back, I have no idea how to calibrate the two digital ones. I took this as a sign that it was time to learn MQTT and be able to install my own, accurate sensors. Of course, I began by ordering the cheapest sensors I could find, but I can always upgrade later on.

Three Cheap Sensors

While we have written quite a bit about MQTT in Hackaday, I had to go all the way back to 2016 to find this introductory four-part series by Elliot Williams. Five years is a long time in the tech world, but I decided to give it a try anyway. Continue reading “Minimal MQTT With Micropython”

LoRa Messenger Does Its Best BlackBerry Impression

While the de facto smartphone design ultimately went in a different direction, there’s no denying the classic BlackBerry layout offered some compelling advantages. It was a gadget primarily designed to send and receive emails and text messages, and it showed. So is it really any wonder [MSG] would build his pocket-sized LoRa messengers in its image?

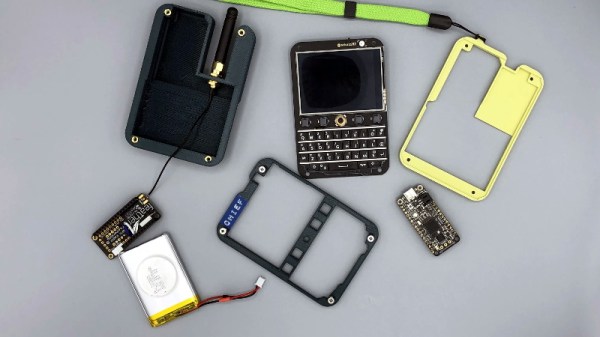
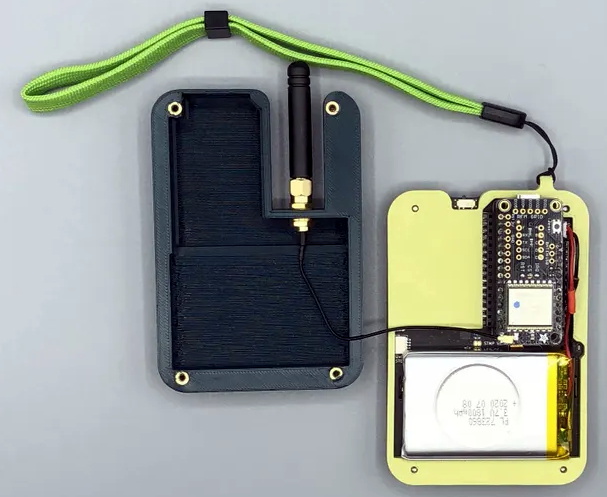
Of course, he did have some help. The communicators use the Keyboard FeatherWing by [arturo182], which puts a surplus BlackBerry Q10 keyboard on a custom PCB designed to accept a board from Adafruit’s Feather collection. [MSG] ended up pairing his with a Feather M4 because he wanted to work with CircuitPython, with a 900 MHz LoRa FeatherWing along for the ride. He notes that switching his code over to Arduino-flavored C would allow him to use the Feather M0 that features integrated LoRa; a change that would allow him to make the gadget a bit thinner.

Inside the 3D printed enclosure, He’s made room for a 3.7 V 1800 mAh pouch battery that should provide plenty of runtime. There’s also an external antenna with a uFL pigtail for connecting to the radio. The case is held together with heat-set inserts, which should make it more than robust enough to handle a few adventures.

[MSG] says slight variations in hardware versions means his STLs might need a little tweaking to fit your components, and warns that his code is basically just a mashup of examples he found online, but he’s still sharing the goods for anyone who wants to reach out and touch someone without all that pesky infrastructure in the way.

Continue reading “LoRa Messenger Does Its Best BlackBerry Impression”

Basics Of Remote Cellular Access: Connecting Via VPN

You’ve got a machine hooked up to the Internet via a shiny new cellular modem, which you plan to administer remotely. You do a quick check on the external IP, and try and log in from another PC. Try as you might, SSH simply won’t connect. What gives?

The reality of the modern internet is that most clients no longer get their own unique IPv4 address. There simply aren’t enough to go around anymore. Instead, most telecommunications operators use Carrier Grade Network Address Translation which allows a single external address to be shared by many customers. This can get in the way of direct connection attempts from the outside world. Even if that’s not the case, most cellular operators tend to block inbound connections by default. However, there is a way around this quandary – using a VPN. Continue reading “Basics Of Remote Cellular Access: Connecting Via VPN”

Starlink Satellite Dish X-Rayed To Unlock RF Magic Inside

When [Kenneth Keiter] took apart his Starlink dish back in November, he did his best to explain the high-level functionality of the incredibly complex device in a video posted to his YouTube channel. It was a fascinating look at the equipment, but by his own admission, he wasn’t the right person to try and explain the nuances of how the phased array actually functioned. But he knew who could do the technology justice, which is why he shipped the dismembered dish over to [Shahriar Shahramian] of The Signal Path.

Don’t be surprised if you can’t quite wrap your head around his detailed analysis after your first viewing. You’ll probably have a few lingering questions after the second re-watch as well. But that’s OK, as [Shahriar] still has a few of his own. Even after cutting out a section of the dish and putting it under an X-ray, it’s still not completely clear how the SpaceX engineers managed to cram everything into such a tidy package. Though there seems to be no question that the $500 price for the early-access hardware is an absolute steal, all things considered.

The layered antenna works on multiple frequencies.

Most of the video is spent examining the stacked honeycomb construction of the phased antenna array, which as expected, holds a number of RF secrets if you know what to look for. Put simply, there’s no such thing as an insignificant detail to the trained eye. From the carefully sized injection molded spacer sheet that keeps the upper array a specific distance from the RF4-like radome, to the almost microscopic holes that have been bored through each floating patch to maintain equalized air pressure through the stack up, [Shahriar] picks up on fascinating details which might otherwise seem like arbitrary design decisions.

But a visual inspection will only get you so far. Eventually [Shahriar] has to cut out a slice of the PCB so he can fit it into the X-ray machine, but don’t feel too bad, the dish was long dead before he got his hands on it. While he hasn’t yet completed his full analysis, an initial examination indicates that each large IC and the eight chips surrounding it make up a 16 channel beam forming module. Each channel is further split into two RX and TX pairs, which provides the necessary right and left hand polarization. That said, he admits there’s some room for interpretation and that further work would be necessary before any hard conclusions could be made.

Between this RF analysis and the initial overview provided by [Kenneth], we’ve already learned a lot more about this device than many might have expected considering how rare and expensive the hardware is. While we admit it’s not immediately clear what kind of hijinks hardware hackers could get into once this device is fully understood, we’re certainly eager to find out.

Continue reading “Starlink Satellite Dish X-Rayed To Unlock RF Magic Inside”

Remoticon Video: Basics Of RF Emissions Debugging Workshop

These days we’re surrounded by high-speed electronics and it’s no small feat that they can all play nicely in near proximity to each other. We have RF emissions standards to thank, which ensure new products don’t spew forth errant signals that would interfere with the data signals traveling through the ether. It’s long been the stuff of uber-expensive emissions testing labs, and failure to pass can leave you scratching your head. But as Alex Whittimore shows in this workshop from the 2020 Hackaday Remoticon, you can do a lot of RF emissions debugging with simple and inexpensive tools.

Professionally-made probes in several sizes
Build your own probes from magnet wire

You can get a surprisingly clear picture of what kind of RF might be coming off of a product by probing it on your own workbench. Considering the cost of the labs performing FCC and other certifications, this is a necessary skill for anyone who is designing a product headed to market — and still damn interesting for everyone else. Here you can see two examples of the probes used in the process. Although one is a pack of professional tools and other is a bit of enameled wire (magnet wire), both are essentially the same: a loop of wire on which a magnetic field will induce a very small current. Add a Low-Noise Amplifier (LNA) and you’ll be up and measuring in no-time.

I really enjoyed how Alex started his demo with “The Right WayTM” of doing things — using a proper spectrum analyzer to visualize data from the probes. But the real interesting part is “The Hacker WayTM” which leverages an RTL-SDR dongle and some open-source software to get the same job done. Primarily that means using SDRAngel and QSpectrumAnalyzer which are both included in the DragonOS_LTS which can be run inside of a virtual machine.
Continue reading “Remoticon Video: Basics Of RF Emissions Debugging Workshop”

Making Smart Bulbs Smarter With The Power Of MQTT

What’s the point of smart home automation? To make every day tasks easier, of course! According to [Tomasz Cybulski], that wasn’t the case when he installed IKEA smart lights in his closet. It’s handy to have them in a common switch, in this case a remote control, but having to look for it every time he needed the lights could use some improvement. Enter his project to make smart bulbs smarter, through the use of a simple ESP8266.

While hooking a door switch to the lights’ power supply could provide a quick solution, [Tomasz]’s wife wanted to keep the functionality of the remote control, so he had to look elsewhere. These light bulbs use the simple Zigbee protocol, so arranging for other devices was rather trivial. A USB dongle to interface with the protocol was configured for his existing Raspberry Pi automation controller, while an ESP8266 served as the real-world sensor by connecting it to reed switches installed in the closet doors.

With all the hardware sorted out, it’s a simple matter of making it all talk to each other. The ESP8266, using the Tasmota firmware, sends a signal to an MQTT server running on the Raspberry Pi, which in turn translates it to a remote trigger on the Zigbee frequency with the dongle. The lights turn on when the door opens, and off again once it closes. And since there were no further modifications to the lights themselves, the original IKEA controller still works as expected, which we’re sure [Tomasz]’s wife appreciates!

MQTT can be an interesting piece of software that goes beyond just home automation though, and if you already have a server in your home you can use it to transfer your clipboard’s contents to another device. If you are using it for home automation though, here’s an inspiration for a rather unusual dashboard to keep things interesting. Check out this hack in action after the break.

Continue reading “Making Smart Bulbs Smarter With The Power Of MQTT”