There’s something thrilling about decoding an unknown communications protocol. You start with a few clues, poke at the problem with some simple tools, and eventually work your way up to that first breakthrough that lets you crack the code. It can be frustrating, but when you eventually win, it can be very rewarding.
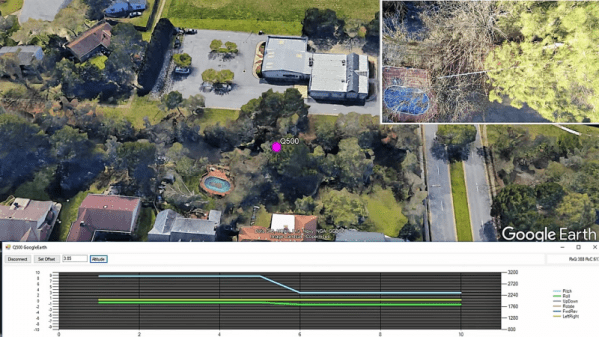
It seems that [Jason] learned this while decoding the wireless conversation between his mass-market quad and its controller. The quad in question, a Yuneec Q500, is one of those mid-range, ready-to-fly drones that’s targeted at those looking to get in the air easily and take some cool pictures. Unsure how the drone and controller were talking, [Jason] popped the covers and found a Zigbee chipset within. With the help of a $14 Zigbee USB dongle and some packet sniffing software from TI, [Jason] was able to see packets flowing, but decoding them was laborious. Luckily, the sniffer app can be set up to stream packets to another device, so [Jason] wrote a program to receive and display packets. He used that to completely characterize each controller input and the data coming back from the drone. It’s a long and strange toolchain, but the upshot is that he’s now able to create KML in real time and track the drone on Google Earth as it flies. The video below shows the build and a few backyard test flights.
Congratulations to [Jason] for breaking the protocol and opening up drones like this for other hackers. If you’re interested in learning more about Zigbee sniffing, you can actually hack a few smarthome gadgets into useful sniffers.
Continue reading “Drone Gives Up Its Wireless Secrets To Zigbee Sniffer”