Long taken for granted – lights are a basic necessity of modern life. From the time of the first light bulb, we’ve been able to navigate the dark without the use of fire. With the advent of the Internet of Things, it has become somewhat of a requirement to bring a little intelligence to lights before labeling yourself as a hardware hacker. There are many ways to do this; one of the most common being making use of an ESP32. [Luca Dentella] is somewhat of an ESP32 expert, and has written a fantastic tutorial on how to use the chip. The tutorial builds up to making a set of lights controllable from a smartphone web browser as well a light intensity sensor.
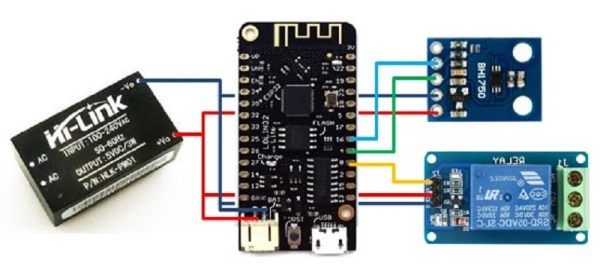
Now before you brush this off as simple n0Ob stuff – consider the following. He’s using a Lolin32 lite dev board, a BH1750 light intensity sensor and a relay to interface with mains for the lights. He wrote his own firmware and gets into the gritty details of developing the HTTP interface and flashing code to the correct memory.
We’ve seen a lot of ESP32 projects here at Hackaday, including this most interesting clock. Be sure to check out the video below to see the smart lights in action.