Quick And Dirty Microscope Motion Control For Focus Stacking

If you’ve spent much time looking through a microscope, you know that their narrow depth of field can be a bit challenging to deal with. Most microscopes are designed to only have a very thin slice of the specimen in focus, so looking at anything above or below that plane requires a focus adjustment. It’s tedious and fussy, and that makes it a perfect target for automation.

The goal behind [ItMightBeWorse]’s microscope mods is “focus stacking,” a technique where multiple images of the same sample taken at different focal planes can be stitched together so that everything appears to be in focus. Rather than twist knobs and take pictures manually, he built a simpler Arduino-based rig to do the job for him. Focus control is through a small stepper motor connected to the fine focus knob of the scope, while the DSLR camera shutter is triggered through a simple relay board. There’s also lighting control, with an RGB LED ring light that can change both the light level on the sample as well as the tint.

The code is very simple, and the setup is quite temporary looking, but the results are pretty impressive. We could do without the extreme closeup of that tick — nasty little arachnids — but the ant at the end of the video below has some interesting details. [ItMightBeWorse] doesn’t mention how the actual stacking is being done, but this CNC-based focus stacking project mentions a few utilities that take help with the post-processing.

Continue reading “Quick And Dirty Microscope Motion Control For Focus Stacking”

A 3D printed cat treat dispenser on a table with a laptop in the background and with a treat in it's tray and a cat on the left about to eat the treat.

Local IOT Cat Treat Dispenser

[MostElectronics], like many of us, loves cats, and so wanted to make an internet connected treat dispenser for their most beloved. The result is an ingenious 3D printed mechanism connected to a Raspberry Pi that’s able to serve treats through a locally run web application.

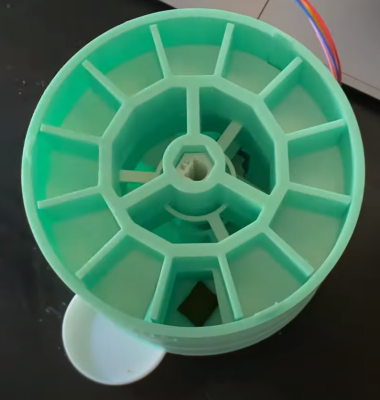
The inside of a 3d printed cat treat dispenser, showing the different compartments, shaft and wires running out the back.

From the software side, the Raspberry Pi uses a RESTful API that one can connect to through a static IP. The API is implemented as a Python Flask application running under a stand alone web server Python script. The web application itself keeps track of the number of treats left and provides a simple interface to dispense treats at the operators leisure. The RpiMotorLib Python library is used to control a 28BYJ-48 stepper motor through its ULN2003 controller module, which is used to rotate the inside shaft of the treat dispenser.

The mechanism to dispense treats is a stacked, compartmentalized drum, with two drum layers for food compartments that turn to drop treats. The bottom drum dispenses treats through a chute connected to the tray for the cat, leaving an empty compartment that the top drum can replenish by dropping its treats into through a staggered opening. Each compartmentalized treat drum layer provides 11 treats, allowing for a total of 22 treats with two layers stacked on top of each other. One could imagine extending the treat dispenser to include more drum layers by adding even more layers.

Source code is available on GitHub and the STL files for the dispenser are available on Thingiverse. We’ve seen cat electronic feeders before, sometimes with escalating consequences that shake us to our core and leave us questioning our superiority.

Video after the break!

Continue reading “Local IOT Cat Treat Dispenser”

Auto Strummer Can Plectrum The Whole Flat-Strumming Spectrum

Playing the guitar requires speed, strength, and dexterity in both hands. Depending on your mobility level, rocking out with your axe might be impossible unless you could somehow hold down the strings and have a robot do the strumming for you.

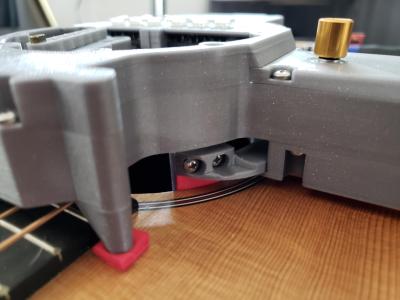
[Jacob Stambaugh]’s Auto Strummer uses six lighted buttons to tell the hidden internal pick which string(s) to strum, which it does with the help of an Arduino Pro Mini and a stepper motor. If two or more buttons are pressed, all the strings between the outermost pair selected will be strummed. That little golden knob near the top is a pot that controls the strumming tempo.

[Jacob]’s impressive 3D-printed enclosure attaches to the guitar with a pair of spring-loaded clamps that grasp the edge of the sound hole. But don’t fret — there’s plenty of foam padding under every point that touches the soundboard.

We were worried that the enclosure would block or muffle the sound, even though it sits about an inch above the hole. But as you can hear in the video after the break, that doesn’t seem to be the case — it sounds fantastic.

Never touched a real guitar, but love to play Guitar Hero? There’s a robot for that, too.

Continue reading “Auto Strummer Can Plectrum The Whole Flat-Strumming Spectrum”

An Epic Quest For A Motorized Volume Knob

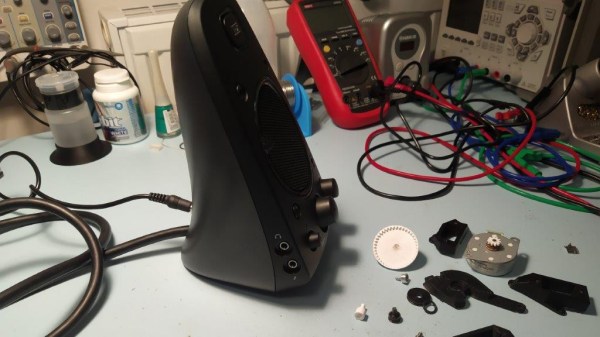
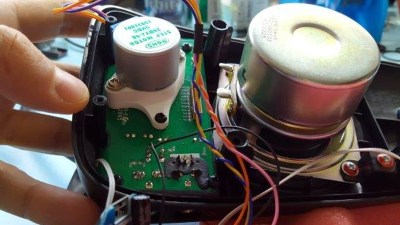
[Haris Andrianakis] likes his Logitech Z623 sound system. He likes it a lot. Which is why he was willing to hack in his own remote volume control rather than just get a new pair of speakers. But he certainly didn’t make things easy on himself. Rather than trying to tap into the electronics, he decided to take the long way around and motorize the volume knob.

The belt drive looked great, but didn’t work.

The idea seemed simple enough. Just drill a hole through the PCB behind the knob’s potentiometer, attach some kind of extension to the axle, and turn it with a small servo. Modifying the PCB and potentiometer went well enough, but the trouble came when [Haris] actually tried to turn the thing.

Attaching the servo directly to the axle worked, but it made turning the knob by hand extremely difficult. His next idea was to add a small belt into the mix so there would be some slip in the system. But after designing a 3D printed servo mount and turning custom pulleys on the lathe, it ended up having too much slip, and the knob didn’t always move when the servo turned.

He then swapped out the servo for a small stepper motor. The motor was easy enough to spin when powered down, but didn’t have quite enough torque to turn the knob. He tried with a larger stepper motor that he salvaged from an old printer, but since he could only run it at half the recommended 24 VDC, it too had a tendency to skip steps.

After experimenting with some 3D printed reduction gears, [Haris] finally stumbled upon the 28BYJ-48. This small stepper with an integrated gearbox proved to be the perfect solution, as it had enough muscle to turn the knob while at the same time not restricting its movement when powered down. The rest of the project was relatively easy; with a DRV8825, an ESP8266, and an IR receiver, he’s able to spin the stepper with his TV’s remote. A simple web page running on the ESP8266 even allows him to control volume over the network with his smartphone. Based on similar projects we’ve seen, he could probably add support for HDMI CEC as well.

[Haris] says you shouldn’t follow his example, but we’re not so sure. He kept going when others would have given up, and the engineering and thought that went into each attempt is certainly commendable. Even if he hadn’t ultimately gotten this project working, we’d still say it was a valiant hack worthy of praise.

Arduino Drives Seventeen Stepper Motors, Carefully

It’s fair to say that building electronic gadgets is easier now than it ever has been in the past. With low-cost modular components, there’s often just a couple dozen lines of code and a few jumper wires standing between your idea and a functioning prototype. Driving stepper motors is a perfect example: you can grab a cheap controller board, hook it up to a microcontroller, and the rest is essentially just software. But recently [mechatronicsguy] wondered if even that was more hardware than was technically necessary to get the job done.

It’s not that he was intentionally looking to make things more complicated for himself, of course. His rationale was entirely economic; if you’re looking to drive a dozen or more stepper motors, even the “cheap” controllers can add up. So he started to wonder if he could skip the controller entirely and connect the stepper motor directly to the digital pins of an Arduino. Generally speaking this is a bad idea, but if you’re careful and are willing to take the risk, [mechatronicsguy] is living proof it’s possible

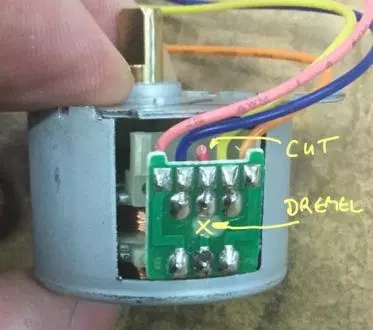
So what’s the trick to running a whopping seventeen individual stepper motors directly from the digital pins of an Arduino Mega? Well, to start with you’re not going to be running the beefy NEMA 17 motors like you might find in a 3D printer. [mechatronicsguy] is using the diminutive (and dirt cheap) 28BYJ-48, a light duty stepper used in many consumer products. Even with this relatively tiny motor, you need to crack open the case and cut a trace on the PCB to switch it from unipolar to bipolar.

Beyond that, you need to be careful. [mechatronicsguy] reports he’s had success running as many as ten of them at once, but realistically the fewer operating simultaneously the better. This is actually made easier due to the relatively poor specs of the 28BYJ-48 motor; its huge eleven degree step size means its not really susceptible to the same kind of slippage you’d get on a NEMA 17 when powered down. This means you can cut power to all but the actively moving motor and be fairly sure they’ll all stay where you left them.

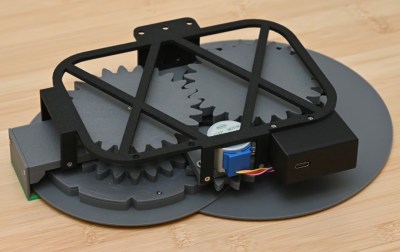
With as popular as the 28BYJ-48 stepper is, there are several projects this “quick and dirty” method of interfacing could potentially work with. This small “barn door” star tracker is an obvious example, but we’ve also seen some very nice robotic arms built with these low-cost motors which could benefit from the technique.

Arduino One Pixel Camera Sees All (Eventually)

Taking pictures in the 21st century is incredibly easy. So easy in fact that most people don’t even own a dedicated camera; from smartphones to door bells there are cameras built into nearly electronic device we own. So in this era of ubiquitous photography, you might think that a very slow and extremely low resolution camera wouldn’t be of interest. Under normal circumstances that’s probably true, but this single pixel camera built by [Tucker Shannon] is anything but normal.

Continue reading “Arduino One Pixel Camera Sees All (Eventually)”

Arduino Star Tracker Raises The Bar

Proving that astrophotography doesn’t have to break the bank, [Gerald Gattringer] has recently documented his DIY “barn door” style star tracker which is built almost entirely from scratch. Short of the Arduino and stepper motor, all the components were either made by hand or are standard hardware store finds.

The build starts with three aluminum plates which [Gerald] cut by hand with an angle grinder. He then drilled all the necessary screw holes and a rectangular opening for the threaded rod to pass through. He even used epoxy to mount a nut to the bottom plate which would eventually attach it to the tripod.

The plates were then roughed up and spray painted black so they wouldn’t reflect light. The addition of a couple of screws, nuts, and a standard hinge.

Motion is provided by a 28BYJ-48 stepper which is connected to the drive nut by way of a belt. The spinning nut is used to raise and lower the threaded rod which opens and closes the “door”. To control the motor, [Gerald] is using an Arduino Nano coupled with a ULN2003 Darlington array which live on a routed PCB he made with his school’s Qbot MINImill. While some might say the Arduino is unnecessary for this project, it does make the final calibration of the device much easier.

We’ve covered a number of similar star trackers here on Hackaday, including one that you crank by hand. But the professional looking final result really makes this build stand out.