Optimized Molds With 3D Printing

[Florian] has a few arcade games and MAME machines, and recently he’s been trying to embed objects in those hard plastic spheres on the end of joysticks. A common suggestion is to 3D print some molds, but even though that’s a great idea in theory the reality is much different: you’re going to get layer lines on the casting, and a mirror finish is impossible.

No, a silicone mold is the way to do this, but here 3D printing can be used to create the mold for the silicone. Instead of a few pieces of hot glued cardboard or a styrofoam cup, [Florian] is 3D printing a a container to hold the liquid silicone around the master part.

After printing a two-piece part to hold both halves of a silicon mold, [Florian] put the master part in, filled it up with silicone, and took everything apart. There were minimal seam lines, but the end result looks great.

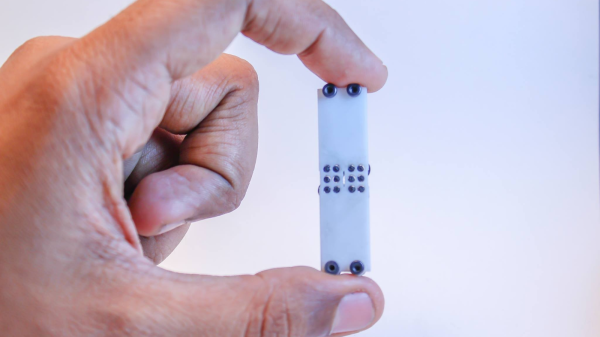
In addition to making a 3D printed mold container, [Florian] is also experimenting with putting 3D printed parts inside these joystick balls. The first experiment was a small 3D printed barrel emblazoned with the Donkey Kong logo. This turned out great, but there’s a fair bit of refraction that blows out all the proportions. Further experiments will include a Pac-Man, a skull, and a rose, to be completed whenever [Florian] gets a vacuum chamber.

DIY Thermal Insert Press

You might not know what a threaded insert is, but chances are you’ve seen one before. Threaded inserts are small metal (typically brass) inserts that are pressed into plastic to give a strong point of attachment for bolts and screws. These inserts are a huge step up from screwing or bolting directly into tapped plastic holes since the brass threads are very strong compared to the plastic. The only major downside to these inserts is that the press to install them is incredibly expensive. Thankfully, [Alex Rich] came up with a cheap solution: a modified soldering iron mounted to an Arbor press.

Commercial threaded insert presses typically use ultrasonic welding or heat welding to fuse inserts with plastic. [Alex] chose the simple route and went with heat welding, which (as you might imagine) is way simpler than ultrasonic welding. To provide the heat, [Alex] mounted a 100W Weller soldering iron to the press, which he says handles the impact with no problem. Unfortunately the copper tips of the Weller just wouldn’t hold up to the impact, so [Alex] made his own tips out of some brass he turned on a lathe.

If, like most people, you don’t have the capability of making injection-molded cases, let alone an Arbor press on hand, you’re not out of luck! Using this same technique people have successfully added thermal inserts to 3d-printed parts using a soldering iron and much smaller DIY presses. Have any ideas on how you could use thermal inserts in your 3d prints? Let us know in the comments.

Midwest RepRap Festival, March 20-22nd

Right now there are two emails in my inbox inviting me to 3D printer conventions. If you’re not familiar with how these cons go, here’s a quick recap: a bunch of 3D printer manufacturers set up their booths the day before, put a printer behind an acrylic enclosure, start a very complex print, and come back the next day. This printer finally completes the print sometime Sunday afternoon, a bunch of people walk by the booths, and the entire venue is filled with enough morose faces as to be comparable to one of the higher circles of hell.

The Midwest RepRap Festival is not this con. It is, to the best of my knowledge, the only 3D printing convention that isn’t a trade show. It’s a blast, it’s March 20th through the 22nd, and we’re going to be there.

This will be our second expedition to the MRRF. Last year we saw 3D printed resin molds, and a strange Core XZ printer from [Nicholas Seward], the mind that brought you the odd Reprap Wally and Simpson. The most interesting man in the universe was there with a Smoothieboard. There were talks on 3D Bioprinting by [Jordan Miller] from Rice University, and everyone ate 3D printed waffles. If you’re looking for the possibilities 3D printing offers, this is the con to go to. If you’re looking for people to sell you stuff, look elsewhere.

This event is organized by the folks at SeeMeCNC, and it will be held on their home turf of Goshen, Indiana. Yes, you will be passing Amish buggies on the way to the event. Even though the MRRF is being held in the middle of nowhere, it was absolutely shocking how many people turned up last year and how good the con was. To put this in perspective, I’m driving nine hours to MRRF, and going to Maker Faire NYC takes me four hours. If I had to choose one 3D printing event to go to, this would be the one. That’s not just because I’m told there will be a t-shirt cannon at MRRF.

The event is free and open to everybody. You can just show up, although it would be a good idea to register. You’ll see the World’s Largest 3D Printed Trash Can. Yes, I’m serious. Call Guinness.

Openhand Combines 3D Printing With Urethane Casting

Yale University brings us quite a treat with their Openhand Project.

If you’ve ever operated a robotic arm, you know that one of the most cumbersome parts is always the end effector. It will quickly make you realize what an amazing work of engineering the human hand really is, and what a poor intimation a simple open-close gripper ends up being.

[Yale] is working to bring tendon-driven robotic hands to the masses with an interesting technique of combining 3D printing and resin/urethane casting. Known as Hybrid Deposition Manufacturing (HDM), it allows the team to 3D print robotic fingers that also contain the mold for finger pads and joints, all built right into the 3D part.  The tendon-driven fingers allow for a very simple design that are not only easy to make, but have a low parts count as well. Because of the human-like tendons, the fingers naturally curl around the object, distributing it’s force much more evenly and naturally, much like a human hand would. In the videos after the break, you can see the building process, as well as the hand in action.

Best news is that it’s all open source. They also include some python libraries so you can customize the CAD files fit your needs.

Continue reading “Openhand Combines 3D Printing With Urethane Casting”

TwinTeeth: The Delta Bot PCB Factory

There are a few all-in-one CNC/milling/plotting/3D printing/engraving bots out there that claim to be mini factories for hobbyists, prototypers, and other homebrew creators. The latest is Diyouware’s TwinTeeth, a bot obviously inspired by a few 3D printers, but something that has a few interesting features we hope will propagate through the open hardware ecosystem.

The design of the TwinTeeth is an inverse delta bot, kinematically similar to a large number of 3D printers out there. Instead of suspending the tool from a trio of arms, the TwinTeeth puts the work surface on the arms and suspends the tool from the top of the machine. There are a few neat bonuses for this setup – all the tools, from a BluRay laser diode, a Dremel, solder paste dispenser, and a plastic extruder for 3D printing can be mounted in easy to mount adapters. The TwinTooth design uses three locking pins to keep each toolhead in place, and after a little bit of software setup this machine can quickly switch between its various functions.

One very interesting feature of this bot is the ability to mask off PCBs for chemical etching with a BluRay laser diode. This actually works pretty well, as evidenced by the teams earlier work with a purpose-built PCB masker machine. The only problem with this technique is that presensitized boards must be used. If that’s an issue, no problem, just use the Dremel attachment with a v-bit cutter.

3D Printering: Hobbs Meters And 3D Printer Reliability

A direct link to Makerbot's  3-pack of Smart Extruders is very hard to find
A direct link to Makerbot’s 3-pack of Smart Extruders is very hard to find

It’s been a little over a year since Makerbot introduced their new line of printers, and since then there have been grumblings about the quality of the Smart Extruder that each one of these printers comes with. While there is no 3D printer extruder that will not eventually clog, wear down, or otherwise break, there are reports of the Makerbot Smart Extruder failing in only hundreds or even tens of hours of use. Considering that a single large print can take a dozen or so hours to complete, you can easily see the why the Smart Extruder is so despised and why even the availability of a three-pack of Smart Extruders is a joke in the 3D printing community.

Of course a cheap shot at Makerbot that plays right into your preconceived ideas and prejudices is far too easy. We’re here to solve problems, not just state them, so here’s what we’re working with: to quantify the long-term reliability of 3D printers we need a way to measure the mean time before failure of extruders. This is already a solved problem; it’s just not implemented.

On aircraft and some very expensive engines that power things like buildings and ships, there’s one gauge, tucked away in the control panel, that keeps track of how long the engine has been running. It’s called a hobbs meter, and the idea behind it is extremely simple – when there is power going to the Hobbs meter, it counts out hours on a small clockwork display. The resolution of the display is only tenths of an hour, usually, but that’s good enough for scheduling maintenance and to be mentioned in NTSB accident reports.

Spend enough time with a 3D printer, and you’ll quickly realize the ‘estimated print time’ is merely a ballpark, and with failed prints the ‘total print time for this object’ isn’t exactly a perfect measure of how many hours you’ve been using your extruder. Only by directly measuring how many hours are logged on a hot end or how many kilometers of filament have been sent through an extruder will you ever get an accurate idea of how long an extruder has been running, and how reliable a printer is.

Hobbs meters are available from Mouser, but you’ll be overpaying there. The better option is from a vendor in a different niche; $30 for a meter that can connect directly to the extruder heater. If enough people add this and keep proper logs, there’s a slight chance of improving the state of 3D printers with real data and not the prejudices of people trying to justify their own designs and purchases.

But perhaps that’s too hard; adding a $30 item to a printer’s BOM just for the sake of data is a bit much. Luckily, there’s an even simpler solution that won’t cost a dime. Just measure the time a heater has been on in the firmware, or save the total length of extruded filament in a microcontroller’s EEPROM. Every printer firmware out there, from Marlin to Repetier to Sprinter has in it a way to calculate both the length of time a heater has been on or how much filament has been pushed through a nozzle.

However, this is 3D printing we’re dealing with. An organized community is not a luxury we currently enjoy, and for this to work several things are needed. The first is somewhere to upload failure statistics. This would be a web site, naturally, with the ability to input the printer make, extruder and hot end model, and the time since last clogged nozzle. The website itself is just a database, some JavaScript, a bit of CSS, and some hosting costs; not hard until you consider tens of thousands of operators would have to know about this website and contribute.

Secondly, if we’re not going with mechanical Hobbs meters there would need to be a ‘total time heater on’ or ‘total length of extruded filament’ variable in the various firmwares. There would hopefully be standardized Gcodes or Mcodes to read and reset this variable.

Will this happen? Of course not. Organization isn’t a strong suit of the RepRap project, and any company that implements Hobbs meter functionality will probably lock that up in proprietary obfuscation. However, Makerbot isn’t dumb, and given they’re selling three-packs of extruders, I would bet they have some data on the MTBF of their extruders. A community-based measurement of the most common cause of broken printers is certainly possible, but like all problems it’s one of organization, not technology.


3D Printering is a semi-weekly column that digs deep into all things related to 3D Printing. If you have questions or ideas for future installments please sending us your thoughts.

PS4 NES

Add Extra Storage To Your PS4 With Retro Flair

[Frank] came up with a clever way to extend the storage of his PS4. He’s managed to store his digital PS4 games inside of storage devices in the shape of classic NES cartridges. It’s a relatively simple hack on the technical side of things, but the result is a fun and interesting way to store your digital games.

He started out by designing his own 3D model of the NES cartridge. He then printed the cartridge on his Ultimaker 3D printer. The final print is a very good quality replica of the old style cartridge. The trick of this build is that each cartridge actually contains a 2.5″ hard drive. [Frank] can store each game on a separate drive, placing each one in a separate cartridge. He then prints his own 80’s style labels for these current generation games. You would have a hard time noticing that these games are not classic NES games at first glance.

Storing the game in cartridge form is one thing, but reading them into the PS4 is another. The trick is to use a SATA connector attached to the PS4’s motherboard. [Frank’s] project page makes it sound like he was able to plug the SATA cable in without opening the PS4, by attaching the connector to a Popsicle stick and then using that to reach in and plug the connector in place. The other end of the SATA cable goes into a custom 3D printed housing that fits the fake NES cartridges. This housing is attached to the side of the PS4 using machine screws.

Now [Frank] can just slide the cartridge of his choice into the slot and the PS4 instantly reads it. In an age where we try to cram more and more bits into smaller and smaller places, this may not be the most practical build. But sometimes hacking isn’t about being practical. Sometimes it’s simply about having fun. This project is a perfect example. Continue reading “Add Extra Storage To Your PS4 With Retro Flair”