This week Jonathan chats with Valentyn Danylchuk about BreezyBox — an interactive shell and toolkit that provides various tools and a compiler on an ESP32 microcontroller. What was the inspiration for this impressive project, and what direction is it heading? Watch to find out!
Every ham radio shack needs a clock; ideally one with operator-friendly features like multiple time zones and more. [cburns42] found that most solutions relied too much on an internet connection for his liking, so in true hacker fashion he decided to make his own: the operator-oriented Ham Clock CYD.
A tabbed interface goes well with the touchscreen LCD.
The Ham Clock CYD is so named for being based on the Cheap Yellow Display (CYD), an economical ESP32-based color touchscreen LCD which provides most of the core functionality. The only extra hardware is a BME280 temperature and humidity sensor, and a battery-backed DS3231 RTC module, ensuring that accurate time is kept even when the device is otherwise powered off.
It displays a load of useful operator-oriented data on the touchscreen LCD, and even has a web-based configuration page for ease of use. While the Ham Clock is a standalone device that does not depend on internet access in order to function, it does have the ability to make the most of it if available. When it has internet access over the built-in WiFi, the display incorporates specialized amateur radio data including N0NBH solar forecasts and calculated VHF/HF band conditions alongside standard meteorological data.
The CYD, sensor, and RTC are very affordable pieces of hardware which makes this clock an extremely economical build. Check out the GitHub repository for everything you’ll need to make your own, and maybe even put your own spin on it with a custom enclosure. On the other hand, if you prefer your radio-themed clocks more on the minimalist side, this Morse code clock might be right up your alley.
Reading analog clocks is a pretty straightforward skill to learn. However, if you’ve already learned to read and don’t want to pick up the extra skill, a word clock is a perfect solution for telling time. [povey_tech] found some nice examples in the wild but didn’t appreciate the price, so he set about building his own.
The build is based around an ESP32 microcontroller. While many projects in this vein would use the onboard wireless connectivity to query network time servers, in this case, the board relies on the user manually setting the time and a DS1307 real-time-clock module to keep a steady tick. Also onboard is a VEML7700 ambient light sensor, which the microcontroller uses to control the brightness of the WS2812 LEDs inside the board.
The words themselves are laser cut out of acrylic panels, with everything set inside a tidy oak picture frame. A layer of anti-reflective glass in front helps cut down on glare, while [povey_tech] was so kind as to implement two LEDs per letter to allow for lovely color gradients to be displayed. Configuring the clock is easy thanks to a webpage hosted on the ESP32 that allows for control of dimming modes, colors, and setting the time. Home Assistant integration is something planned for the future.
[Yeckel] recently put the finishing touches on an ambitious implementation of a simple D-STAR (Digital Smart Technologies for Amateur Radio) transceiver using some very accessible and affordable hardware. The project is D-StarBeacon, and [Yeckel] shows it working on a LilyGO TTGO T-Beam, an ESP32-based development board that includes a SX1278 radio module and GPS receiver. It even serves a web interface for easy configuration.
What is D-STAR? It’s a protocol used by radio operators for voice that also allows transmitting low-speed data, such as short text messages or GPS coordinates. While voice is out of scope for [Yeckel]’s project (more on that in a moment) it can do all the rest, including send images. That makes beacon-type functions possible on inexpensive hardware, instead of requiring a full-blown radio.
As mentioned, voice is a big part of D-STAR. While [Yeckel] was able to access the voice data, attempts to decode it were unsuccessful. A valiant effort, but we suppose voice decoding isn’t terribly relevant to beacon-type operations like transmitting APRS (Automatic Packet Reporting System).
So far as [Yeckel] is aware, D-StarBeacon is currently the only open-source implementation of a D-STAR radio available on the internet, which is pretty interesting. We’ve seen projects that touch indirectly on D-STAR, but nothing like this.
Watch it go through its paces in the video embedded below. Since the T-Beam is just a microcontroller development board, the user interface comes from an Android app on a mobile phone, which is why you see a phone in the video.
Having an AI assistant is all the rage these days, but AI assistants usually don’t know about your automation setups and may have difficulty dealing with tasks asynchronously. Enter zclaw. It gives you the option to have a personal assistant on an ESP32 backed by Anthropic, OpenAI, or OpenRouter. The whole thing fits in 888KB, and while it doesn’t host the LLM, it does add key capabilities to monitor and control devices connected to the ESP32.
You communicate with the assistant via telegram. You can say things like “Remember the garage sensor is on GPIO 4.” Then later you might say: “In 20 minutes, check the garage sensor and if it is high, set GPIO 5 low.” It has an RTOS for scheduling tasks and is aware of the timezone and common periods. Memory persists across reboots, and you can pick different personas.
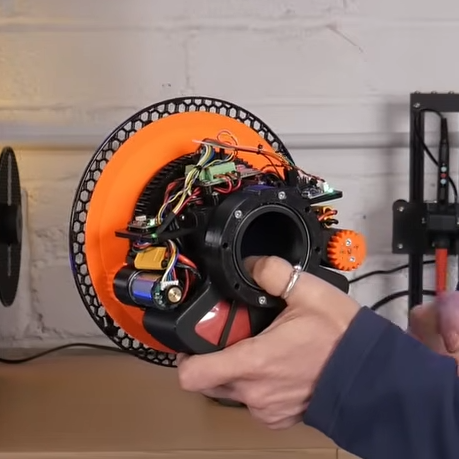
[Matt Denton]’s SpoolBot is a surprisingly agile remote-controlled robot that doesn’t just repurpose filament spool leftovers. It looks exactly like a 2 kg spool of filament; that’s real filament wound around the outside of the drum. In fact, Spoolie the SpoolBot looks so much like the real thing that [Matt] designed a googly-eye add-on, because the robot is so easily misplaced.
The robot’s mass rotates around a central hub in order to move forward or back.
SpoolBot works by rotating its mass around the central hub, which causes it to roll forward or back. Steering is accomplished by tank-style turning of the independent spool ends. While conceptually simple, quite a bit of work is necessary to ensure SpoolBot rolls true, and doesn’t loop itself around inside the shell during maneuvers. Doing that means sensors, and software work.
To that end, a couple of rotary encoders complement the gearmotors and an IMU takes care of overall positional sensing while an ESP32 runs the show. The power supply uses NiMH battery packs, in part for their added weight. Since SpoolBot works by shifting its internal mass, heavier batteries are more effective.
The receiver is a standard RC PWM receiver which means any RC transmitter can be used, but [Matt] shows off a slick one-handed model that not only works well with SpoolBot but tucks neatly into the middle of the spool for storage. Just in case SpoolBot was not hard enough to spot among other filament rolls, we imagine.
The googly-eye add-on solves that, however. They clip to the central hub and so always show “forward” for the robot. They do add quite a bit of personality, as well as a visual indication of the internals’ position relative to the outside.
The GitHub repository and Printables page have all the design files, and the video (embedded just below) shows every piece of the internals.
The kind of hardware available nowadays makes self-balancing devices much more practical and accessible than they ever have been. Really, SpoolBot has quite a lot in common with other self-balancing robots and self-balancing electric vehicles (which are really just larger, ridable self-balancing robots) so there’s plenty of room for experimentation no matter one’s budget or skill level.
Random numbers are very important to us in this computer age, being used for all sorts of security and cryptographic tasks. [Theory to Thing] recently built a device to generate random numbers using nothing more complicated than simple camera noise.
The heart of the build is an ESP32 microcontroller, which [Theory to Thing] first paired with a temperature sensor as a source of randomness. However, it was quickly obvious that a thermocouple in a cup of tea wasn’t going to produce nice, jittery, noisy data that would make for good random numbers. Then, inspiration struck, when looking at vision from a camera with the lens cap on. Particularly at higher temperatures, speckles of noise were visible in the blackness—thermal noise, which was just what the doctor ordered.
Thus, the ESP32 was hooked up to an OV3660 camera, which was then covered up with a piece of black electrical tape. By looking at the least significant bits of the pixels in the image, it was possible to pick up noise when the camera should have been reporting all black pixels. [Theory to Thing] then had the ESP32 collate the noisy data and report it via a web app that offers up randomly-generated answers to yes-or-no questions.
[Theory to Thing] offers up a basic statistical exploration of bias in the system, and shows how it can be mitigated to some degree, but we’d love a deeper dive into the maths to truly quantify how good this system is when it comes to randomness. We’ve featured deep dives on the topic before.