It’s great to see people are out there trying to find fun ways to exercise amid the current crisis. Although jumping up and down isn’t great for the knees, it does give decent cardio. But if you don’t have a rope or a puddle, we admit that jumping can lose its bounce pretty fast.
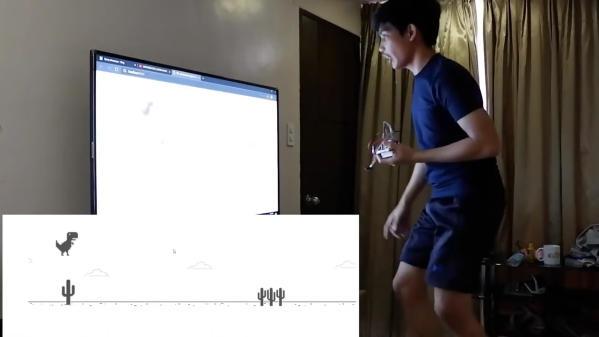
Quarantine has been a game-filled time for [fridaay]. Somewhere between a handful of FPS games, he decided to try to play Google’s offline dinosaur-based side scroller game by making the dinosaur spring over the saguaros whenever he physically jumps in the air. (Video, embedded below.)
Here’s how it works: [fridaay] holds a transmit circuit that consists of an Arduino UNO, an accelerometer module, and an nRF24L01 transceiver, all running on a 9 V battery. Whenever [fridaay] jumps, the accelerometer reads the change in Z and sends it to the receiving circuit, which is just another UNO and nRF. The receiving UNO is connected to a laptop and configured to press the space bar so the dinosaur canters over the cacti.
We’ve never been able to stay alive long enough in the game to see this happen, but apparently you need to crouch at some point in the game. [fridaay] has yet to implement a control for that, but we’re sure he’ll think of something. Jump past the break to see the video, and hit him up if you need the code.
If you have a lot of parts at your disposal, why not make a physical version?
Continue reading “Offline Dinosaur-Jumping Becomes A Real Workout”