Rubber Duck Debugging The Digital Way

Anyone who slings code for a living knows the feeling all too well: your code is running fine and dandy one minute, and the next minute is throwing exceptions. You’d swear on a stack of O’Reilly books that you didn’t change anything, but your program stubbornly refuses to agree. Stumped, you turn to the only one who understands you and pour your heart out to a little yellow rubber duck.

When it comes to debugging tools, this digital replacement for the duck on your desk might be even more helpful. Rubber duck decoding, where actually explaining aloud to an inanimate object how you think the code should run, really works. It’s basically a way to get you to see the mistake you made by explaining it to yourself; the duck or whatever – personally, I use a stuffed pig– is just along for the ride. [platisd] took the idea a step further and made his debugging buddy, which he dubs the “Dialectic Ball,” in the form of a Magic 8-Ball fortune teller. A 3D-printed shell has an ATtiny84, an accelerometer, and an LCD screen. To use it, you state your problem, shake it, and read the random suggestion that pops up. The list has some obvious suggestions, like adding diagnostic print statements or refactoring. Some tips are more personal, like talking to your local guru or getting a cup of coffee to get things going again. The list can be customized for your way of thinking. If nothing else, it’ll be a conversation piece on your desk.

If you’re more interested in prognostication than debugging, we have no shortage of Magic 8-Ball builds to choose from. Here’s one in a heart, one that fits in a business card, and even one that drops F-bombs.

Continue reading “Rubber Duck Debugging The Digital Way”

Internet Of Laundry — Let The ESP8266 Watch Your Dirty Drawers Get Clean

When you think of world-changing devices, you usually don’t think of the washing machine. However, making laundry manageable changed not only how we dress but how much time people spent getting their clothes clean. So complaining about how laborious our laundry is today would make someone from the 1800s laugh. Still, we all hate the laundry and [Andrew Dupont], in particular, hates having to check on the machine to see if it is done. So he made Laundry Spy.

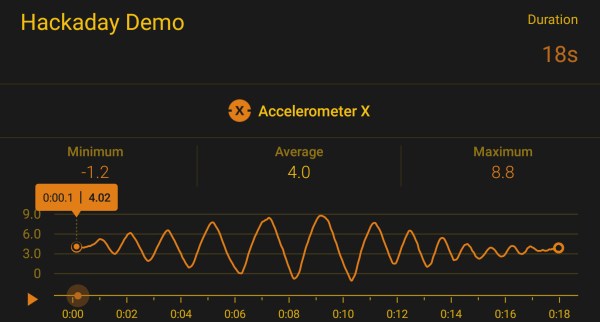
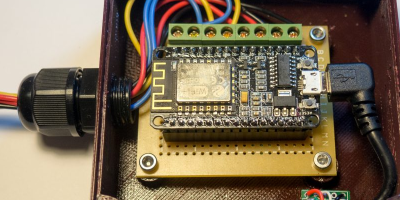
How do you sense when the machine — either a washer or a dryer — is done? [Andrew] thought about sensing current but didn’t want to mess with house current. His machines don’t have LED indicators, so using a light sensor wasn’t going to work either. However, an accelerometer can detect vibrations in the machine and most washers and dryers vibrate plenty while they are running.

The four-part build log shows how he took an ESP8266 and made it sense when the washer and dryer were done so it could text his cell phone. He’d already done a similar project with an Adafruit HUZZAH. But he wanted to build in some new ideas and currently likes working with NodeMCU. While he was at it he upgraded the motion sensor to an LIS3DH which was cheaper than the original sensor.

[Andrew] already runs Node – RED on a Raspberry Pi, so incorporating this project with his system was a snap. Of course, you could adapt the approach to lots of other things, as well. The device produces MQTT messages and Node – RED subscribes to them. The Pushover handles the text messaging. Node – RED has a graphical workflow that makes integrating all the pieces very intuitive. Here’s the high-level workflow:

You might wonder why he didn’t just have the ESP8266 talk directly to Pushover. That is possible, of course, but in part 2, [Andrew] enumerates some good reasons for his design. He wants to decouple components in the system for easier future upgrades. And MQTT is simple to publish on the sensor side of things compared to API calls which are handled by the Raspberry Pi for now.

Laundry monitoring isn’t a unique idea and everyone has a slightly different take on it, even some Hackaday authors. If phone notification is too subtle for you, you can always go bigger.

IKEA Lamp With Raspberry Pi As The Smartest Bulb In The House

We love to hack IKEA products, marvel at Raspberry Pi creations, and bask in the glow of video projection. [Nord Projects] combined these favorite things of ours into Lantern, a name as minimalist as the IKEA lamp it uses. But the result is nearly magic.

The key component in this build is a compact laser-illuminated video projector whose image is always in focus. Lantern’s primary user interface is moving the lamp around to switch between different channels of information projected on different surfaces. It would be a hassle if the user had to refocus after every move, but the focus-free laser projector eliminates that friction.

A user physically changing the lamp’s orientation is detected by Lantern’s software via an accelerometer. Certain channels project an information overlay on top of a real world object. Rather than expecting its human user to perform precise alignment, Lantern gets feedback from a Raspberry Pi camera to position the overlay.

Speaking of software, Lantern as presented by [Nord Projects] is a showcase project under Google’s Android Things umbrella that we’ve mentioned before. But there is nothing tying the hardware directly to Google. Since the project is open source with information on Hackster.io and GitHub, the choice is yours. Build one with Google as they did, or write your own software to tie into a different infrastructure (MQTT?), or a standalone unit with no connectivity at all.

Continue reading “IKEA Lamp With Raspberry Pi As The Smartest Bulb In The House”

Test Ideas Now With Sensors Already In Your Pocket

When project inspiration strikes, we’d love to do some quick tests immediately to investigate feasibility. Sadly we’re usually far from our workbench and its collection of sensor modules. This is especially frustrating when the desired sensor is in the smartphone we’re holding, standing near whatever triggered the inspiration. We could download a compass app, or a bubble level app, or something similar to glimpse sensor activity. But if we’re going to download an app, consider Google’s Science Journal app.

It was designed to be an educational resource, turning a smartphone’s sensor array into a pocket laboratory instrument and notebook for students. Fortunately it will work just as well for makers experimenting with project ideas. The exact list of sensors will depend on the specific iOS/Android device, but we can select a sensor and see its output graphed in real-time. This graph can also be recorded into the journal for later analysis.

Science Journal was recently given a promotional push by the band OK Go, as part of their OK Go Sandbox project encouraging students to explore, experiment, and learn. This is right up the alley for OK Go, who has a track record of making music videos that score high on maker appeal. Fans would enjoy their videos explaining behind-the-scene details in the context of math, science, and music.

An interesting side note. Anyone who’s been to Hackaday Superconference or one of the monthly Hackaday LA meetups will likely recognized the venue used in many of the OK Go Sandbox videos. Many of them were filmed at the Supplyframe Design Lab in Pasadena. It’s also nice to see AnnMarie Thomas (Hackaday Prize Judge from 2016 and 2017) collaborated with OK Go for the Sandbox project.

While the Science Journal app has provisions for add-on external sensors, carrying them around would reduce its handy always-available appeal. Not that we’re against pairing smartphones with clever accessories to boost their sensing capabilities: we love them! From trying to turn a smartphone into a Tricorder, to an inexpensive microscope, to exploring serious medical diagnosis, our pocket computers can do it all.

[via Engadget]


DIY Dungeon Crawler Game Plays On Single LED Strip

A delightful version of a clever one-dimensional game has been made by [Critters] which he calls TWANG! because the joystick is made from a spring doorstop with an accelerometer in the tip. The game itself is played out on an RGB LED strip. As a result, the game world, the player, goal, and enemies are all represented on a single line of LEDs.

How can a dungeon crawler game be represented in 1D, and how is this unusual game played? The goal is for the player (a green dot) to reach the goal (a blue dot) to advance to the next level. Making this more difficult are enemies (red dots) which move in different ways. The joystick is moved left or right to advance the player’s blue dot left or right, and the player can attack with a “twang” motion of the joystick, which eliminates nearby enemies. By playing with brightness and color, a surprising amount of gameplay can be jammed into a one-dimensional display!

Code for TWANG! is on github and models for 3D printing the physical pieces are on Thingiverse. The video (embedded below) focuses mainly on the development process, but does have the gameplay elements explained as well and demonstrates some slick animations and sharp feedback.

Continue reading “DIY Dungeon Crawler Game Plays On Single LED Strip”

Balance Like A Mountain Goat On This Simple Stewart Platform

No goats were harmed in the making of this 3-DOF Stewart platform for [Bruce Land]’s microcontrollers course at Cornell.

If the name “Stewart platform” doesn’t ring a bell, the video below will help you out. [Team Microgoats] built a small version of the mechanical system commonly seen in flight simulators, opting for 3 DOF  to simplify the design. Their PIC32-controlled steppers can wobble and weave the table in response to inputs from an MPU-6050 six-axis accelerometer embedded in the base of a 3D-printed goat. Said goat appears to serve no other role in the build, but goats are cool, so why not? And if you’ve ever seen a mountain goat frolicking across a sheer vertical rock face like it was walking across a parking lot, you’ll understand the connection to the balance and control offered by a Stewart platform.

[Bruce Land]’s course is always a bonanza of neat projects that pop up in our tipline this time of year, like a POV box fan, a coin cell Rickrolling throwie, and a dynamometer for small electric motors.

Continue reading “Balance Like A Mountain Goat On This Simple Stewart Platform”

Smart Station Runs Entertainment, Is Entertainment

It’s that special time of year—time for the parade of student projects from [Bruce Land]’s embedded microcontroller design course at Cornell. [Timothy], [Dhruv], and [Shaurya] are all into remote sensing and control applications, so they built a smart station that combines audiovisual entertainment with environmental sensing.

As with the other projects in this course, the smart station is built on a PIC32 dev board. It does Bluetooth audio playback via RN-52 module and has a beat-matching light show in the form of a NeoPixel ring mounted atop the 3D-printed enclosure. But those blinkenlights aren’t just there to party. They also provide visual feedback about the environment, which comes from user-adjustable high and low trigger values for the mic, an accelerometer, a temperature and humidity sensor, and a luminosity sensor.

The group wanted to add an ultrasonic wake-up feature, but it refused to work with the 3.3V from the PIC. The NeoPixel ring wanted 5V too, but isn’t as picky. It looks to be plenty bright at 3.3V. Another challenge came from combining I²C, UART, analog inputs, and digital outputs. They had to go to the chip’s errata to verify it, but it’s there: whenever I²C1 is enabled, the first two analog pins are compromised, and there’s no official solution. The team got around it by using a single analog pin and a multiplexer. You can check out those blinkenlights after the break.

Maybe you prefer working in wood. If so, you might like this hexagonal take on audio-visualization.

Continue reading “Smart Station Runs Entertainment, Is Entertainment”