It’s Time For Watch Clocks To Make A Comeback

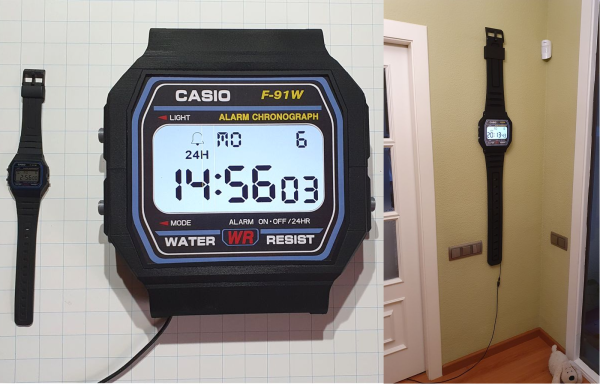
Along with all the colorful, geometric influence of Memphis design everywhere, giant wristwatch clocks were one of our favorite things about the 80s. We always wanted one, and frankly, we still do. Evidently, so did [Kothe]. But instead of some splashy Swatch-esque style, [Kothe] went the nerdy route by building a giant Casio F-91W to hang on the wall.

Not only does it look fantastic, it has the full functionality of the original from the alarm to the stopwatch to the backlit screen. Well, everything but the water resistance. The case is 3D-printed, as are the buckle and the buttons. [Kothe] might have printed the straps, but they were too big for the bed. Instead, they are made of laser-cut foam and engraved with all the details.

Inside there’s a 7″ touch display, a real-time clock module, and an Arduino Mega to make everything tick. To make each of the printed buttons work, [Kothe] cleverly extended a touch sensor module’s input pad with some copper tape. We think this could only be more awesome if it were modeled after one of Casio’s calculator watches, but that might be asking too much. Take a few seconds to watch the demo after the break.

Prefer your clocks less clock-like? Get a handle on the inner workings of this slot machine-based stunner.

Continue reading “It’s Time For Watch Clocks To Make A Comeback”

3D Print Your Way To A Glass Cockpit Simulator

Today’s commercial aircraft are packed to the elevators with sensors, computers, and miles and miles of wiring. Inside the cockpit you’re more than likely to see banks of LCDs and push buttons than analog gauges. So what’s that mean for the intrepid home simulator builder? Modern problems require modern solutions, and this 3D printed simulator is about as modern as it gets.

Published to Thingiverse by the aptly named [FlightSimMaker], this project consists of a dizzying number of 3D-printed components that combine into a full-featured desktop simulator for the Garmin G1000 avionics system. Everything from the parking brake lever to the push buttons in the display bezels was designed and printed: over 200 individual parts in all. Everything in this X-Plane 11 compatible simulator is controlled by an Arduino Mega 2560 with the SimVim firmware.

To help with connecting dozens of buttons, toggle switches, and rotary encoders to the Arduino, [FlightSimMaker] uses five CD74HC4067 16-channel multiplexers. The display is a 12.1 inch 1024 x 768 LCD panel with integrated driver, and comes in at the second most expensive part of the build behind the rotary encoders. All told, the estimated cost per display is around $250 USD.

Even if you aren’t looking to build yourself a high-tech flight simulator, there’s plenty of ideas and tips here that could be useful for building front panels. We particularly like the technique used for doing 3D-printed lettering: the part is printed in white, spray painted a darker color, and then the paint is sanded off the faces of the letters to reveal the plastic. Even with a standard 0.4 mm nozzle, this results in clean high-contrast labels on the panel with minimal fuss.

Of course, while impressive, these panels are just the beginning. There’s still plenty more work to do if you want to build an immersive simulation experience. Including, in the most extreme cases, buying a Boeing 737 cockpit.

Perfect Cheese Every Time With This Temperature Controller

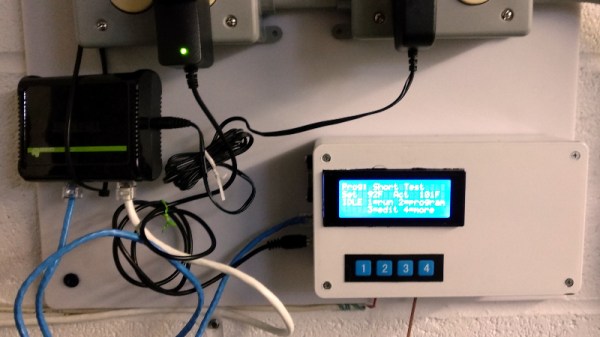
Anyone who is from a background in which cheesemaking is a feature will tell you that it is an exact science in which small differences in parameters can make a huge difference in the resulting cheese, to the extent that entire batches can be rendered inedible. In particular the temperature at which the milk is held can be crucial to the production of individual styles of cheese. A friend of [William Dudley]’s had this problem, as a dairy farmer and artisinal cheesemaker they had to carefully control their vat with a set of profiles depending upon the recipe in use. This was achieved using an Arduino Mega 2650 and a thermocouple to control the heat source for the hot water in the outer wall of the vat.

A cheap K-type thermocouple amplifier proved unsatisfactory, so a Sparkfun item was substituted. A relay, Ethernet adaptor, and LCD display provided power control, access to a web interface, and user feedback respectively. Four buttons to select programs were added, and the whole was neatly boxed up to survive the dairy and put to work. In tests with a saucepan it was configured as a PID controller, but the real vat proved to have a much greater thermal inertia so a simpler bang-bang home thermostat style approach was used. Temperatures are logged in an eeprom for later retrieval via the web interface.

We don’t see the cheeses produced, but we’re sure they must be worth the effort. Blessed may be the cheesemakers, but doubly blessed are they who have a little help from an Arduino.

A Fleet Of Pressure Washers Powers This Interactive Public Fountain

Public art installations can be cool. Adding in audience interactivity bumps up the coolness factor a bit. Throw civic pride, dancing jets of water, music, and lights into the project, and you get this very cool pressure washer powered musical fountain.

The exhibit that [Niklas Roy] came up with is called Wasserorgel, or “water organ”, an apt name for the creation. Built as part of a celebration of industry in Germany, the display was built in the small town of Winnenden, home to Kärcher, a cleaning equipment company best known for their line of pressure washers in the distinctive yellow cases. Eight of the company’s electric pressure washers were featured in the Wasserorgel, which shot streams of water and played notes in response to passersby tickling the sturdy and waterproof 3D-printed keyboard. The show was managed by an Arduino with a MIDI shield, which controlled the pressure washers via solid state relays and even accepted input from an anemometer to shut down the show if it got too windy, lest the nearby [Frau Dimitrakudi] be dampened.

The video below shows how engaging the Wasserorgel was during its weeks-long run in the town market square; there’s also one in German with build details. And while we can’t recall seeing pressure washers in public art before, we do remember one being used as the basis of a DIY water-jet cutter.

Continue reading “A Fleet Of Pressure Washers Powers This Interactive Public Fountain”

Building An Arduino Smart IC Tester For $25

There’s no question that you can get a lot done with the classic multimeter; it’s arguably the single most capable tool on your bench. But the farther down the rabbit hole of hacking and reverse engineering you go, the more extravagant your testing and diagnostic gear tends to get. For some of us that’s just an annoying reality of the game. For others it’s an excuse to buy, and maybe even build, some highly specialized equipment. We’ll give you one guess as to which group we fall into here at Hackaday.

[Akshay Baweja] is clearly a member of the second group. He’s recently published a guide on building a very slick intelligent Integrated Circuit tester with a total cost of under $25 USD. Whether you’re trying to identify an unknown chip or verifying your latest parts off the slow-boat from China actually work before installing them in your finished product, this $25 tool could end up saving you a lot of time and aggravation.

[Akshay] walks readers through the components and assembly of his IC tester, which takes the form of a Shield for the Arduino Mega 2560. The custom PCB he designed and had manufactured holds the 20 Pin ZIF Socket as well as the 2.4 inch TFT touch screen. The screen features an integrated micro SD slot which is important as you need the SD card to hold the chip database.

With an IC to test inserted into the ZIF socket, the user can have the tester attempt to automatically ID the chip or can manually enter in a part number to lookup. The source code for the Arduino as well as the chip ID database is up on GitHub for anyone looking to add some more hardware to the device’s testing repertoire.

The importance of good test equipment simply cannot be overstated. Between highly specialized gear like this IC tester to classic instruments such as the oscilloscope, your bench is going to be full of weird and wonderful pieces of equipment before too long.

Continue reading “Building An Arduino Smart IC Tester For $25”

Modern Technology For An Ancient Contest

Certamen is a special class of  high school quiz bowl tournament that’s focused solely on the classics. No, not Austen and Dickens, the actual classics. All the questions are about stuff like ancient Greek and Roman civilization and culture, classical mythology, and the finer points of Latin grammar. Like any other quiz bowl, the contestants use buttons to buzz in and answer the questions.

To win at Certamen, a team needs more than just a vast working knowledge of classical antiquity. They also have to be fast on the buzzer. The best way to do that is to practice with official equipment. But this is Hackaday, so you know what comes next: all the ones you can buy cost five times more than they should, so [arpruss] made an awesome open-source version for a fraction of the cost.

The practice machine consists of 12 arcade-style buttons connected to a control box. An Arduino Mega in the control box records the order of button presses as they arrive and displays a corresponding code on an LCD. A toggle switch selects between Certamen mode, where one button press locks out the rest of the team, and a Quiz mode with no lockout.

Our favorite thing about this build is the way [arpruss] took care of managing long cables, which was one of his main must-haves. The buttons are wired to the control box with Cat6 in three groups of four—one cable per table, one pair per chair. Our other favorite thing is the Easter eggs. Hold down the clear button on the control box when the system is booting and one of two things happens: either the buttons band together and turn into piano keys, or some Latin poetry appears on the screen.

[arpruss]’s 3D-printed buzzer bases look pretty slick. If Certamen practice ever starts to get out of hand, he might consider more robust packaging, like these Devo hat buttons.

Fight A Minotaur With This Gorgeous Handheld

[Jason Carlson]’s favorite game as kid was 1983’s Treasure of Tarmin by Intellivision, a maze game that eventually came to be called Minotaur. As an adult there was only one thing he could do: remake it on a beautiful Arduino-based handheld.

[Jason] built the handheld out of a small-footprint Arduino Mega clone, a 1.8” LCD from Adafruit, a 5 V booster, a 1” speaker and vibe motor for haptic feedback. There are some nice touches, like the joystick with a custom Sugru top and a surprisingly elegant 2 x AA battery holder — harvested from a Yamaha guitar.

The maze maps are all the same as the original game, which [Jason] found online, but he stored the maps as bytes in an array to speed up the game—there was a flicker in the refresh already. However he added a progress map so players could see every area that was explored. In addition to Minotaur [Jason] also added remakes of Tetris, Simon and Snake, simpler games he wrote to test out the hardware.

We’ve published a bunch of handheld gaming projects over the years, including putting a Pi Zero in a GameBoy, building a throwback handheld, and playing Ocarina of Time on a N64 handheld.

Continue reading “Fight A Minotaur With This Gorgeous Handheld”