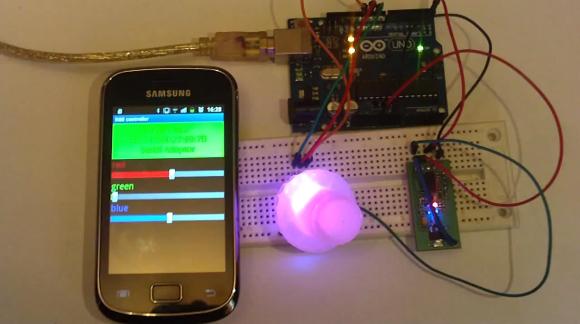
Learn To Translate IR Codes And Retransmit Using Arduino

[Dave Jones] from EEVBlog.com takes “Arduino fan boys” off the garden path getting down and dirty with different methods to capture, evaluate and retransmit IR remote control codes. Capturing and reproducing IR remote control codes is nothing new, however, [Dave] carves his own roads and steers us around some “traps for young players” along the way.

[Dave] needed a countdown timer that could remotely start and stop recording on his Cannon video camera, which he did with simplicity in a previous EEVBlog post using a commercial learning remote control unit. The fans demanded better so he delivered with this excellent tutorial capturing IR codes on his oscilloscope from an IR decoder (yellow trace) as well as using an IR photo transistor (blue trace) which showed the code inclusive of 38 KHz carrier frequency. Either capture method could easily be used to examine the transmitted code. The second lesson learned from the captured waveforms was the type of code modulation being used. [Dave’s] remote transmitted NEC (Japanese) pulse length encoding — which can be assertaind by referencing the Infrared Remote Control Techniques (PDF). Knowing the encoding methodology it was trivial to manually translate the bits for later use in an Arduino transmitter sketch. We find it amazing how simple [Dave] makes the process seem, even choosing to write his own sketch to reproduce and transmit the IR codes and carrier instead of taking the easy road looking for existing libraries.

A real gem of knowledge in the video was when it didn’t work! We get to follow along as [Dave] stumbles before using a Saleae Logic analyzer to see that his transmitter was off frequency even though the math in his sketch seemed correct. Realizing the digital write routine was causing a slowdown he fudged his math to make the needed frequency correction. Sure, he could have removed the performance glitch by writing some custom port control but logic dictates using the fastest and simplest solution when hacking a one-off solution.

[Dave’s] video and links to source code after the break.

Continue reading “Learn To Translate IR Codes And Retransmit Using Arduino”

Wi-Fi Enabled Garage Door Opener

Normally, internet-controlled household devices are a cobbled together mashup of parts. This is great for a prototype, but if you’re looking for something that will last a decade in your garage, you’ll need something a little cleaner and more robust. [Phil]’s Internet-enabled garage door opener is just that, replete with a custom-made enclosure for his Arduino powered system.

The main hardware for [Phil]’s build is a Freetronix EtherTen, an Arduino clone with a built-in Ethernet interface. Aside from that, the electronics are simple: a relay, transistor, and diode provide the connection from the EtherTen to the garage door opener.

The software for this setup consists of a main file that sets up the web page, the serial monitor, and loops through the main program. There are a bunch of classes for initializing the web page, writing passwords to the EEPROM, activating the door, and setting the MAC and IP addresses.

Opening the door with this remote is a snap: with any WiFi enabled smartphone or tablet, [Phil] only needs to log onto his network, surf on over to the page hosted on the Arduino, and enter a password. From there, opening the door is just a press of a button. Passwords and other configuration settings cane be entered with MegunoLink. This software also includes a serial monitor to log who opened the door and when.

It’s an interesting and compact system, and handy to boot. You might sometimes forget your garage door opener, but we’re thinking if you ever find yourself without your phone, a closed garage door is the least of your problems.

Safety Warning: Arduino GSM Shield May Cause Fires

Be careful with those Arduino GSM cards. As [James] reports, they may turn into fire starters. One person has reported a small explosion and fire already on the Arduino forums.
Now before we go any further – You may be asking yourself who the heck [James] is, and what gives him the ability to second guess the Arduino team. Well, here is [James’] blog disclaimer:  “James is a Senior Technical Expert for Technology and Applications at KEMET Electronics, a capacitor manufacturer. The content of this post are his and in no way reflects opinions of his employer.”

Senior Technical Expert?  That’s a good enough reason for us to believe him.

[James] states the problem is a tantalum capacitor used to decouple the GSM radio power supply from the main Arduino supply.
Tantalum capacitors are great for their low ESR properties. However, they have a well known downside of getting very hot, or even exploding when stressed. It’s not the Tantalum Anode that is burning. The Manganese Dioxide used as a cathode in some Tantalum capacitors is the culprit. Continue reading “Safety Warning: Arduino GSM Shield May Cause Fires”

BeagleBone Black Does CNC With RAMPS

[Bart] Wanted to try controlling a CNC with his BeagleBone black, but didn’t want to invest in a CNC Cape. No problem – he created his own translator board for RAMPSLinuxCNC for the BeagleBone Black has been available for a few months now, and [Bart] wanted to give it a try. He started experimenting with a single stepper motor and driver.  By the time he hooked up step, direction, and motor phases, [Bart] knew he needed a better solution.

Several CNC capes are available for the BeagleBone boards, but [Bart] had a RAMPS board just sitting around, waiting for a new project.  Most RepRap fans have heard of the RAMPS – or Reprap Arduino Mega Pololu Shield.  In fact, we covered them here just a few days ago as part of our 3D Printering series.   RAMPS handle all the I/O needed for 3D printing, which carries over quite nicely to other CNC applications as well.   The downside is that they’re specifically designed for the Arduino Mega series. Continue reading “BeagleBone Black Does CNC With RAMPS”

FLASH.IT: The RGB LED Climbing Wall

rockWallLEDs2

[Chris] and his friends were kicking around ideas for a Burning Man project, and this is the one that stuck: a rock climbing wall with RGB LEDs embedded in the holds. The holds themselves were custom made; the group started by making silicone molds of varying shapes and sizes, then added the electronics and poured in polyurethane resin to create the casting. The boards for these LEDs are equipped with a central hole that pairs up with a peg in the silicone mold. [Chris] also solved an annoying spinning problem by affixing a bolt to the far end of the LED board: once embedded in the polyurethane, the bolt provides resistance that the thin board cannot. The finished holds bolt onto the wall with all their wires neatly sticking out of the back to be hooked up to a central controller.

The Instrucables page suggests a few ways to get the lights working, including grabbing the nearest Arduino and relying on the Neopixel Library from Adafruit. [Chris] went the extra mile for Burning Man, however, designing Arduino-software-compatible controller boards capable of communicating via DMX, which expanded the system from a simple display to one capable of more complex lighting control. Stop by the Github for schematics and PCB layouts, and stick around for a video of the wall after the break. If the thrill-seeking outdoorsman inside you yearns for more, check out WALL-O-TRON from earlier this summer.

Continue reading “FLASH.IT: The RGB LED Climbing Wall”

Hacking A Disco Laser

hacked laser disco

[Mark] was looking for a cheap disco laser projector for parties, and he found one. Unfortunately for him, the advertised features were a bit lacking. The “sound activation mode” was merely an on off circuit, as opposed to it actually being controlled by the music — he set out to fix this.

Taking the unit apart revealed a very convenient design for hacking. All of the components were connected to the main PCB by connectors, meaning the laser driver board was completely separate! He replaced the PCB completely using a prototyping board, an Arduino pro mini, a microphone with a simple preamp, a rotary encoder, and a MSGEQ7 chip to analyse the levels. Oh, and a MOSFET to control the motor via PWM output. It even ended up being close to the same size as the original!

If you happen to have one of these projectors and want to fix it too, he’s posted the source code and circuit diagram on github.

After the break, check out the before and after video. It’s still a cheap disco laser projector, but at least it works as advertised now!

Continue reading “Hacking A Disco Laser”

Stewart Platform Reinvents The Wheel So You Don’t Have To

StewartPlatform

[Dan Royer] has noticed that most university projects involving a Stewart platform spend more time building a platform than on the project itself. He hopes to build a standard platform universities can use as the basis for other projects.

Stewart platforms are six degree of freedom platforms often seen hefting flight simulators or telescopes. The layout of the actuators allows movements in X,Y,and Z as well as pitch, roll and yaw. While large platforms often use hydraulic systems to accelerate heavy loads quickly. [Dan] is looking at a smaller scale system. His platform is built of laser cut wood and uses six steppers to control motion.

One of the harder parts in designing a platform such as this is creating a mechanical system that is strong, precise, and smooth. With so many linkages, it’s easy to see how binding joints could bring the entire thing to a grinding halt. [Dan] is currently using RC helicopter ball joints, but he’s on the lookout for something even smoother.

Continue reading “Stewart Platform Reinvents The Wheel So You Don’t Have To”