Remember when The Weather Channel actually had weather? It’s been a while, but we sure remember what a boon Local on the 8’s was when getting ready for the day. Not having to wait for the low-information national forecast on the morning shows or putting up with the antics of [Willard Scott] or [Al Roker] was just icing on the cake.
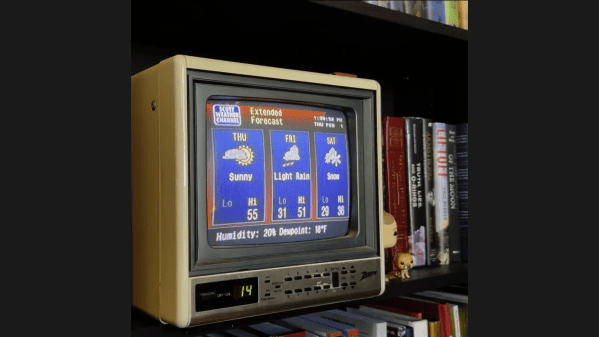
Recreating the retro look and feel of the Weather Channel experience is what this 1990s-style weather feed is all about, and we have to say that [Mitchell Scott] knocked it out of the park. Luckily, a lot of the heavy lifting was done already thanks to the WeatherStar 4000+ emulator project, which renders forecasts using online weather APIs in the distinctive retro graphics The Weather Channel used back in the day. He combined the graphics with the original smooth jazz soundtracks that TWC used back then; they’re online, because of course they are.
To really sell the look, [Mitchell] tracked down a period-correct Zenith TV with a 9″ CRT to display the feed from a Raspberry Pi 4’s composite video output. Why such a small screen? Easy. [Mitchell] wanted it on a shelf behind him to be visible during videoconferences. It’s a bit of a weird flex, but we respect it. Getting the composite video output working was a bit of a chore, as was tricking the TV into starting up on channel 14 so the feed is instantly visible.
The nostalgia is strong with this one, especially for weather geeks. For a more in-depth look at how The Weather Channel brought those local forecasts to cable, make sure you check out how the WeatherStar box was reverse-engineered.
Thanks to [USA-RedDragon] for the tip.